
Windows 8 is highly reliable and stable, but even in the most modern system, situations may arise that require immediate recovery: a malware attack, loss of system files, incorrect user actions. In general, everything that somehow led to failure.
Restoring Windows 8
Many users believe that the only correct solution when a critical error occurs on a laptop is to completely reinstall the operating system, but they are wrong. OS recovery is also able to solve almost all problems, having a number of advantages:
- Restoring the system is much faster than reinstalling it;
- If specific knowledge is required to reinstall Windows (for example, how to configure the BIOS), then such skills are not needed to restore;
- When you roll back the OS on a laptop, the data will not be affected (those files that are deleted can be easily restored by clicking on the link in the report);
- No need to look for external media that has Windows licenses for reinstallation (although in most cases a distribution is still needed, an image can be used instead).
There are four ways that you can roll back Windows 8 on a laptop:
- Using a special key (it has its own for each brand of device), which will launch the system recovery environment;
- Launching an integrated program that will carry out automatic recovery;
- OS rollback to a previously created checkpoint;
- Using files for installation from external media (disk, flash drive).
The first method involves rolling back the system even if it does not boot.
The second method is a specially integrated utility provided by the device developers.
The program should come with the OS by default, but if not, it can be found on the installation disk / flash drive.
The third way is to roll back the system on a laptop to a specific point. It can be created both automatically and manually.
The fourth option is to use the media with the licensed system to start the Windows Recovery Environment. The screenshot shows its main elements:
System rollback using a special key
The presented rollback method is used when Windows completely refuses to start due to malware or loss of system files.
The first thing to do is to find out which button on your device model is responsible for calling the recovery environment. On a laptop, these can be keys:
Comment. This information can be found in the manufacturer's instructions. If it is not there, then we just poke and look for it experimentally.
As soon as the button is found, the following window will be launched: 

Refresh Your PC Tool
A similar function is used when the OS starts up, but is unstable. At the same time, the rollback to the point did not change the situation.
The method involves a complete reinstallation of Windows 8, but without affecting user files. To do this, we need a system distribution package located on a USB flash drive or disk.
Changes will not affect:
- Absolutely all documents of the owner (photo, music, video, etc.);
- Files on the desktop will also not be affected in their places;
- Windows Store Utilities will be preserved;
- Reinstallation by this method will not affect the network settings.
The only thing that will be deleted are the files installed in the Program Files system folder. In addition, all personal settings of the owner will be reset to basic.
The recovery algorithm is as follows:
- We launch the Refresh Your PC application at the time when the system is running. To do this, go to the parameters section and then change their value:

- Go to the general section and select the second item: restore the computer without deleting user files:

- A warning window appears, which describes all the changes that take effect after the start of the procedure. Particular attention should be paid to the last paragraph of the memo, which notes that the list of removed applications will be placed on the desktop. This will allow the user, if necessary, to quickly restore the lost:

- Before clicking next, inserts a device with a Windows 8 distribution:

- As soon as the device with the system has been detected, the laptop will restart to prepare the system for the recovery process:

- Click to restore. Further, no secondary actions from the user are needed, the procedure is completely automatic. The approximate rollback time to basic settings is 20-40 minutes, depending on the power of the laptop:

Restoring a Windows system without a distribution
Using the Refresh Your PC function allows you to roll back the system even in the most hopeless situations. But often the user simply does not have an external media with installation files.
Sooner or later, many users think about how to roll back the system to an earlier state. True, many people understand different things by this action. Someone wants to just undo a few recent changes that were made when installing the utilities. Someone wants to return Windows to its original clean state. In this article, several ways will be unsubscribed on how to undo the changes made to the system.
Using restore points to roll back the system
This method is used by users most often and helps in most cases. When you rollback to a restore point there is a recovery changed system data. Information about what data has been changed and what exactly will be restored is stored at each point separately. A big plus of this method is that the user himself can create such points before making any serious manipulations with the PC. However, they are also created automatically when you install programs and drivers. This can come in handy if the computer started to crash or fail after installing the application.
To rollback to saved point you need to follow a couple of simple steps. First you need to go to the control panel, and then select recovery. In this window, you should click on the start of system recovery, after which, you should select from the presented points the one to which you want to reset the changes.
Here you can also look at those utilities that will be affected by resetting the OS. Don't worry about documents. change touch only programs and system files.
Roll back Windows updates
This option should be used when failures began to occur after a system update. There is multiple methods reset: through the update center, through the command line and using third-party programs.
The easiest way to uninstall is through the update center, which is located in control panels. After it is launched, you need to select the item " Installed updates". In the list that opens, all packages will be visible along with the date they were installed. If the problem started to occur from a certain date, then you can easily find the source by sorting the updates by it. 
After that, it remains only to select the desired one and click on the button " Delete».
How to reset Windows 8 settings
This method should only be used if all others have failed. To start, you need to go to the right panel and go to parameters, after which you should go to computer settings changes. Then you have to choose Update and recovery, and then, directly, restoration. 
Then you need to activate the item, which is shown in the picture. After that, it remains only to wait for the end of the process.
Using the System Recovery Image
This image is embedded by default on all laptops that come with a preinstalled OS. If it is not there, then you can create such a partition yourself, or you can make a backup disk. It is better to make it right after all the drivers and programs are installed, and the initial setup is also carried out. Such a drive will help roll back the system to initial state, but the user can avoid the hassle of setting up and downloading software. 
In the first case, recovery can be done directly from the OS. To do this, you need to follow the same route as in the previous chapter, however, the final point must be the same as indicated in the image.
In the second case, to use the image, you will need boot from disk recovery or from the installation disc.
When it comes to what a Windows 8 system rollback is, people mean different things by this concept. Someone wants to return the previous configuration, others want to get rid of updates, others prefer the original state of the system. All these cases can be discussed so as not to expose the user to doubt in any situation.
Recovery points
Restoring Windows 8 is most often carried out through special points. These operating system state fragments are generated automatically. You also have the option to create them yourself. The restore point method allows you to return the system to its original state with simple errors. You need to do the following:
- Open the Recovery menu in the control panel.
- In it, click on Start System Restore.
- In the list, specify exactly the restore point to which you want to roll back.
This is a trivial solution to typical problems that involve small changes.
Opting out of updates
It happens that the computer starts to fever from recently installed updates. Restoring Windows 8 in this case occurs by canceling the installation of these updates. To do this, you need to use the Update Center, which will help you figure out which low-quality software products should be removed.

Revert settings
In difficult situations, it is possible to return the settings to their original state. In this case, the personal files of users will be preserved. This is the kind of solution that should be used when others have failed.

- Open the right Charms panel;
- Select the Options button;
- Click Change computer settings;
A list will appear in which you need to click Update and Recovery >> Recovery.
In this case, the user's programs will be changed, but the music, videos and photos will remain untouched.
Also in the search, you can score the Recovery parameter. Such a word is typical for manufacturers, for example, laptops. Naturally, the computer will display a list of applications that help restore the device to its factory settings.
Notebook recovery manager
A laptop is such a wonderful compact computer that even has its own built-in program that allows you to return to its original state. Most often it is called Recovery Manager or some other Recovery. Before loading Windows in a laptop:
- Asus companies need to hold down the F9 key, after which the factory settings will return;
- HP companies need to hold down the F11 key to start Recovery Manager, which will offer to roll back the computer to factory settings;
- Acer companies need to hold down Alt + F10 at the same time, and then enter the password 000000.
Rollback images
Any Windows 8 computer contains recovery images. These are copies of the operating system that store all programs, files, and settings. Users have the ability to independently create such images at any time.

USB and DVD
How to restore Windows 8 if it won't even start? It is possible to create a USB or DVD drive that will help you get your computer back in any difficult situation, especially when it refuses to start the operating system. Such media are created automatically by Windows tools:
- The disk is created with the standard recdisc utility;
- A USB stick can be organized using Create a recovery drive.
These simple tools help bring your computer back to life in any difficult situation. It is enough to select in the BIOS to boot from these devices, and the automatic process will begin to return the system to its original state. The disk with the operating system itself also helps. In this case, you can save files that are not on the system drive. It is very important to divide the hard drive into several parts: for example, drive C is for system files, drive D is for the user's personal files. The computer can be attacked at any time by malware, but the C drive can be easily cleaned and put on it with a fresh operating system, while photos and videos remain recorded on the D drive.
In toga, there is nothing easier than how to restore Windows 8. To date, a huge number of methods have been invented. The main thing is not to panic, because a computer is a device that supports the Recovery option.
(Visited 572 times, 1 visits today)
Instructions for those who encountered problems when restoring the factory image on tablets or laptops.
The main reason for restoring the factory image on my tablet was Windows 10, which has set its teeth on edge and why you don’t need to install it yet. I didn't like her, for the life of me.
So the disposition is as follows:
Device: Asus VivoTab 8 64GB
Current OS:Windows 10
Required OS: Windows 8.1
Problem: There is no item in the Windows 10 recovery menu that allows you to roll back to the factory settings or otherwise of your choice.
All preparatory work was carried out on the enemy Windows 10 system. And now, in order.
We select and mount the Windows image
Before proceeding with destructive actions, find a disk image with a factory installation, which will actually be installed on the target device (at the end I will give a factory image of the system with Windows 8.1 for Asus VivoTab Note 8 for a flash drive with autoload).
It is usually called Install.wim or install.esd
In my case, I looked around the 4pda forum thread on Asus VivoTab Note 8, where I found what I was looking for. In your case, I recommend doing the same: find a thematic forum and search there. If everything is bad, then there are also torrent trackers, where they also often upload factory images of systems to tablets and laptops.
If the image is found, then half the battle is already done!
After that, you need to find and download the files from the Windows installation disk.
We connect the ISO file of the installation disk using the built-in Windows utility or using third-party software: UltraISO, Daemon Tools, etc.
Image Install.wim we'll need it later.
Create a bootable flash drive

We insert the flash drive into the computer. An 8 GB flash drive is ideal because fits any of the available ISO images.
Launching the command line interpreter cmd(with administrator rights) and enter diskpart to launch the Disk Partition utility.
After that, we begin to sequentially enter the following commands:
1. DISKPART> list disk //shows a list of active disks 2. DISKPART> select disk # # //number of your USB stick 3. DISKPART> clean //deletes all created partitions on the USB stick 4. DISKPART> create partition primary / /creates a primary partition on the USB flash drive 5. DISKPART> select partition 1 //select the newly created partition 6. DISKPART> active //make the new partition active 7. DISKPART> format FS=NTFS //format the flash drive using the NTFS file system 8. DISKPART> assign // Assign a letter to the formatted partition 9. DISKPART> exit // Exit the Disk Partition
After the above steps, your USB drive should appear in Windows Explorer with a drive letter assigned to it.
Making a USB flash drive bootable
Before copying the installation files, we need to make the flash drive bootable.
To do this, use the Boot Sector Registration Tool ( bootsect.exe) located in the folder boot on the mounted ISO image.
Execute the command bootsect /nt60J: with two options:
- the first indicates the version of the OS bootloader (/nt60 is the parameter required to create the bootloader for Windows Vista, Windows 7 and Windows 8)
- the second parameter is the letter assigned to our flash drive
You will see an inscription about the successful completion of the command.
If the OS on which you are preparing the flash drive is 32-bit and you have mounted a 64-bit Windows image, then you will not be able to run bootsect, because this version of bootsect is 64 bit
Create your own boot disk
To copy Windows 8 files to a flash drive from the command line, use the command XCOPY. So do not miss all sorts of hidden and system files.
In the following example i- a virtual drive in which the Windows ISO image is mounted; j- prepared flash drive.
In the Sources folder on the flash drive, we replace the install.wim file with the file with the factory image.
Regarding Asus Vivotab Note 8, you also need to add the file to the root of the flash drive SSN.txt with the serial number of the tablet in the format DCNXCYXXXXXXXXXC
Usage
We reboot the tablet / laptop in BIOS / UEFI, select boot from a USB flash drive and follow the installation instructions.
For users of Asus Vivotab 8 I will describe in more detail
You need to go into the BIOS of the tablet. There are two main ways to get there:
- From the recovery menu of Windows 8/8.1/10. Item - Advanced UEFI Settings
- From the “tablet off” position: hold down Volume down and power down, wait three seconds, when the light next to the camera lights up, briefly release the power button and press it again. If you did everything correctly, you will immediately get into the BIOS of the tablet.
In the Boot menu, set the priority for booting from a USB flash drive. Reboot and alga.
Due to the presence of viruses, inconsistencies in drivers or software, the OS may fail. If your Windows crashes, don't panic. The situation can be corrected by returning the state of files and programs to the moment when the PC was working properly.
While running OS Windows 7, 10 or 8, certain errors and problems may occur. As a result of such failures, a new launch of the operating system in operating mode becomes impossible. In this case, it is not at all necessary to do a laborious reinstallation of the OS. It is enough to perform a system restore.
OS recovery using the recovery environment
At work, we use the following scheme of actions:
- Reboot the computer, press the F8 key during boot;
- Troubleshooting;
- System restore, OS restore point selection;
- click "Further" and again "Further";
- We press the button "Ready", reboot the system (in the Menu, select boot with the last known good configuration).
Windows 7 System Restore
There are several ways that you can resort to resuming the operation of the OS. Some of them are based on reverting to saved settings. Others simply clear the data.
You can perform "resuscitation" of the OS in one of the following ways:
- by selecting restore points;
- using the command line;
- through safe mode;
- using the recovery environment;
- using an image/boot disk.
Restoring the operating system using system "resuscitation" checkpoints is one of the most affordable, effective and popular options. To apply it, you need to make a series of clicks:
- Panel "Start";
- "System Restore";
- "Further";
- "Select a restore point";
- "Ready".
This operation will fix the problems with the computer, undo the changes and return the system to a working state that allowed the PC to boot normally. Loss of data, files and documents does not occur during such recovery. All data is saved. The operation is reversible. You can roll back the system to a previous state of the computer and use a different restore point.
Many people ask themselves how to make a recovery point on their own (manually) in order to choose it in the future? To do this, in the same menu "Start" - "System Restore" You can create such a point yourself at any convenient and suitable time for you. It will be saved with the current date, which can only be remembered.
From a restore point
In computer engineering, there is such a thing as a restore point. These are saved PC settings. As a rule, saving occurs automatically with each successful OS boot. The easiest way to resume Windows 7 is to use exactly this data.
Press F8 when the computer boots up. This command will bring up a menu of system startup options. Next, select the Last Known Good Configuration option.
You can also use another method. Enter the properties of the My Computer folder. Find the System protection line, clicking on which you will open the dialog box of the same name. Click Recovery - Next. We set a key date, indicate the disks that are subject to correction, and confirm the actions. After rebooting, the PC should work normally.
No restore points
You can fix OS problems without having restore points. To do this, you will need to resort to the LiveCD program. It needs to be downloaded and written to a USB flash drive with the .iso extension.
Further, all actions will take place in the BIOS. You need to configure boot from a flash drive. To do this, in the Boot section, select USB-HDD in the First boot device line.
Before proceeding directly to recovery, copy all the necessary files to a removable drive. The LiveCD program provides a special menu for these purposes.
We will fix the system error using the backup copy. Connect the flash drive, open the folder Windows\System32\config\ . Files with the names default, sam, security, software, system must be moved to any other folder. In their place, we transfer similar files from the RegBack folder and restart the computer.

The described method will only help if the problem is related to the registry.
Command line
You can resort to "reviving" Windows 7 from the command line if the PC begins to freeze or work slowly, however, the system boots up. Enter the menu "Start" and using the right mouse button, launch the command prompt as an administrator. Issue the rstrui.exe command, which will open the System Restore program. Click "Further". In the next window, select the desired rollback point and click again "Further". Upon completion of the process, the PC should work normally.
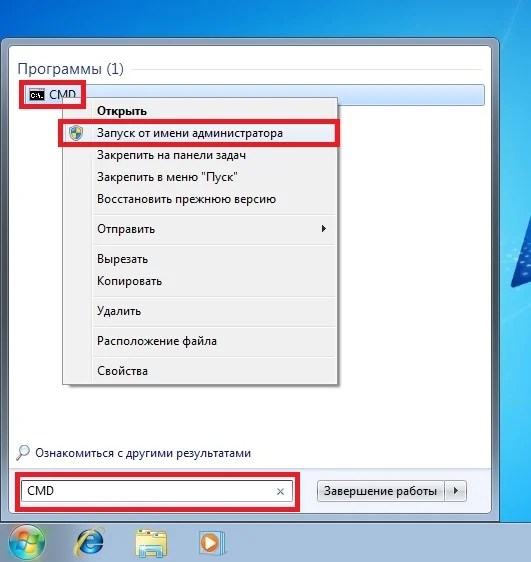
You can enter the utility in another way. We go to "Start". To call the command line, press "Run" and write the CMD command. We click on the found file CMD.exe and wait for the launch. Next, enter rstrui.exe on the command line and confirm the action with the Enter key on the keyboard.
It is not always possible to play it safe and create OS restore points in advance. There may be problems that block the option of such a "resuscitation" of the PC. Then you can use another, no less effective and easy option - restoring the Windows system using the system itself.
Based on the diagram:
- Icon "My computer"- right mouse button "Properties";
- "System Protection";
- In a new window, click "System Protection", restore button;
- "Further";
- Choose a restore point according to the date;
- Specify the system disks to be restored;
- Confirm the operations and reboot the system.
Restoring Windows 7 using Safe Mode
This method is preferred if the usual system boot is not possible. Then, after pressing the PC power button on the system unit, hold down the F8 key to call "Launch Menu". One of the menu options is "Safe mode". Select it and press Enter on the keyboard. As soon as Windows loads, we perform the algorithm of actions that we described earlier.
System Restore Windows 8/8.1
If you were able to start the OS, you can resume Windows 8 via "Parameters". Hover over the upper right corner and enter them. Click on "Changing computer settings" – . Chapter "Recovery" will offer several options:
- "Typical Restore with Information Preservation".
- "Delete data and reinstall OS".
- "Special Option".
Decide exactly what needs to be done. Then follow the menu prompts.
If you choose the latter method, in the window that opens, click on the diagnostic item. You will be offered the following options:
- "Restore";
- "Return to original state";
- "Extra options". This item includes the ability to roll back to the desired resume point.

To resume Windows 8.1 press Win+R and call sysdm.cpl . In the system properties window, on the tab "Protection" specify the required system drive. Click "Restore". Clicking "Further", you will be able to see a list of rollback points. Select the one you want and click "Search for affected programs". Changes that have been made to the PC since the selected moment will be deleted. End the process by clicking "Ready".
In the case of working with Windows 8, there may be problems, incorrect Internet operation, etc. To fix this, you can use the classic recovery method through restore points.
Another option is to roll back the system. To do this, open the menu "Start" - "Control Panel" - "Windows Update". Choose an item "Uninstall updates". You can do the same using the command line.
So, in the list of updates that opens, we remove those of them, from the moment of installation of which (we look at the date) problems and malfunctions began. Delete unnecessary files and reboot.
In Windows 8.1, you can perform a factory reset. Important files will not be affected during this operation. The method is effective, but for its implementation, the OS needs to boot without any problems. We use the algorithm:
- Right side of the monitor - "Parameters";
- "Change settings";
- "Renewal and Recovery" - "Recovery";
- "Recovery without deleting files".
If you cannot log into the system in the usual way, you must use the disk with the system. Load the installation disk, select "System Restore". We press the button "Diagnostics", and "Restore".
Windows 10 System Restore
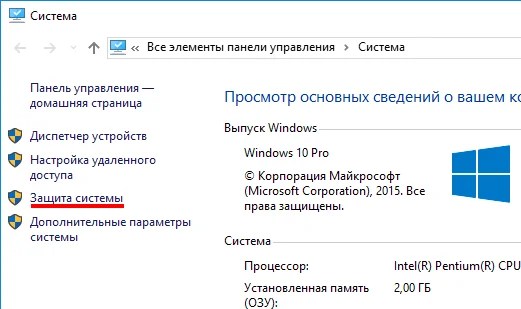
If you're having problems with Windows 10, press Windows + Pause. Go to "System Protection" and press "Restore" – "Further". Select the desired indicator and click again "Further". When finished, press "Ready". The computer will automatically restart and the changes will take effect.
One of the advantages of the "dozens" is the ability to return the settings to the factory settings. This helps avoid having to install the system first. To reset your data go to "Computer Settings" – "Update and Security" – "Recovery" – "Reset your computer". Click "To begin".
You can take care of the possibility of rollback in case of failure in advance. Resume points can be created manually or configured to be automatically created at the desired frequency. To do this, in the settings, in the Update and security item, select the Backup service. Specify where to save copies, click Add disk. After selecting a device, the function will be activated.
You can restore the Windows 10 system again through the use of restore points. In this case, the system will be rolled back to the moment when it was freely loaded and worked without failures. This recovery method is described at the beginning of the article.
If the OS is not loaded, then a warning table appears on the screen with the key "Additional recovery options". Click it and choose "Diagnostics" - "System Restore". We make a choice of a Windows restore checkpoint, we are waiting for a system rollback and reboot.
If such operations did not help and the computer continues to work incorrectly, you can roll back to the basic settings. Some programs and utilities, personal PC settings will be reset, and personal data will be deleted.
This technique is used extremely rarely if the other options described above do not help. The algorithm of actions in this case is as follows:
- "Start" - "Setting options"- tab "Updates and Security";
- Paragraph "Recovery"- button "To begin";
- Choose to delete all files or save some of them.
The system rollback after that will take 40-90 minutes.
Resume using the installation disc
One of the radical methods of fixing the error involves using the installation disk. After running it in BIOS, click System Restore. In the Troubleshooting section, select the desired action. Then follow the system prompts to complete the process.
Similar posts
The debate about which is better than Windows 10 or Windows 7 does not subside. This phenomenon is not accidental. Microsoft developers claim that nothing is better than Windows 10, and experienced users say the opposite, they say, the system is more reliable than Windows 7 now ...
Computer freezing is a rather annoying problem. This can occur both at the stage of system startup, and in the middle of the process of its operation. Let's see why this can happen and what to do about it? Why does my computer freeze...
Sometimes, when installing programs or applications, a message appears on the computer screen stating that error 5 Windows 10 has occurred. This means that the user is denied access. This happens if there are several accounts in the system ...