
The standard Windows XP distribution kit does not include drivers for the SATA controller from Intel and AMD (7th series chipsets). Because of this, when installing Windows XP, the installer does not find hard drives. There are two main ways to solve this problem without using floppy drives:
Switch the controller operation mode to BIOS with AHCI on IDE Mode(name may vary depending on BIOS). In this case, Windows XP will be delivered, but in this case the NCQ technology will not work. What kind of technology is this and what is the use of it described in this material :?
If, after installing Windows, switch the controller's operating mode back to AHCI in the BIOS, the system will not be able to boot and will display a “blue screen of death.” How to enable this mode without reinstalling Windows XP is described in this article:
Integrate SATA drivers directly into the distribution itself. This method is also applicable for integrating other drivers into the Windows XP distribution. It can also be drivers for a sound card, modem, network cards, and so on. Thus, the author integrated the driver for the RAID controller into the distribution kit when installing Windows Server on a RAID array. This method is more correct, versatile and elegant, so to speak. Not all motherboards support changing the operating mode of the controller and it is not always possible to have a floppy drive at hand to “slip” drivers on a floppy disk when installing Windows. It is about this method that will be discussed in this article.
Note: the drivers need to be integrated into the distribution kit only if you have a chipset from Intel or 7-series chipsets from AMD. For chipsets from nVidia and AMD (4 and 6 series) nothing needs to be integrated. Windows XP will work fine.
Preparing for driver integration
To integrate drivers into the Windows XP distribution, we need:
Directly the distribution kit of Windows XP. It is highly recommended to use original assemblies of Windows XP from Microsoft, otherwise problems may arise when installing the system and drivers
CD-R or CD-RW disc
NLite program. You can find it in the archive using the links above (/)
SATA driver. For Intel chipsets, they are located in the archive using the links above. The drivers are constantly updated there.
For chipsets from AMD 7th series (Puma platform), download drivers from this link:
Driver Integration
You should start integrating drivers by installing the nLite utility. It requires Microsoft .NET Framework 2.0 (/) to work. In Windows Vista, Windows 7, 8 and 8.1, it is already built in.
When the utility is installed, we start copying the Windows XP distribution kit. To do this, create on disk D: WinXP folder eg.
Insert the Windows XP disc into the drive, select all files and folders on it and copy:
Insert files into daddy D: WinXP


So it was unpacked (for AMD, the daddy will have a different name):

Launch nLite:

We indicate in the window the folder where the Windows XP distribution was copied:


We select the driver and Bootable ISO Image:


Selecting the Drivers folder

For Intel chipsets:
Click OK:

Select all the items (press the CTRL key and select with the mouse):

Click OK. As a result, you get something like this:

For AMD chipsets:


All questions related to the installation of Windows XP, we ask in this forum thread:
Questions on integrating SATA drivers into the Windows XP distribution are set out in this forum thread:
To avoid possible misunderstandings and save your time, I strongly recommend that you familiarize yourself with this material:
Edited: FuzzyL- September 9, 2014
Reason: Material version 2.1
Despite the long-gone Windows 8, 8.1, 10, quite a few users still prefer the good old "seven". Windows 7 was released on October 22, 2009, but is still the most popular OS in the world. Unfortunately, its distribution may not include USB 3.0 drivers. Accordingly, it is impossible to install the operating system on a computer without an optical disc drive. The only option is to install from a USB flash drive.
Description of the problem
A striking example is HP notebooks from the 250 G5 series, which do not have a DVD drive in the budget configuration. Despite the aggressive marketing of Windows 10, HP still provided drivers on its official website not only for the “dozen”, but also for Windows 7. Although, when trying to install it, you may encounter an error: “No device drivers found. Verify that the installation media contains the correct drivers and click OK.
The Windows 7 Setup Wizard does not start because the computer does not see the USB 3.0 device. And then there is a need to integrate USB 3.0 drivers into the Windows 7 distribution, which we will now do.
You can embed drivers into the installation image both using the command line and its utilities, and resorting to third-party, specially made programs.
Integration of the driver into the Windows 7 distribution using NTLite
There are many videos and articles on the Internet that describe the procedure for deploying drivers using the command line. But for the average user, the graphical interface is much simpler and more understandable. The ability to read prompts and press familiar buttons strongly disposes and does not frighten a person who has never sewed drivers into a ready-made Windows distribution.
First, you need to download the NTLite program from https://www.ntlite.com/download/, choosing a version for the bitness of your OS.

Then we launch the downloaded file and carry out a simple installation. We accept the license agreement and click "Next".

You can choose the place of installation as you wish or leave it unchanged. "Next" again.

If you want to copy the NTLite folder to a USB flash drive and carry it with you, then check the "Portable mode (no uninstall support)" checkbox and, again, "Next".

Installation completed. If you do not uncheck the "Start NTLite" checkbox, the program will start immediately after clicking the "Finish" button.

After starting NTLite, you will be prompted to select a license type. We select "Free (limited, non-commercial)". This will be enough for our purposes.

After that, go to the folder with the unpacked Windows 7 distribution kit, or open the USB flash drive containing the OS ready for installation.

Next, we look for the boot.wim file, which is usually located in the sources folder. It is into it that the USB 3.0 drivers will be integrated so that the installer can read information from the flash drive and start installing the OS. Click "Open".

After that, a list will appear, which can be divided into 2 parts: 1 - operating systems that can be installed from this distribution kit, 2 - bootloader.

First, we integrate the USB 3.0 drivers into the bootloader, because it was their absence that caused the error, which is described at the beginning of the article.
We select "Microsoft Windows Setup (x86)" and click "Download".

The image download procedure will begin, which depends on the capacity of your PC. The status "Loaded" will inform you about readiness.

Now you need the drivers, which we will embed. Which ones - depends on the chipset and its manufacturer. If you don't have them, or you don't know what you need, you can use this set.
Very common installation problem Windows XP- this is the appearance of an error of missing hard drives.
The problem is that modern computers, especially laptops, use hard disk controllers manufactured much later than Windows XP.
Therefore, the standard version of Windows XP does not contain the necessary drivers for installation.
One way to get around this problem is to switch to BIOS the operating mode of the SATA controller.
It is necessary to switch the operating mode of the SATA controller to IDE Mode... But often in BIOS laptops do not have this option.
In this case, the SATA drivers can be integrated directly into the Windows distribution using the program nLite.
This method is the most convenient, secure, and the resulting Windows XP image can be reused.
Also, this option remains the only one for laptop owners, since they do not have the opportunity to connect a floppy drive.
So how do you integrate drivers into your Windows XP distribution?
For integration we need:
1. Windows XP distribution kit. It is highly recommended that you use the original Windows XP image. It is also better to take Windows XP SP2, and after installing Windows, install service pack 3.
2. The nLite program. It should be downloaded from the manufacturer's website (download). If the drivers will be integrated on a computer with Windows XP installed, then for the program to work, you should also install Microsoft .NET Framework 2.0(download). For Windows Vista and higher, you do not need to install anything except the program.
3. Drivers for Sata / RAid controllers:
Integration of drivers.
Installing the program nLite.
Download the SATA driver and save it on your computer. After that, you need to unpack them into some folder (for example C: / SATA /).
Insert the Windows XP disc into the CD / DVD drive and copy the entire contents of the disc to the hard drive, for example, to the folder C: / WINXP /.
Launching the program nLite... At startup, you can immediately specify the language of the program interface - Russian.
To continue, press the button " Further". In the appeared window" Location of Windows installation files"necessary after pressing the button" Overview"specify the path to the folder C: / WINXP / where the contents of the Windows XP disk were copied.
after a little check the program nLite we will show details about the version of Windows XP
In the window " Task selection"we mark in the section Integrate paragraph Drivers, and in the section Create- Bootable ISO Image.
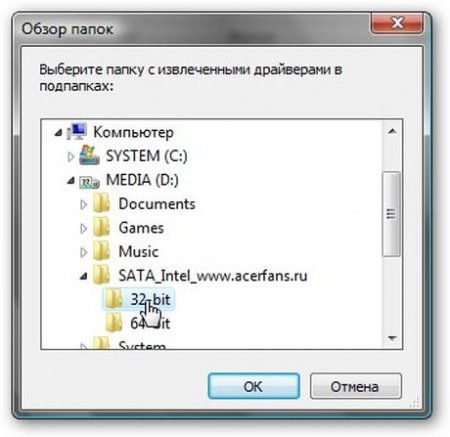
and in the menu that appears, select the item " Drivers folder"
specify the path to the folder with the unpacked drivers
Hereinafter, it is very important to point to the folder with drivers of exactly the same bitness as the used Windows distribution kit. In 32-bit Windows XP, you should integrate only drivers for a 32-bit system (in a 32-bit or x86 folder), and for a 64-bit OS - drivers for a 64-bit system (they are in a 64-bit or x64 folder).
This is a very important point, otherwise an error may appear during Windows installation.
"The ahcix64.sys file is corrupted. Press any key to continue".
In the window that appears " Select drivers for integration"specify the required ones (use the key CTRL to highlight several). Don't forget about the bitness of your Windows XP.
After selecting the drivers, click " OK". In the next dialog box, we also select drivers. For Intel drivers, you can safely select all drivers ( CTRL + A), observe the bit depth for AMD drivers.
After selecting, click " OK". In the next window, click" Further".
agree to start the integration process by clicking the " Yes".
Integration in progress.
After completing the integration of SATA drivers, press the " Further" to continue
A window appears " Bootable ISO Image". Insert a blank CD into the CD / DVD burner. We are waiting for its initialization by the program. nLite... We indicate the label we need (for example, WinXP_SP2). We select the recording speed. For high-quality recording, it is better to choose the slowest speed.
After the necessary settings, press the button " Recording"and agree to record the disc by clicking the button" Yes".
All that remains is to wait until the end of the disc recording.
After that, we insert the disc into the drive of the computer we need, reboot and install Windows XP.
After installing Windows XP, install the drivers and Service Pack 3 if the XP image was SP2.
Hello friends! A very interesting article awaits you, since the topic raised in it is quite relevant today. So, a reader's question.
Hello! Sometimes I reinstall Windows 10 on my computer and I'm tired of installing drivers on all devices again after reinstalling! I wanted to ask you how to integrate drivers my computer to the installation distribution of Windows 10 so that after installing the operating system I do not have to install them again every time? I am far from a beginner in computer science and I know that you need to first export drivers from the operating system, and then integrate these drivers into the mounted folder with Win 10 files. You can do all this using a special DISM tool. But the matter is complicated by the fact that the Windows 10 distribution contains the install.esd operating system image file, not install.wim, but the tool DISM cannot mount files install.esd.
I went to the Internet for information, it basically offers to convert a file install.esd to install.wim using third-party tools such as Wim.Converter.2.5 or VDISM_2.0 and 78RePack_v1.4. But I do not trust these tools, and I wanted to use the official method that Microsoft offers. Therefore, I turned to the official forum on the use of Microsoft products for help and asked my question there:
and got such a strange answer.

It turns out that if I want to integrate drivers into the Windows 8.1, Windows 10 distribution, then I am violating the license agreement! All this is rather strange, because a million users around the world every day integrate drivers into the operating system using DISM if the Windows 8.1 ISO image contains the fileinstall.wim (such images can still be downloaded from the official Microsoft website), but in the case of the fileinstall.esd, this cannot be done !!!
As a matter of fact, I approached my questions:
What is the difference between install.wim and install.esd files?
What official tools (from Microsoft) can be used to integrate drivers into the distribution of Windows 8.1, Windows 10, provided that the Install.ESD file is in the ISO image of the operating system?
Hello everybody! My name is Vladimir and I will answer these questions.
What's the difference between install.wim and install.esd?
The install.wim file appeared in the distribution of Windows Vista and Windows Server 2008, then in Windows 7. It is a disk image format developed by Microsoft for deploying Windows operating systems. In file install.wim contains the operating system files in a compressed state. If you mount the fileinstall.wim to a folder, then this folder will weigh about 14 GB. When compressed, the operating system files weigh 3-4 GB and can easily fit on a DVD disc.
At the same time, Microsoft offered a tool for working with the file WIM called ImageX. By using ImageX (requires installation of p Windows Automated Installation Kit (AIK) ) you could mount the WIM file to a folder, then make the necessary changes to the system image (edit) and then unmount.
With the arrival of Windows 8, a new tool called DISM came to the scene. If using ImageX could only edit the file WIM, then DISM already allowed you to customize the components and various parameters of the operating system in the image. A little later, Windows 8.1 appeared and there was no install.wim file, but there was an install.esd file, and upon closer examination it turned out that the files install.wim and install.esd differ only in compression type,Microsoft came up with a new 4th compression (compress) recovery (before that there were three: none, fast and maximum) and recommends to install the esd extension when compressing recovery (to make it easier for us to workwith archives). That's the whole difference.In simple words that esd, that wim, is an archive with operating system files.
Unfortunately Dism mounts a file install.wim, but does not mount the esd file, this is what our reader is talking about.
What official tools (from Microsoft) can be used to integrate drivers into the distribution of Windows 8.1, Windows 10, provided that the Install.ESD file is in the ISO image of the operating system?
Friends, of course there is a completely legal way to integrate drivers into the Install.ESD operating system image file.
We just need to expand the install.esd file to the mounted VHD partition, then integrate the drivers into Windows 10, then pack the install.esd file back, and after that create an ISO image of Win 10. I'll tell you everything in detail using the example of my laptop with Windows 10 Home installed for one language.
First, download and install the Windows ADK Assessment and Deployment Kit for Windows 10, version 1607, as you can't do anything without it.
https://developer.microsoft.com/ru-ru/windows/hardware/windows-assessment-deployment-kit


https://www.microsoft.com/ru-ru/download/details.aspx?id=39982

After installing the Windows ADK, look at Disk Management on my computer (build 14393).

Create a folder on disk (E :) with an arbitrary name, for example 1.

Open a command prompt as administrator and enter the command:
DISM / online / export-driver / destination: E: \ 1(this command will export to folder 1 on disk (E :) all drivers that are in my Win 10 operating system.


Download on the official Microsoft website.
Click on the image by double-clicking the left mouse

and attach it to the virtual floppy drive (in my case (G :)).
The install.esd file is located in the sources folder and can contain multiple Windows releases,

each release has its own image index.
We need Windows 10 Home for one language.
Find out the indices of all releases. Let's enter the command:
DISM / Get-WimInfo / WimFile: G: \ sources \ install.esd(where G :, the letter of the virtual drive containing the Windows 10 files, the sources folder, and the install.esd file).
As you can see, Windows 10 Home Single Language, image index 3.

The next command in Disk Management is to create a virtual disk VHD.
Action -> Create Virtual Hard Disk

We mark the item "Dynamic expandable".
The size of the virtual hard disk is 20 GB.
Click on the "Browse" button.

In the explorer, select the location to save the virtual hard disk.
I will select drive (E :).
I assign a name to the virtual disk - "10" and press the "Save" button.


The created virtual disk is 20 GB unallocated space (Disk 1) in Disk Management.

Click on Disk 1 with the right mouse and select "Initialize Disk"

Since I have a new laptop with UEFI BIOS, I mark the item "Table with GUID partitions (GPT)" and press "OK"

After initializing the disk, create a simple volume on the unallocated space.


A new volume (N :) has been created.

With the next command, I expand the install.esd file to the virtual disk VHD (section N :)
Dism / apply-image /imagefile:G:\sources\install.esd / index: 3 / ApplyDir: N: \


The following command will export the drivers from folder 1 to the mounted partition (N :) of the virtual disk VHD.
DISM / image: N: / add-driver / driver: E: \ 1 / recurse / ForceUnsigned


After exporting the drivers, we archive Windows 10 into the install.wim file, and later we apply compression (compress) recovery to it and it will be converted to install.esd.
Dism / capture-image /imagefile:E:\install.wim / capturedir: N: / name: 10(with this command, we archive Windows 10 on disk (N :) into the install.wim file, which will be located on the (E :) partition. Install.wim file is on disk (E :) andtakes only 4.68 GB.
Today I will talk about one of the many ways to integrate, embed, drivers into a windows installation image. Thus, you can integrate absolutely any driver you need into almost any windows image, starting with the 7 series and ending with windows 10.
We need it.
First of all, the very image of the operating system into which we will integrate the driver. For a positive final result, you need to take the original image, the one in which no changes have been made.
Find out the original image from you or not is told.
We also need drivers that we will integrate into our image.
Well, the program itself with which we will do this. The program is called Ntlite. The program can be downloaded from the developer site Ntlite.com
Preparatory process.
Drivers prepared for integration must be unzipped and located in the same folder.
The image into which we integrate these drivers must be unpacked using an archiver, I use the 7zip archiver.
The NtLite program must be installed.
Our actions or the integration process itself.
We launch the NtLite program. In the window of the program that opens, at the top left, click the Add item and specify the path to the folder with the unpacked windows image.
The folder will be added to the list of sources and the program will show which versions of windows are contained in your unpacked image.
Select the version of the operating system that you will modify and click on it with the left mouse button twice or once with the right mouse button and select download from the menu that opens.
The version you have selected will be mounted by the program into a temporary folder for further work with the files of this image.
We'll have to wait a little while the process of mounting and loading is in progress. When finished, a green circle appears to the left of the image.

In the left half, menu items will appear for editing and changing the contents of the windows image, select the item Drivers, then add — folder with multiple drivers.
Specify the path to the folder with the prepared drivers and click open.
The program will queue all the drivers in this folder to integrate them into the image.
Now let's select the menu item to apply.

In the window that opens, after clicking on the menu item to apply put a tick on the opposite of the item Save the image,
Then give a label for the image and click OK.

Now we press the button in the upper left corner of the Processing program.

The program will process all the drivers you downloaded, integrate them into the image and create the image itself.
The finished image will be saved where you specified.