
A faulty driver can cause many problems for a computer. The most common sign that drivers need to be updated is the blue screen of death. Fortunately, this blue screen shows us error codes, memory dumps, which allows us to identify the cause in a particular driver, device and update or delete it. It becomes difficult when memory dumps and error codes do not help, or the computer does not even show error codes, but simply blocks the system. What to do in these cases?
Embedded in Windows Driver Verifier designed to test drivers by causing extra stress on system drivers and stress tests to cause a crash. This will help you identify bad drivers in Windows.
Preparing the system for windows 10 driver check
Before switching on Driver Verifier, note that drivers can lock you out of your own computer if you're not careful. Driver Verifier will give you a blue screen when it detects a bad driver, if there are several of them, then a download> download> crash cycle is formed and you will not be able to start back to the windows system to disable the crash test of system drivers. Therefore, we will prepare for every fireman, otherwise in our time the Russian "maybe a ride" is already weakly working. Do one of the following before enabling Driver Verification.
- Check that you can easily boot into Safe Mode without the need for BIOS. In common words, entering Safe Mode must be done using the windows desktop. Hold Shift + Reload, while pressing and holding the Shift button, click on Reload with the mouse. Try another way, install the option through Windows.
- Create a system restore point while disabling your antivirus products. Open Windows search and type Create a restore point, choose from the proposed and follow the instructions offered to you.
- Create for your computer so that you can access the command line through options when using the recovery disk.
- You can or any other data you are concerned about.
- Be sure to read my crash test at the end of the article. He will help you in case of failure that happened to me.
Activating the windows Driver Verifier function
Before activating the drivers, make sure you read the section above on how to protect yourself from endless loading.
- Press Windows+R and type cmd to bring up the command prompt.
Enter the following code on the command line:
- verifier

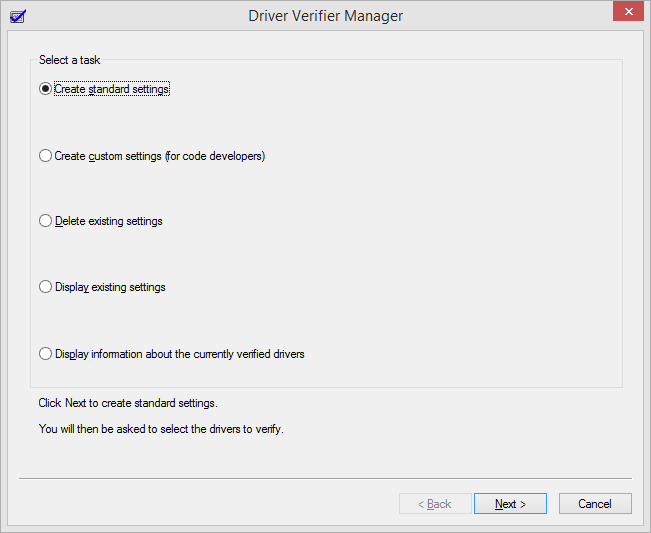
Specify item (for program code).

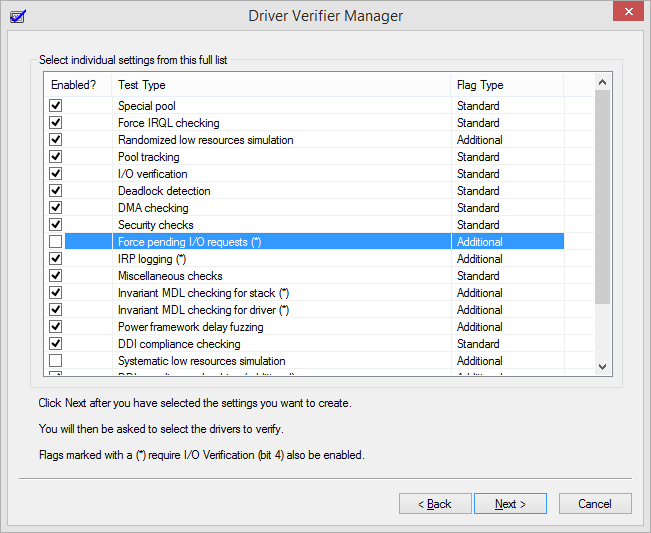
Select all but "DDI Compliance Check" and "Emulate Random Resource Shortage".


Click on the vendor column to sort. It is not necessary to select all drivers, only from other suppliers where there is no Microsoft Corporation inscription. If you are sure that the error is in any driver, then select all the items with checkmarks.

After all the settings, click Done and you will be told that the check will be performed after the system reboots. If the checker gives a blue screen, then write down the error code, memory dump and restart the computer.
Back in windows, you can disable driver checking in one of the following ways:
- Go back, as you went through the command line and select the item delete existing settings.

Open a command prompt and enter the following code:

How to Fix Cyclic Boot with Blue Screen of Death
- I want to note that I had a cyclic boot with a faulty driver. No error or memory dump code was provided, which is surprising to me.
- After 2-4 blue screen boot cycles, the System Restore option was automatically launched. In which I clicked "troubleshoot" > "advanced options" > "boot options" > "restart". Once downloaded, select 4 or 5 to boot in safe mode. Disable Driver Verification Manager as above.
- In order not to boot into safe mode, go to the option "troubleshooting" > "advanced options" and "COMMAND LINE". In which just type the command verifier /bootmode resetonbootfail.
- Copy or take a picture on your mobile phone, before starting to check the drivers, all 3 of the above points. Don't forget to copy the link to the article just in case.
How to open DMP file to view error analysis
- The test files are on the path C:\Windows\Minidump.
- You can open the DMP file format with
For such cases, to check how correctly the drivers work in Windows XP, there is a special utility verifier.exe. Utility driver Verifier, creates the most severe conditions for drivers, in which the probability of failure is very high, and the name of the failed driver is determined with the highest accuracy. Therefore, in case of non-systematic failures, it is useful to run the utility driver verifier.exe. There is no need to download Verifier, since the utility is included with Windows and is located in the directory Windows\system32
1 Working with verifier.exe
1.1. Let's run verifier.exe.Start - Run - Verifier.exe:
1.3. Utility driver verifier.exe will ask for a reboot:
 |
1.4. Two new parameters will appear in the registry:
-- HKEY_LOCAL_MACHINE\SYSTEM\CurrentControlSet\Control\Session Manager\Memory Management\VerifyDriverLevel
HKEY_LOCAL_MACHINE\SYSTEM\CurrentControlSet\Control\Session Manager\Memory Management\VerifyDrivers
 |
| Registry settings related to driver verifier.exe |
2 Test results
2.1. If in the first window of the utility driver verifier.exe select "Display information about currently tested drivers", then a window like this will appear. It shows which drivers are checked and which are not. pressing "Further", you can see other information about the tested drivers:
 |
2.2. As a result of checking the drivers with the utility driver verifier.exe it is possible for the system to crash in . When an error occurs while checking drivers, system errors are caused and. Typical codes and error codes are shown below.
0xC1: SPECIAL_POOL_DETECTED_MEMORY_CORRUPTION
0xC4: DRIVER_VERIFIER_DETECTED_VIOLATION
0xC6: DRIVER_CAUGHT_MODIFYING_FREED_POOL
0xC9: DRIVER_VERIFIER_IOMANAGER_VIOLATION
0xD6: DRIVER_PAGE_FAULT_BEYOND_END_OF_ALLOCATION
0xE6: DRIVER_VERIFIER_DMA_VIOLATION
2.3. Examples of dump decryption by the program :
 |
3. Useful links
Users who have at least once reinstalled the Windows operating system on their own have a question about which drivers need to be installed after that for the normal operation of all devices connected to the computer. In this article, we will look at how to check drivers on Windows 10. The instructions below will work for other versions of the system.
How to check driver version
If you try to figure it out, it will become clear that the computer must have drivers installed for all devices, both external (mouse, keyboard, joystick) and built-in (video card, network adapter, processor). Developers from Microsoft are doing their best to make life easier for users, with each update significantly expanding the internal database of drivers, but sometimes you still have to look for software and manually install it. Four ways will now be presented on how to check drivers on Windows 7, 8 and 10.
Method 1: official websites of manufacturers
The most reliable way to get the latest device software is to download it directly from the manufacturer's official website. But it should be understood that these manipulations are paramount and will not provide all devices with drivers. But this is the essence, first you need to upgrade the main components: the motherboard, processor and video card. But first you need to know the name and model.
Find out the model of the motherboard
To find out the motherboard manufacturer and model, you need to follow these steps:
- Open the Run window. To do this, press the Win + R keys on your keyboard.
- In the window that appears, enter and execute it by clicking "OK".
- The Command Prompt window will appear. In it, write two commands in turn: wmic baseboard get Manufacturer and wmic baseboard get product.
- The issue for the first command will indicate the manufacturer of the board, the second - its model.
Remember the name, you will need it to find the appropriate driver.
Find out the model of the video card and processor
You can find out the manufacturer and model of the video chip and processor in almost the same way:
- Open the Run window.
- Enter the dxdiag command into it.
- Click OK.
- In the window that appears, go to the "Screen" tab.
- In the category "Device" opposite the lines "Name", "Manufacturer" and "Type of chips" will be indicated the corresponding information regarding the processor of the computer.
- Go to the Converter tab.
- By analogy with the processor, all the necessary information about the video card will not be indicated.

Write down all the data received to search for the appropriate drivers for computer components.
Looking for drivers
Knowing the names of all devices for which drivers need to be installed, you can easily find the software itself for them without much difficulty.
- Go to any search engine.
- Enter the name and model of the component that needs to be updated.
- Go to the official website of the manufacturer.
- In the site interface, find the search bar and run a query with the name of the device.
- Find the appropriate driver in the output.
- Download it to your computer.
- Install.
This is how you can simply update the main components of your computer. Now you know the first way to check your computer drivers, but it is far from the last.
Method 2: Software to update drivers

The previous method of how to check drivers may seem rather complicated to you, and partly it is. For an ordinary user, it will be much easier to use special programs that will automatically scan the computer for outdated versions of software and offer the appropriate updates for them. One such program is Driver Booster.
- Run the program.
- Click the "Scan" button.
- Wait for this process to complete.
- As a result, devices that need to be updated will be displayed.
- If you want to install new versions of individual software, then click "Install" next to the corresponding component.
- If you decide to update all components at once, click the corresponding button on the top panel of the program.
Immediately after this, the process of downloading and then installing drivers for computer devices will start. Your computer may restart several times during this step.
Method 3: online services
Someone fundamentally does not want to install additional software on a computer, in this case there is a great way to check drivers on Windows 10 and in general all other versions of the OS, which involves using online services.
- Open the "Device Manager" and look in it for the device ID for which you want to download the driver.
- Go to the online service to search for drivers by their ID.
- On the main page, enter the identifier in the search box and click the "Find" button.
- The output will display a list of all drivers suitable for your hardware.
- Choose the one you like and click the "Download" button.
- Install.
As you can see, this is perhaps the fastest way to check the drivers on your computer, but it can't help everyone either.
Method 4: updating by regular means of the operating system
Is an update required, how to check the drivers? You can also update them without using additional software through the Device Manager utility.
- In the system search, enter "Device Manager" and run the appropriate program from the results.
- In the list of all devices, select the one you want to update.
- Click on it with the right mouse button.
- Select "Update Drivers" from the menu.
- In the new window, click the "Update automatically" button.

After that, the computer will independently try to find and install new versions of drivers for the component. This method is not always effective, since the search for software goes through the internal Microsoft database.
A driver is a program that is necessary for the operating system and various software applications to interact with the hardware devices connected to it. Hardware components such as sound, video cards, printers, scanners and they all need a compatible driver to work properly.
All device drivers are designed for specific operating systems. For example, Windows XP drivers will be different from Windows Vista drivers. Therefore, it is necessary to take extra precautions when installing and updating device drivers, because installing incorrect or incompatible drivers can not only damage the device, but also your system.
Common Causes of Driver Errors
Some common causes of driver errors are listed below:
- You are trying to use a hardware device that is not properly connected to your computer.
- Two or more drivers on the system are incompatible with each other.
- The driver or drivers installed are not compatible with your system.
- There are unnecessary or outdated drivers on the PC.
Steps to Fix Driver Errors
The first step in fixing a driver error is to make sure the device is properly connected to your system. Many devices give connection related errors, so make sure your device is connected to your system correctly. Next, you need to make sure that there are no problems with the drivers. You can do this using the Device Manager utility that comes with your Windows computer system. You can open Device Manager by directly running devmgmt. msc
from the command lineStart>Completedit.
When you open Device Manager, you will see a list of all devices connected to your system. You can easily identify a defective file because it will be marked with a yellow triangle with an exclamation point inside. Right-click on a device to open its properties dialog. In the properties dialog box, check the section Device Status tab Are common. Drivers are displayed on the Drivers tab of the properties window. Here, perform one of the following tasks:
- Check and Install Driver Updates: Outdated drivers are one of the main causes of driver errors. To solve this problem, click the button Update Driver.The Hardware Update Wizard opens. You can use the wizard to update the driver. It is recommended that you first download the driver update and save it to a convenient location on your hard drive, and then start the update process because the update wizard will ask you to specify a location to install the update.
- Driver rollback: If you started getting an error shortly after installing a new update, then it's likely that the new update is buggy. To fix this problem, click the button Driver Rollback to return to your previous driver version.
- Driver uninstallation: If there are problems with your current drivers - missing or corrupted files - then the best thing you can do is click Delete to uninstall the current driver, and then reinstall the driver again.
In case you are not sure what you are doing and if you find the above fixes a bit complicated, then it is recommended that you choose a reliable driver scan tool. Driver scanning tools are designed to check all device drivers and make sure they are not up-to-date. Whenever new updates are available, Driver Scanner automatically downloads and installs the best updates for your computer.
So, you have a recurring blue screen of death, and like many BSoDs, it's because a bad driver is to blame. However, the screen doesn't give you the correct information, either because it doesn't contain any driver at all, or because it lists a system driver that acts like a bogus one.
Driver Verifier is a free utility included with all versions of Windows from Windows XP. It literally checks every one of the drivers on your PC until it hits the issue that caused the problem, intentionally creating the same blue screen but then writing the information to a log file helping you identify the problem.
Run driver driver
If you experience the same blue screen frequently and you would like to get active and fix it, here is how to use Driver Verifier.
- Click the button Start
- Click " Execute"...
- Enter cmd and press Enter.
- In the new window enter verifier and press Enter.

On Windows Vista and 7:
- Click the button Start
- Enter cmd in the box and click Enter.
- In the new window enter verifier and press Enter.

On Windows 8 and 8.1:
- Press key Windows+X
- Click " Command line" ("Administrator") (Windows PowerShell (Admin) in Windows 8.1)
- In the new window enter verifier and press Enter.
All versions of Windows:
- Make sure it's selected setting user preferences (for code developers) .
- Click " Further" .
- Select " Select individual settings" from the full list .
- Click " Further" .
- Deselect system simulation with low resource and standby I/O requests. (These two cause unnecessary workload on your PC.) Make sure everything else is selected.
- Double click " Further" .
- Select " Select Driver Names" in the list .
- Click " Further" .
- Select all drivers on this screen except those that say Microsoft Corporation under the provider. It is very unlikely that a Microsoft driver is causing this issue.
- Click " Ready" .
Note. If you are unable to complete the above steps because the blue screen continues to occur, try downloading to .
At this point, you must restart your computer. Then try causing the BSoD again by doing what you did before. Windows puts an extra load on your drivers to help you. If you are unable to reproduce the BSoD, try starting your computer overnight. Once the BSoD reappears, restart your computer and read the Minidump file.

Reading a dump file
The Verifier driver will run, run a blue screen, and write a log file. This log file is located in C:\Windows\Minidump\. Read it and you will see which driver is causing this problem. Try looking up the name of the driver to see what piece of hardware your PC is using.
So how do you read it? You need a debugging tool, which you can download from Microsoft.
A . Download the SDK, install it, select debug tools, and deselect everything else.
Note that debugging tools for previous versions of Windows are no longer available; you will have to send the dump file to a Microsoft technician for analysis.

After installing it, look for it on the launch screen. It's called windbg (x64). Run it.
- Click " File", then " Open crash" .
- Switch to C:\windows\minidump\ and open the .DMP file contained inside.
- Look at the bottom of the resulting file where the line says " Probably caused". This is a good indicator of which driver is causing this problem.
Fix Driver
Update the driver associated with this hardware:
- Click the button Start
- Click Control Panel
- Click " Switch to classic view"
- Double click system
- Go to tab "Hardware"
- Click Device Manager
- Click " Update driver".
On Windows Vista and 7:
- Click the button Start
- Click Control Panel
- Double click Device Manager
- Find the device causing the problem
- Right click on it
- Click " Update driver".

On Windows 8 and 8.1:
- Press key Windows+X
- Click Control Panel
- View by small icons
- Click Device Manager
- Find the device causing the problem
- Right click on it
- Click " Update driver".
Or use our app not to be confused with Driver Verifier. Driver Reviver automatically updates all existing drivers on your PC and is especially good for updating underperforming drivers like this one to the latest and greatest version.
After fixing the problem driver, you will want to disable Driver Verifier.
Disable driver verifier
Once you're done using Driver Verifier, you'll want to turn it off as it's pretty heavy on your PC while it's running.
On all versions of Windows:
- Re-run Driver Verifier using the steps above.
- Select " Delete existing settings" .
- Click " Ready" .
- Restart your computer again.

Bookmark this article for the future so whenever you have a blue screen you can fix the problem. Also, check out our interactive and enter your error name for more tips on resolving your specific blue screen of death. Good luck!