
Your contact list is one of the most important things on your device. This is where you will store people's contact information: their names, phone numbers, and email addresses.
If you have any existing Google Contacts, they are most likely added when you set up your phone or tablet. Also, you can easily add contacts manually. To get started, open the app Contacts.
As in the picture above, you can add a new contact using the Add Contact button (which is usually identified by a + sign or something similar). A list of fields will open where you need to enter your name, phone number, email address, address, and so on.
Sometimes you can add contacts directly from other apps, for example if someone sends you a message via e-mail, you can save his address in a contact. To add their email address, click on the sender's information. A dialog box will open where you can quickly add the contact to your contact list.

Viewing and editing contacts
You will return to contacts whenever you need to view or edit one of your contacts. Each version of the contacts app is different (you might have a different icon, for example), but some tasks are still fairly versatile.

Using Contacts
To commit phone call or send a text, use your contact list. There are two ways to use contact details: you can start from the app Contacts or go directly to the app you want to use to make a call or send a message.
In general, working with contacts on Android is both easy and difficult at the same time. The thing is that most people use applications installed by the manufacturer, and these can be either standard ones from the Android supply, or programs as part of proprietary shells. So to begin with, let's consider the general situation using one of the examples.
Android contacts are in the application of the same name. As a rule, developers of shells for Google OS make it the first home screen so it's not difficult to find it.
The interface of the Contacts application is simple and straightforward. At the top there is a menu of Phonebook sources, icons for searching and creating a new contact, as well as the menu of the application itself.

Swiping left and right, you can quickly go to contact groups, screen speed dial and even the call log.

The phone book sources menu allows you to choose which contacts to show in the application. There are options: SIM, Skype and other instant messengers, Google accounts and the actual phone book of the device. The user can check or uncheck the boxes next to each source. Useful advice: if it annoys you that Android pulls up email addresses, nicknames from skype and turns phone book into the mess, then just turn off the corresponding sources.

The search for contacts in the application has auto-selection. To find the right person, it is not necessary to type his full name. It is enough to specify the first letters and the application will select all matches.


When creating a contact, the user selects its location, then indicates the number (you can choose from 6 options), e-mail. A contact can be added to a group. In addition, for each contact, you can specify additional fields: from a birthday or other significant events to an arbitrary note.


The application menu includes eight items. We will dwell on some of them later. The settings mainly concern the way contacts are displayed in the app. You can also set up synchronization with accounts, view the capacity of the SIM card, and select the tabs that will show when you scroll left and right.
How to Transfer Contacts from Android to Android
Unlike iOS, Android offers a large selection of native options by default for transferring contacts from one device to another.


Every Android smartphone is tied to account Google. To transfer contacts from Google, you just need to make sure that the old smartphone is enabled to sync contacts with Google profile and Gmail. To do this, go to Settings - Account and Sync - Google - Gmail. Next, click on the account name and select Contacts there. Depending on the settings made earlier, they will be synchronized automatically or when clicked. Further, on the new device, it is enough to do the same for the contacts to appear on it. It is important that the gadgets are connected to the Internet.

You can also transfer contacts from Android to Android using a SIM card or VCard file. To do this, in the Contacts application, go to Menu - Manage Contacts - Import / Export Contacts. Here you can export contacts to the SIM card, memory card or phone memory.
The SIM is then inserted into new phone, you can also move the memory card there. On the new device, the same actions are performed, only instead of Export, you need to select Import from the appropriate location.
If the user has exported contacts to the phone's memory, then he will then need to transfer the VCard file from there. This can be done by connecting phones to a computer - most android phones are defined as removable drives, either send by e-mail to yourself (but here it is more logical to use the synchronization via Gmail described above), or transfer via Bluetooth. Then, on the new phone, you need to repeat the steps already described for importing contacts.

You can also transfer contacts from phone to phone using Bluetooth. True, this method is only suitable for a small number of entries - and once you can send no more than 10 pieces. To do this, go to the Contacts application menu and select the Send contacts option. Then mark the necessary entries with a checkbox and then select the sending method - Bluetooth. You must first establish a Bluetooth connection between the phones.
Also, the Send contacts item allows you to send them by e-mail, via SMS or MMS, but these methods are not relevant when transferring contacts from phone to phone.
How to Transfer Contacts from iPhone to Android
There are two ways to transfer contacts from iPhone to Android, syncing with Gmail and using a VCard file. Both will require some effort.

By default on iPhone contacts synced with iCloud. You need to switch synchronization to Gmail and not lose your phone book. To do this, go to iPhone Settings - Mail, addresses, calendars - Accounts / iCloud and turn off Contacts synchronization. A pop-up window will appear. In it you need to select the option "Leave on the phone." This is how we save contacts to the iPhone. If you select another option, contacts will be deleted from iPhone.

Now you need to make Gmail the default account for iPhone Contacts. The setting is done in the Settings - Mail, Addresses, Calendars section. In the Contacts sub-item, one of the last ones will be the Default account. You need to select the item and mark Gmail. After a while, the contacts will be synced with Gmail. If it already has contacts, then they can be duplicated.

Next, you need to activate your Gmail account on Android. After a while, the contacts will appear on your phone. If this does not happen, then you need to look in the sources menu in the Contacts application, which sources are activated. Perhaps with an account Gmail entries unchecked. You may also need to force the sync to start. This is done in Settings - Account and Sync - Google - Gmail.
To transfer contacts from iPhone to Android, you can use the VCard file. You can only make a file in iCloud. Therefore, first of all, you need to make sure that the contacts are synchronized with the cloud.

To do vCard file, you need to select all contacts using ctrl-AWindows or Command-A on a Mac, there is an Export vCard option in the iCLoud web app settings menu. Save the file to your hard drive or flash drive. In any convenient way, write it to the memory of an Android device.
We have already described the next steps. In the Contacts application, you need to go to Menu - Manage contacts - Import and export contacts, select Import contacts, and then the location of the VCard file - in the phone's memory or on an SD card. The Contacts application will overwrite all the data from the file in the device's memory.
Instead of writing a VCard file to an Android phone, you can import contacts from it into Gmail and then sync it with your gadget. To do this, in Gmail you need to select Contacts, and there - the Import item. In the pop-up window, select the last item. It remains only to synchronize the device with Gmail.
How to Transfer Contacts from Windows Phone to Android
There are several ways to transfer contacts from Windows phone on Android. You can use applications that allow you to make a VCard file. Since the contacts Windows users Phone are synchronized with the account Microsoft record, then they will be located in Outoook.com by default, you can add an account Outlook entry in android. Finally, you can transfer contacts from Outlook using a csv file.

To transfer contacts from Windows Phone to Android by syncing with Outlook.com, you need to add an account to your phone. To do this, go to Settings - Accounts and sync and click +. From the proposed selection, click on Outlook, then enter your account information and select sync contacts. At this method there are some disadvantages. In some cases, Outlook does not allow you to edit contacts on third-party devices, so it's better to make contacts "native" for Android by transferring them through a file
On Outlook.com, select People from the menu. Then click on the Manage button, and in the new menu - Export for Outlook.com and other services. Contacts will be saved to a CSV file. It needs to be saved to your computer.

Next, in Gmail, as already described above, you need to select Contacts. There is an Import item in the menu. If you click it, a pop-up menu will appear in which you need to select import from CSV file or VCard. It remains to select a file on your hard drive, contacts will be uploaded to Gmail, and then synchronized with Android.
How to Transfer Contacts from Android to Computer
It is very easy to transfer contacts from Android to computer. It is enough to generate a VCard file. They can work with him Microsoft programs Outlook or Windows Contacts, as well as other applications.

To export contacts to a VCard file on your phone, you need to go to the Contacts application: Menu - Manage contacts - Import and Export contacts and select the item you need: Export to SD card or Export to phone memory.
All contacts will be saved to VCard file. Then it can be written to the computer's memory and opened in the appropriate program for working with contacts. The file can be stored as backup on the computer. However, it will not sync with Android. Therefore, it is advisable to sync Android contacts with Gmail.

By the way, you can also export contacts from Gmail. To do this, select the export contacts item in the menu. They can also be saved in a VCard file.
When opening VCard in Windows programs there may be problems with the display of the Cyrillic alphabet. VCard is saved with UTF-8 encoding by default, while Windows uses Windows-1251, however, in latest versions Microsoft OS has extended support for Unicode. However, if the problem still exists, then you need to open the file in any text editor, for example, Notepad 2, which supports changing the encoding. Change it and save. In fact, VCard is a plain text file.
Sync Android Contacts with Google
Android contacts are synced with Gmail and Google by default if the corresponding account is added to the phone. And without an account, it is impossible to fully use Android.

To add an account, you need to go to Settings - Accounts and Sync. Here, click on the Plus and select from the list of the Google list. Next, enter your account information or create one.

Google will now appear in the list of added accounts. If you go into it, then there will be a name mailbox"[email protected]". By selecting an account, you can manually start synchronization of various data and Google services. Contacts are at the very bottom of the list.
In the menu item Settings - Accounts and Synchronization at the very top there is an Auto-Sync switch. If you activate it, then all accounts will be synchronized automatically. If it is disabled, then synchronization must be started manually, as described in the paragraph above.
Import Contacts to Android
Importing contacts on Android is organized quite simply.
In the Contacts application, you need to go to Menu - Manage contacts - Import and export contacts.

A menu will open with three options for importing contacts. Import from SIM. It must be selected in order to transfer contacts from the SIM card to the phone's memory. Import sSD card and Import from phone memory must be selected to overwrite contacts from contact files, such as VCard. Android does not need to specify the location of the contacts file. The system itself will find all supported files and prompt you to select the one from which the data will be imported.
If it is not physically possible to connect the phone to a computer in order to write a VCard file to the phone, it can be sent by mail, via Bluetooth, uploaded to the cloud and then downloaded to the device.
Importing contacts to Android can also be done through the application Google Contacts. You can access it from Gmail. In the Extras menu item, select Import contacts. Further, to transfer contacts to Android, it is enough to synchronize contacts with Gmail.

AT new version In Gmail, the Import item is in the More section, not Advanced. It also supports importing contacts from Yahoo mail, Outlook, AOL and others. Therefore, if contacts are synchronized with other mail services, you can pick them up from there directly. It is enough to enter the access data to the mail. True, Google warns that for a number of services, the contact import function is implemented at the expense of third-party developers, so it is up to everyone to decide whether to trust their credentials to third-party service providers.
Where are contacts stored in Android
Contacts in Android are stored in the contacts.db or contacts2.db file. It is a SQLite database. It is easy to find software on the Internet that can read such files. However, the files themselves are not so easy to find.
To access them, you must have root rights. If they are not there, the user simply will not see given file, he will not see the folder in which the database is located. Only if you have root rights, you can go to Android/data/data/com.android.providers.contacts/databases/, where the contact files are located.
Export Contacts from Android
You can export contacts from Android using the built-in functionality of the Contacts app.
In the application menu, select Manage contacts and then Import and export contacts. There are three options for exporting: save contacts to SIM, save to memory card or phone memory. When saved to a memory card or phone memory, contacts will be exported to a VCard file, which can then be used to import contacts, both on Android and iOS, mail services, cloud, desktop applications.
How to Recover Android Contacts
The solution to this problem depends on whether the contacts were synchronized with Gmail, whether a backup copy of the VCard was made.
If the contacts have been synced with Gmail, then just sync them to your phone. However, it may happen that the contacts have been accidentally deleted from the Android smartphone. It synced with Gmail and the contacts there also disappeared. It's not a problem.
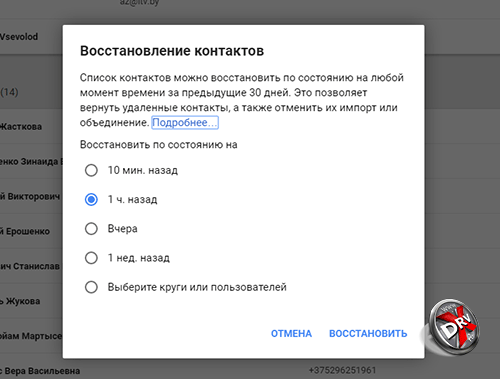
Google stores contacts for up to 30 days. In Gmail, in the Advanced / More section, select Restore Contacts. A menu will appear in which you can select a date for restoring contacts. After they are restored to Gmail, they can be synced to your phone.
If a backup was made to VCard, then to restore it, it is enough to load the file into the device's memory or onto a memory card and import contacts from it, as described in the previous sections.
How to delete contacts on Android
There are several ways to delete contacts on Android, depending on how many contacts you need to delete and how securely.

To delete one contact, you can open the Contacts application, select the desired Contact and tap on it while holding your finger at one point. will appear context menu which has a Delete option.

You can also go into contact and click on the three dots in the right upper corner. This is the contact menu. There is also a delete option here.

The Delete contacts item is also in the menu of the Contacts application itself. When clicking on Delete contacts, the user will be offered a list of contacts in which he can mark contacts for deletion, or select all. Next, click on the Delete button.
You can simply reset all phone data. This is done in Settings - Backup and Reset.
Backup Contacts on Android
Android offers several ways to back up contacts at once
The first method is simple and reliable, but it will be difficult to keep your contacts backup up to date. We are talking about exporting contacts to a VCard file. See Exporting Android Contacts above for how to do this.
The second way is to sync contacts with Gmail. It is often enabled by default. How to manage synchronization is described above.


Choosing an account for Android backup
The third way is to enable backup for all phone Google servers. This is done by Settings - Backup and Reset. When backup is activated, Android will make a copy of the phone on Google servers, not only contacts will be saved there, but also all personal data, application data, etc.
Android contacts apps
The Contacts app for Android has good functionality and is quite convenient, so there is not much point in third-party solutions, but we will still consider some applications.
Contacts
- Developer: AndloRD.
- Grade: 4,1.
- Number of installations: 1 million.
This application is an alternative for standard Contacts from android. It does not differ in extended functionality, but rather interesting in a different approach to storing the phone book. Where Google Contacts stores all information in a database, VCF Contacts store all information in a vCard (vcf) file. It is this file that can be obtained as a result of export.


When you install the app, it takes an existing vCard file as a basis or creates one based on the Android phone book. As a result, the user always has an up-to-date vCard file in the phone. This can literally save in the event of a sudden system failure.
Contacts can be sorted, sent by mail, via messengers. Unfortunately, the functions to add to Android and to another vCard file are only available in the paid version.
Contacts+
- Developer: Contact Plus team
- Grade: 4,1.
- Number of installations: 50 million.
Makes contacts more fun. All contacts are presented with avatars. This representation simplifies calling the desired subscriber - choosing by faces is faster. There are advanced search functions: you can search not only by name or phone, but also by mail, SMS, etc.


Themes and various design options for the phone book are supported. Contacts+ also have a call log and SMS.
Contacts are stored in encrypted form.
The application has a separate backup function. True, in free version only up to 2000 contacts, calls or SMS can be saved. Copying is configured separately for each category of information.
Save contacts to TXT
- Developer: Viked.
- Grade: 4,3.
- Number of installations: 15 thousand.
On Android, contacts can be exported in vCard format. This application allows you to save them to txt. You can save to text file All contacts, separate entries or several.
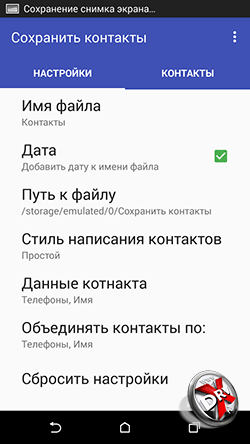

It also allows you to customize which fields will be saved in the file.
In the future, the file can be used at the discretion of the user. You can also send it by email.
Simpler Contacts Dialing
- Developer: SimplerApps
- Grade: 4,3.
- Number of installations: 5 million.
First of all, it is an alternative to the standard Android phone implementation. Not only the phone book is supported, but also the dialer, Caller ID, work with SMS. However, the application has some interesting features for working with contacts. The most important one is backup. You can make both a local copy of contacts and save it in the application cloud. You can set up automatic backups. The search for duplicates in contacts is carried out by the application constantly in automatic mode.


Another interesting feature is Facebook photo search. The application prompts the user to compare his friends in social network with a list of contacts and if there are matches, use Facebook profile photos for Caller ID.
In addition, you can use different themes for the application interface.
SA Contact Lite
- Developer: sapp.
- Grade: 4,0.
- Number of installations: 1 million.
Applications for exporting and importing contacts to Excel files. Excel is the best source to import to Outlook.
The application allows you to customize which fields will be exported to Excel. You can transfer all contact fields, including a photo. The only exception is personal melody assigned to the contact.


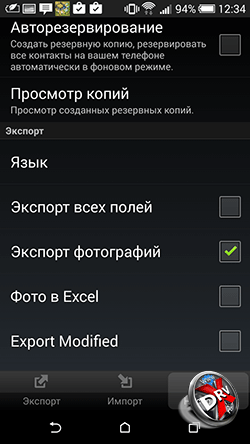

The application also automatically converts encodings according to Windows requirements and Microsoft applications so that names in contacts are displayed correctly.
The exported file can be stored on a memory card, sent by mail, uploaded to cloud services.
The limitation of the free version is that you can only export the first 300 contacts. You will have to pay for a larger phone book.
Conclusion
Working with contacts in Android is well organized. There is practically no need to turn to third-party applications if you read our guide. With Android tools, you can perform all possible actions with contacts.
However, if you want to decorate and diversify the dialer or phone book, then in Play market enough apps. True, you need to be careful when choosing them. It's all about personal data.
Mi Band 2 is a great device that allows you to track and adjust your activity throughout the day. Apart from basic functions like step counting, sleep tracking and a heart rate monitor, the bracelet can also notify you of incoming calls and messages, and small screen allows you to configure Mi Band 2 to display the name of the caller. In addition, vibration can be set for other applications. It is thanks to this that the band stands out from the background of other fitness bracelets.
Missing a call is now impossible
Now any owner of the bracelet will not miss a call. In addition to vibration, it is also possible to set the display of the caller's name in Russian. In more earlier versions problems occur and during a call Mi Band 2 displays question marks instead of the name. However, users have found a way to make this function even better and set up the bracelet so that after a call, the name written in Cyrillic is displayed correctly.
You can also set the time that will elapse before the notification of the call. On the screen it is possible to configure and read messages. The screen sizes will not allow showing them in full, so the message will be displayed in parts, which is not very convenient. However, such a function will help determine the importance of the message.
How to display caller name on iphone on mi band 2
Mi Band works with both iPhone and Android devices. Setting to different devices differs little. First, let's look at how to set up the display of the caller's contact on Mi Band 2 in the iOS version.
As with setting up all other Band features, you will need to install Mi Fit if the app is not already installed. Turn off the app and Bluetooth. Now you need to perform the following sequence of actions:
- Change the device language to Chinese (simplified). This is done in the settings in the "Language and Region" tab.
- Now turn on Bluetooth and open Mi Fit. At this point, the firmware update should begin, which will take some time.
- After that, you need to enable call notification. Orienting in Chinese is not very convenient, since the menu is simple. Go to the "Profile" tab (the third button on the bottom panel), then select the band in the list of devices, click on the line with the phone image and check the box for notifications.
- Turn off the app and Bluetooth connection again.
- We return the device language to the usual Russian.
- We turn on the connection via Bluetooth and Mi Fit.
After that, notifications will work correctly. It is worth considering that labels up to 10 characters long are displayed on the Band screen.
Display caller name on android
In exactly the same way, you can configure the Band on Android devices. In order to set up the display of the name of the caller, you will need to turn on the Chinese language for a while and follow the steps that were shown above. If you simply check the box next to the items written in Chinese in the "Notifications" and "Messages" tabs, then the notification about the caller will not be displayed correctly in the form of question marks.
If Mi Band 2 does not show notifications, then you should try to remove the current version of Mi Fit and install it again, because the problem may be outdated firmware. Over time, the developers promise to finalize the firmware and correctly display the name of the caller on the Mi Band 2.