
Many people want to build a gaming computer in 2017, while keeping within a small budget. But this is a very difficult matter, because the cost of computer components is increasing every year, as well as the requirements of games regarding PC performance. At the same time, I want to assemble such a computer, the filling of which will remain relevant for at least a few more years, because it is unprofitable to invest in its modernization every year, and not everyone can afford it. In our material, you will learn what details are most important in games and how to build an inexpensive gaming computer.
Assembling a gaming computer in 2019 do it yourself
CPU
The first step is to decide on the choice of processor - the most important element of the computer, which is responsible for everything computing processes. You have to choose between the products of two world famous brands Intel and AMD. It is recommended to find performance tests on the Internet and compare the results with each other. Best Choice in our opinion is the processor intel core i5 - its power is enough for any games and fast work operating system.

The higher the generation of the processor, the better performance Please take this into account when choosing. To assemble a powerful budget gaming computer, you can use the i5 7500 - almost the top solution in the line, which does an excellent job with resource-intensive tasks. Of course, Intel core i7 processors will be better, but the performance gain in them is not as big as an overpayment. AMD Athlon II X4 640 will great solution for assembly budget computer, although in terms of its capabilities it is inferior to solutions from Intel.
Choosing a motherboard
You need to find a motherboard that will support the format of the selected processor. When choosing it, you need to pay attention to the processor socket (for example, an LGA 1151 socket is required to connect an Intel i5). Also important is the standard of slots for RAM, their number and frequency. Additional connectors may also be present, which you should pay attention to in order to choose a motherboard with suitable functionality.

RAM
When assembling a gaming computer in 2017, the best solution would be DD4 RAM with a capacity of 8 or 16 GB. There is simply no need for a larger volume, and so everything will fly. But 4 GB will not be enough for modern games, especially since part of the memory is eaten up by the system. Volume random access memory you need to choose based on your budget - the more you put it, the faster games will load and the interface will work smoother. But keep in mind that if in the future you have a desire to expand the volume, then you need to install a bar with a similar frequency and preferably from the same manufacturer, otherwise it may turn out to be incompatible. It is better to choose a memory with a maximum frequency, its performance largely depends on this. When deciding how to assemble an inexpensive gaming computer in 2017, you need to make sure that the selected RAM standard is supported motherboard.

Please note that if you set the RAM bar to more than 3 GB, then the operating system must have a 64-bit architecture. Otherwise, no matter how much memory you install, no more than three will be available.
Video card - the most important part in the assembly gaming computer
The question of how to assemble a good gaming computer is impossible to imagine without choosing a video card that is responsible for processing graphics in games. The graphics card and processor are the most expensive parts that affect gaming performance the most. When choosing, it is better to read reviews, as manufacturers offer a huge variety of models that vary greatly in their capabilities. Enough for a budget PC Nvidia GeForce 1050 Ti with 4 GB of memory. But in Lately with video cards, everything is not so simple - they are bought up by miners, and if they manage to be found on sale, then it costs much more than it should. This applies to the entire video card market. If you have a large budget, then you should pay attention to Nvidia Geforce 1060, 1070 and 1080 cards - the top solutions for today, by purchasing which you will get maximum performance.

When deciding how to assemble a gaming computer yourself, you can also pay attention to cheaper solutions from ATI or Nvidia. When choosing, consider the connector to which the video card is connected. DDR5 is in the lead - this is the latest format, which is equipped with almost all motherboards. Therefore, it is better to opt for it, DDR3 will become less and less popular over time, until it completely dies out. And remember that a bigger model number doesn't always mean it's better. You need to look at reviews and comparison of performance tests on special sites.
Drive selection
The best option today is to use an SSD drive paired with a standard one. The system is installed on the first one, which gives a noticeable performance boost. But due to the high cost, it will not be profitable to buy a large SSD, which means that over time you will no longer be able to store all the files on it.

Here the standard saves HDD which is much cheaper. So, for 3000-4000 rubles you can buy a 1 TB hard drive, while for the same amount you can find a maximum 128 GB SSD. Again, when deciding how to assemble a good gaming computer inexpensively in 2017, you should read reviews and pay attention to such a characteristic as rotation speed. It must be at least 7200 rpm. The speed of writing and reading data depends on this parameter. Fast storage speeds games up and reduces installation time.
Power Supply
Thinking about how to assemble a 2017 gaming computer yourself, you need to calculate the required power of the power supply. To do this, you need to look in the characteristics of how much energy each part of the computer consumes, add up the amount and add about 20% just in case. Most PSUs come with 20 or 24 pin connectors, make sure they are compatible with your motherboard. Do not take the power supply bundled with the case. As a rule, it is not of high quality. A gaming PC will require a variant with at least 500W of power.
Frame
The case should not only be beautiful, but also contain all the connectors you need to use. Particular attention should be paid to cooling, because even on the most powerful hardware, games will slow down if it overheats. Some cases have 80mm fans, others 120mm. The top solution is a liquid cooling system, but it is unreasonably expensive, so it is better to opt for a case with 3-4 powerful coolers. How more powerful stuffing the more efficient the cooling system should be.
Hello friends! If you are a computer enthusiast, then learn by yourselfassembling a computer will not be difficult for you.
When I wrote this article, I immediately showed it to a person who had never assembled personal computer. He read it carefully and began to ask me questions, from which I realized that the publication needed to be urgently supplemented with a lot of little things, only then it would become understandable to beginners, as a result, I almost completely rewrote the article several times, and only now I offer it to your court.
In my last publication, I explained to you, but today we will independently produce a classic PC assembly.It is best to assemble a computer on a table so that you can see everything and as conveniently as possible. Let's start withapplying thermal paste to the processor and installing it in the motherboard socket, then compose the processor cooler and connect it, after that we insert RAM modules into special connectors on the motherboard, then we mount the power supply unit into the case and tighten the wires, fix the SSD, HDD in the system unit, and only after that we install the motherboard into the case ...
How to build a computer yourself
First, we need to buy thermal paste and apply a thin layer on the processor. It is inexpensive and is usually sold together with a special hard card, with the help of which, literally, it is smeared on the surface. Why do you need thermal paste? During operation, the processor becomes very hot and with the help of thermal paste effectively removes heat from itself to the cooling radiator.


Installing the processor on the motherboard
Now install processor in , in my case i5 6400 and Asrock z170m pro4s. It is worthwhile to install the processor into the socket very carefully and carefully so as not to damage it. In particular, this applies to AMD processors, since, unlike Intel processors, which have contact pads, first there are so-called "legs", bending which the processor will stop working. So, open the socket socket on motherboard using the side latch and look at the keys that show us how to properly insert the processor.


We take the processor in our hands and see that it has the corresponding recesses, and a triangle in the corner, thanks to which it will be difficult to make a mistake during the installation process.

With a gentle movement of the hand, we simply put the processor into the socket,

make sure that it does not hang out there and close the side latch.

CPU cooler
Further, I prefer to outfit the motherboard in full and install the RAM on it immediately, outside the case, because it’s problematic for me personally with my big hands to do this in a cramped space (inside the case).
So, we look at the motherboard and see special connectors for mounting the cooler, that's where we will put it with you.


This is done simply, we take the cooler, get into the holes with special legs and snap them into place.
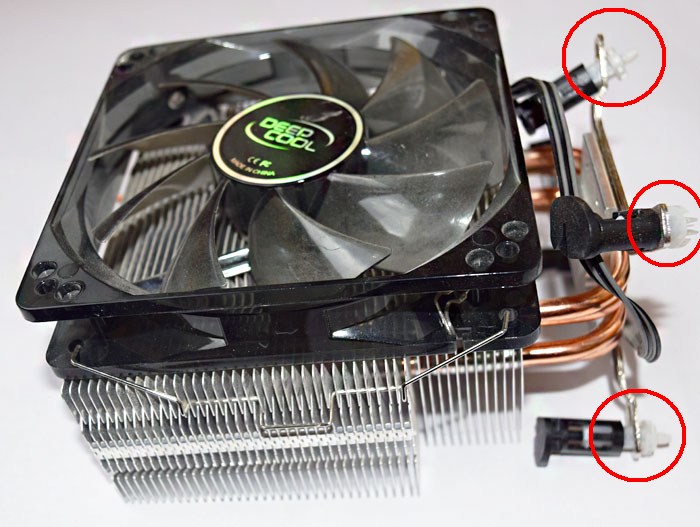
After installation, everything will look like this.


Do not forget to also connect the power supply of the cooler to a special connector on the motherboard called CPU FAN.


RAM
Power Supply
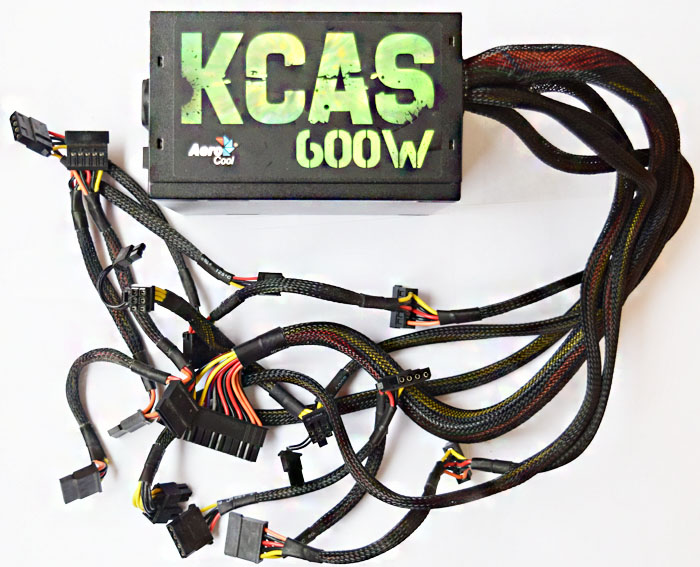
Now that the motherboard is fully charged, we move on to installing it in the case. Many advise installing the motherboard in the case first, but I prefer and recommend that you start with a power supply unit, because if you follow my advice, you can stretch all the necessary wires properly and avoid damage to the mother, since the unit is usually very large and takes up a lot of space . One awkward movement and you can easily damage the chips - goodbye motherboard. In my case, a GMC Forge case and an Aerocool KCAS 600W PSU.
Installing the unit is a very simple process. We put, we stretch the wires as we wish and we twist the screws into special holes on the back of the case.


I want to note that the power supply is always installed in such a way that the fan is directed downwards when the unit is bottom mounted. Inside the case, you can tell your own microclimate and your own temperature, so it would be better if the power supply draws in cool air from the outside, and not warm from the inside.
Solid state drive SSD and hard drive
Now before installing the motherboard for the same reason, similar to the power supply. We insert the solid state drive and the hard drive into the appropriate baskets, if they are, if they are not, then we simply fasten them to the case. I will have a Patriot Spark 128gb and a Seagate Barracuda 7200 1000gb working hard on my system.


Motherboard
Let's move on to installing the motherboard in the case. On the mother itself there are special holes for mounting, depending on the model, the number of these holes may vary. We insert the motherboard into the case in accordance with these fasteners and tighten with screws, which must be included with the case.


Processor power
And finally, it remains for us to connect all this stuff together. Let's start with the processor power. The power connector is 4pin and 8pin and is usually located directly next to the processor. We find the appropriate cable at the power supply and connect it.


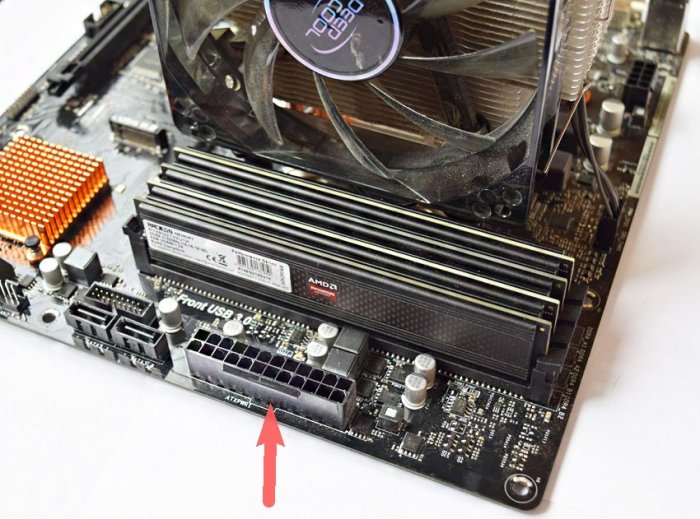
Motherboard power

Case cooler
Let's move on to connecting case coolers for blowing / blowing. They are connected to the corresponding connectors on the motherboard with the name CHA FUN or SYS FAN or similar.


Now let's connect our drives interface cables SATA to the appropriate slots on the motherboard.

Don't forget to connect extra food to our drives. In my case, this can be done from the back of the case.

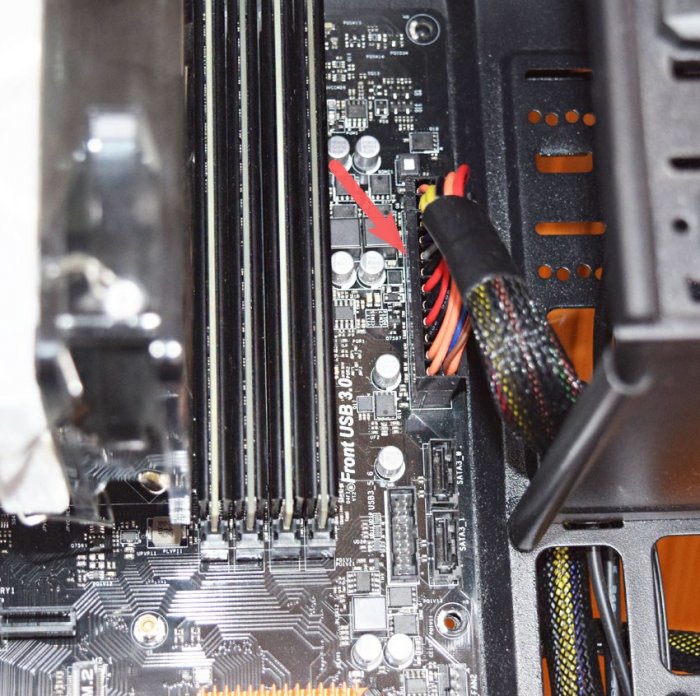
Connecting Front Panel Cables to Motherboard
And finally, I decided to leave the most difficult thing that causes some problems for most users, namely the front panel power connection. All connectors are located at the bottom of the motherboard. Let's start with the audio outputs. We take a wire with the name AUDIO and connect to the connector with the same name.

It is worth noting the following point. Budget motherboards are equipped with a 4-pin CPU power connector. So with our hands we divide the existing 8-pin cable into two 4-pin ones and connect to the board. Expensive motherboards, on the contrary, in addition to the 8-pin connector, are equipped with an additional connector. The trick is that in this case everything will work from one 8-pin wire. An additional port is needed if, for example, you will overclock very seriously CPU. But then you will also need an accompanying power supply, or an adapter.
Step #5: Install Drives and Optical Drive
For a desktop PC, there are two most common drive form factors: 2.5-inch and 3.5-inch. Plus, M.2 SSDs are gaining popularity. As for the latter, everything is simple with this form factor: the device is installed directly into the port soldered on the motherboard. But 2.5- and 3.5-inch drives must first be fixed in the case.
In 99% of cases, the case is equipped with a special basket with skids. The manufacturer also indicates in the characteristics the number of slots for 2.5- and 3.5-inch drives, as well as 5.25-inch devices. In the case of the Fractal Design Define R5, two metal baskets are used. The first (top) can accommodate five 3.5-inch or as many 2.5-inch drives. The second (lower) - three. In some cases, these baskets may be removable. Plus, this case specifically has two seats for 2.5-inch drives behind the chassis.
Not all computer cases support the installation of 2.5-inch drives as an option. True, many SSD manufacturers complete their products with special adapters for 3.5-inch sleds. Usually they are packed in cardboard boxes, but not sealed in a blister.
Computer configurator with compatibility check allows you to quickly assemble system unit with the necessary user technical specifications. With the help of our online builder, you can easily assemble a reliable office machine, a home multimedia system unit or a powerful gaming setup.
Computer assembly online
In our time, like many years before, it is popular to assemble a computer from self-selected components. This is a good opportunity to choose exactly what you want. Nothing limits you, hundreds of options are available for assembly, among which there is sure to be one that you like.
Our online store offers the possibility of assembling a computer online, through a configurator. In him this process presented in the form of categories of components, from the processor to the power supply. Each category contains an extended range of models with a description of the characteristics for ease of selection.
To simplify the selection of components, the configurator has a compatibility filter for the main components of the assembly. For example, by selecting a specific processor, the following components are automatically filtered by compatibility. Also, you will be presented with the choice to install the operating system. After the assembly process is completed, you get the final result in three parameters: price, technical data, rendered image. After placing an order and confirming it by phone, our specialists assemble this equipment and check its performance.
The advantage of this method of buying a system unit is that you not only choose the components you want, but also have the opportunity to choose the brand or manufacturer of the part.
After assembling a certain configuration, completing by pressing the assemble / buy buttons, the assembly is assigned a certain serial number, by typing which in the product search bar, you can find this PC and send a link to it to friends or acquaintances for advice or recommendations for them to buy.
An important feature of our configurator is the “get expert opinion” function. By sending your request through this form, you will receive a detailed answer with a recommendation for email specified by you.
Try it and see for yourself - assembling a computer online is easy and simple! In case of difficulty, you can always get advice from our experts on all your questions.
First body needs to be prepared system unit for assembly.
- Unscrew the screws from the side panels of the case
- Remove both side covers
- Installing the motherboard connector panel before it is installed in the case
This connector panel is already always comes with with mother. Gently (so as not to cut yourself on its sharp edges) insert it into the body until a characteristic click, it should snap tightly in the hull.

Preparing the motherboard for assembly in a PC case
At this stage we prepare the motherboard for installation in a PC case. We will install:
- CPU
- RAM modules
- CPU cooling system (cooler, fan)
Installing an Intel Processor (Intel)
First thing remove the protective black plastic from the processor socket. Just press the clamping bracket and remove the plastic protection.

Gently grasp the processor with your fingers and set it to socket paying attention to its correct orientation.

Back clamp the clamp with some effort at the end of the action.
The CPU should "go into the socket" without any effort and the use of force.

At this stage, we will install CPU cooling system. V this case a regular cooler is used, the one that came with the processor, the so-called "boxed" cooler.
If you have your own thermal paste, it's best to replace the one already applied to the heatsink. If not, leave it as it is and install CO (don't forget to remove the film from the thermal paste!).

We install the cooler so that the fixing the pins entered their respective holes on the motherboard. Please note that the power cable reached the connector power supply (in our case, it is located at the top of the motherboard).
Then with effort snap the pins diagonally, and each time there should be a characteristic click.
Connect the fan to the power connector "CPU FAN1".

Now we need to produce installing RAM to the motherboard. For this spread out the latches-clip slots for RAM modules.
Pay attention to the notch in the module RAM, it must necessarily coincide with the partition in the slot. This is protection against incompatible modules. Do not miss this moment, otherwise you can damage working memory!
By installing the RAM module, fasten it with snaps, which you previously parted to the sides.

to install into the motherboard case, take it with your hands and install it in the system unit case. All side connectors and I / O ports should be very enter the plate exactly with holes for them, previously installed by you in the case at the previous stages of assembling the computer.

Now screw the motherboard bolts to the system unit case. It is better to tighten the first screw a few turns not completely so that the other bolts fit exactly. Tighten the rest of the screws until there is clear resistance., then screw the first one.

Connect to motherboard front panel with usb and audio output
In the manual (instructions) for our motherboard, we must find information on how to connect the front panel with audio and USB output. You also need to make sure that all cables do not interfere with the free flow of air in the case.


Installing a hard drive in the system unit case
Now set hard HDD disk 3.5 inches in the system unit case. It is quite simple to do this, as you can see in the photo, the HDD is installed in a place specially designated for it closer to the front of the case.
Secure the hard drive to the sides four bolts, two on each side.

Installing the power supply computer should not cause you any difficulties either. Just put it in the appropriate compartment body and secure with four bolts. Always fasten bolts better diagonally.!


Connecting the Power Supply Cables
At this stage of the build, you need connect power to accessories. SATA (SATA) cable you connect to hard drive and a drive if you choose to install one. As well as EPS cable (CPU power), 24-pin motherboard connector, graphics power PCI-E cards. Make sure the cables are routed so that no problem for heat dissipation.
The power supply has a special output with 4 yellow-black wires, so we connect it to the processor power socket on the motherboard.

In this photo you see connected by SATA cable(5 wires - 2 yellow, 2 black, 1 red) hard drive, top. And the power is on motherboard, at the bottom right of the photo.
On modern motherboards, you need to connect an additional 4-pin connector, which, as a rule, is separate from the main cable. To make it easier to connect, take the main connector in hand, and connect it with additional. Then connect the entire structure to the connector on the mat. board.

Signal cable connection SATA from hard drive to the motherboard to the "sata 1" connector.

Installing the graphics card in the case
For installation video cards in the case computer, you first need to remove metal bar opposite the PCI-E slot.

Further install the video card to the PCI-E slot on the motherboard. For this you need release locking clip and insert the card until it clicks. Then screw the card to the panel where you previously removed the metal plate.

The result of self-assembly of the computer system unit
As we see, with self assembly PC system unit anyone can handle the user, in the presence of all the necessary components and the desire to do it himself with his own hands at home.