
Installing Windows XP, and Windows in general, is a simple process, but a long one.
I will tell you how to do this without the help of computer specialists / friends. So, the whole process is divided into 3 logical steps:
- Stage I: Preparation
- Stage II: Installation
- Stage III: Setup
Stage I: Preparing to install Windows
Before proceeding with the installation of Windows, you need to copy the entire important information and settings so as not to lose them.
There are many different ways to do this, and I will not consider all the options, but dwell on the most basic ones.

At this our preparations are completed, and you can proceed directly to the installation.
Stage II: Installing Windows
So, now we are prepared and you can proceed directly to the installation.
We insert the drive from our coveted Windows XP into the drive and ... no, we do not install it. Do not even think about installing the Operating System from the Operating System itself! We need to reboot and enter the suspended bios (from the word B asic I nput / O utput S ystem). To enter it, you need to press the Del or F2 button when you boot the computer, if you have a laptop. Although in some cases you need to press other keys, so see what is written at the bottom of the monitor screen. there will be an inscription like "press del to enter setup".

Finally, Windows was installed, you rebooted, now you can remove the installation disk and proceed to the third stage.
Stage III: Setup after installing Windows
We take out our installation disk and begin the setup.
- Drivers and what to do about it.
First of all, you need to install drivers so that the computer knows what to do with, and indeed can feel comfortable.- We insert a disk from the motherboard. It is important for us to install 3 drivers: chipset (chipset), audio (audio) and Internet (ethernet). But if the program offers you more, then we agree to such a courtesy and install. We reboot so that the drivers are fully installed.
- If there are no drives, then remember where we downloaded our drivers from official sites and install them from there.
- We insert a disk from our video card. As you may have noticed (or could not), if you drag the windows, you can see that they are moving in jerks. This indicates that you have not installed the video driver. So install the video driver from the disk and reboot.
- Next, we follow the same scheme and install the rest of the equipment. For example, a scanner, printer, tablet, mouse, keyboard, etc.
- Successfully Installed or how to determine if everything is in place
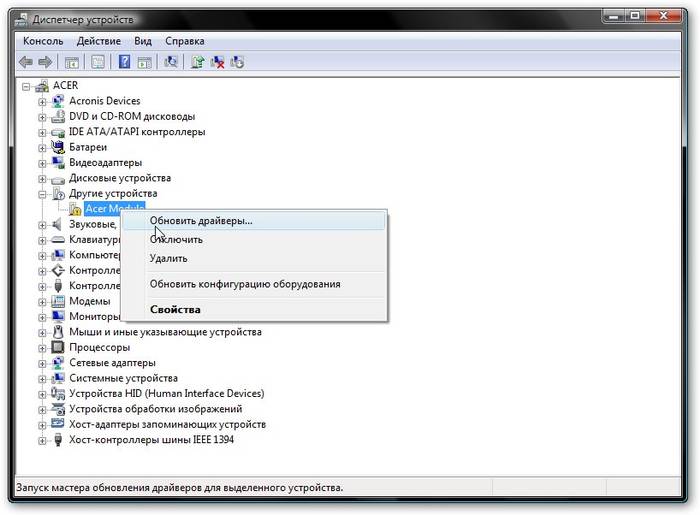
We need to make sure that we haven’t forgotten anything and that all the drivers got up correctly. This is not difficult to do. We go in Control Panel -\u003e System -\u003e Hardware -\u003e Device Manager. As you can see, here we have listed all of our installed equipment. If the question mark is opposite something, this means that the driver for this device is not installed and the system does not know what to do with this equipment. If you find such an icon, then read the opposite of what it is, and install the driver for this device. Ideally, there should be no question icons at all, as, for example, here:
3. Optimize or free up memory.
For more comfortable work, in the section where you have installed Windows, nothing superfluous should be installed, it is also advisable not to have a swap file on it and a temp folder. This is what we will do now.
- Do not let on the Internet?
Remember, we wrote down strange letters on a piece of paper? Now you need to enter them back. To do this, follow step 3 of the first stage
This completes the whole process. You now have a brand new Windows, which is also already configured. Can use
Afterword
It seems like all this is very complicated and incomprehensible, but after 10-20 identical actions and installations of Windows you will do it instantly. And there is actually nothing complicated in installing the OS, it just takes a little more time and attention
Now I would like to stipulate some points that were somehow not included in the scope of this article.
- When writing an article, I only considered a disk with an official copy of Windows XP. I do not consider various assemblies, like Zver, Philka, etc. And, although the installation of assemblies is practically no different from the installation of a licensed copies of windows XP, you put the assembly at your own peril and risk.
- I did not consider the item about registering your Windows XP for the reason that this process is very clear regardless of whether your key is printed on a box with a disk or it was sent to you by mail.
- I did not consider installing drivers with special programs, because I do not think this option is safe enough.
PS: The article was written by a person hiding under the nickname “barn4k“ (friend and project assistant). For which many thanks to him.
This article will explain in detail how to install Windows 7 on Windows XP. At the end of last year, Microsoft announced that the XP version will no longer be updated. In this regard, this issue remains highly relevant.
What is needed for this
There are still many users who are faithful to XP. This is largely due to the fact that the "seven" is very demanding and old computer it is impossible to install. In the era of rapid development of high technology, even software products have become very demanding.
The owners of the old iron have no choice but to use an outdated system. This allows you to achieve normal system performance. Those users who decided to install "Seven" were sometimes dumbfounded by the terrible inhibition of their computer.
Nevertheless, having updated their equipment, the lion's share of people immediately decide on windows update. This allows you to use all the innovations of modern technology.
- a processor with a clock frequency of at least 1 GHz;
- 1 GB random access memory (for 32-bit) and 2 GB (for 64-bit);
- at least 16 GB of free hard disk space. If your Windows version includes an additional software (office, antivirus, drivers, etc.) will need much more;
- internet connection (for further registration);
- a video card that is compatible with DirectX 10 or later;
Tip: this condition is only necessary for modern games. If you intend to use only office programs, then it can be omitted.
- some functions may require additional equipment (for example, a TV tuner or flash memory);
If you are sure that your equipment fully meets these requirements, then you can proceed with the installation. You can view all parameters through the control panel, then the “system and security” item, in which we select the “system” tab.
BIOS setup
First of all, you will need to make some tuning in the BIOS. To many inexperienced users, this seems like a complicated operation, but in fact, everything is quite simple.
We do the following:


That's all, now the next time you start your computer, the system will start from the desired device and installation will begin. Also in BIOS, you can immediately make additional settings, for example, increase the intensity of coolers. However, if you are not familiar with BIOS, it is better not to do this in order to prevent mistakes.
How to install Windows 7 if it costs Windows XP
Before installation, you will need to transfer all the files from the computer to removable media, because it is better to install the OS with disk formatting. If there is not enough space, you can upload some files to the file hosting service.
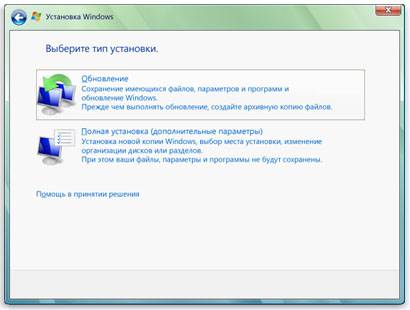
Having completed all the preliminary manipulations, it is time to start the main procedure. Almost all latest versions OS are installed in automatic mode, so usually it does not cause difficulties even for not the most experienced users.
Launching the installation, you can go do other things. The system will do everything itself, and you will only need to specify some additional parameters.
Installation process
After turning on, the computer will immediately begin installing the operating system. Almost the entire process takes place automatically, so usually there are no problems with it.
You only need to make some settings:
- language in which the system will work. However, it can always be changed through the control panel;
Important! Select complete installation, as this will eliminate additional difficulties
- creating partitions. You can divide the entire disk space into several parts. It is recommended that you create a separate partition for Windows;

That's all. Now you just have to wait until the installation is complete. At the end, a window will appear in which you will need to enter a username and password (if necessary).
Some versions at the end enter the username themselves (usually the standard “Administrator”). If desired, you can edit this parameter.

If you did not format partitions, then in one of them (most likely in C) all XP files were saved. They need to be removed so that there are no errors in the future.
It is done like this:
- open the start and in the search menu enter "Disk Cleanup". A list of found items appears, among which you need to select the very first;
- a disc selection window will appear. You need to select the one on which the previous OS was installed and click “ok”;
- in the window that opens, select "clean system files";
- then you need to check the box next to the item “previous settings” and click “ok;
- upon completion, click "delete files";
- after a few seconds, the unnecessary folder is deleted.
We put drivers
Now it remains only to install drivers for all available devices (video card, chipset, network, sound, etc.). If you have a driver disk specifically for your computer (it is usually issued upon purchase), then you will only have to insert it and trust the instructions.

However, if it is missing, then you will have to select drivers for all the equipment.
There are several ways to do this:

Now it is possible to judge with confidence that all the work is completed, and you coped with the task. Do not forget that you will have to reinstall all the software. Therefore, pre-acquire distributions in order not to experience problems in the future.
In addition, software products running in XP may not work in the Seven. Therefore, before switching to this system, you should acquire more modern software products.
As you can see, this is a very simple process and strictly following all the instructions, you will certainly cope with it. If necessary, you can supplement the system with various additional utilities.
Despite its hopeless obsolescence, the Windows XP operating system is still very popular among users, due to its ease of use and fairly high stability. In some ratings, it is even ahead of the "seven". Next, the question of how to install Windows XP from disk and perform the initial setup of the system is proposed for consideration. It is believed that the installation of this particular modification should not cause particular difficulties, however, in fact, it is necessary to pay attention to some important nuances, without which the installation of the system may be unsuccessful.
Create a Windows XP installation disc
At the first stage, we will proceed from the fact that the user does not have the original installation disk. Windows boot XP can be implemented as an image from the official Microsoft website or from another (necessarily trusted) source.
In this case, you should immediately pay attention to the contents of the download distribution. It is recommended to download only the one in which initially there are second and third service packs, so that later you do not deal with their manual installation.
Writing an image to an optical storage medium is not difficult. To do this, you can use many programs for working with images (for example, UltraISO or Nero Burning ROM). If you want to create a multi-boot disk Windows XP, it is best to use a tiny utility called WindowsSetupFromUSB, but already to write the distribution to a USB flash drive.
BIOS Presets
So, we assume that the installation distribution is recorded. Now you need to make sure that you can boot from it. To do this, use the BIOS settings of the primary input / output system. Typically, on desktop computers, you enter by pressing the Del key, but different keys (F1, F12), or combinations thereof, may be used on different laptop models.

To be recognized as bootable, you need to find a section with a name like Boot, Boot Priority, Boot Sequence and the first in the list boot devices by pressing PgUp / PgDown optical drive (CD / DVD-ROM).
Start of installation
After all preparatory actions you can move on to solving the problem of how to install Windows XP from disk directly. After turning on the computer and starting from a removable device, a black screen will appear with a line offering to press any key to boot from disk. Keep in mind that you will only have five seconds to make a decision. Otherwise, it will boot from the next device (usually hDD) provided that it has a bootloader installed or even damaged by the OS.

Next, a preload screen for the basic components of the installation will appear and a line at the bottom with a suggestion to install additional SCSI and RAID drivers. In most cases this is not necessary, however, if there are several hard drives, combined into the same RAID array, the installation must be applied. But it will come from the fact that the user has one hard drive.
Partition selection and formatting
At the next stage, a welcome screen appears with a suggestion of actions to choose from:
- immediate system installation;
- recovery damaged system through the console;
- failure to install.

Select the first item by pressing the enter key. Next, we agree with the license agreement and to continue the installation, press F8 (prompts will appear at each stage of installation).
After that, the previously installed copies will be scanned, after which you will need to make a choice in favor of the installation new system (Esc).
Now, in the matter of how to install Windows XP from disk, the most important thing begins. First of all, you need to decide on the system partition and its size. In case of installation on a new hard drive, on which there were no logical partitions, an unallocated area (full volume) will be shown.

It is undesirable to allocate all the space under the system partition (this may subsequently play a trick). It is better to split the disk immediately by pressing the C key and indicating the required volume in MB (for the system, you can allocate 40-60 GB, but not less than 20 GB). Immediately pay attention to the moment that for the normal functioning of Windows XP in the system partition, about 10-15% of its size should always remain free after installing the OS and after installing user programs. After returning to the partitioning screen, you can start formatting (but more on that later).

If the hard drive has already been broken, and it has an old system, the user will be shown all available partitions. If necessary, all sections can be deleted (when you select a section, press D). If the user’s disk structure is satisfactory, simply select the desired partition in which the system was installed earlier, and proceed to formatting.
In the case of new hard drives, you can immediately choose quick formatting in NTFS. If the operation is applied to an existing partition, several options will be offered. It is best to perform full formatting in NTFS. But to save data, you can leave the file system unchanged. Most likely, a warning will be issued later that the Windows system directory already exists, with a suggestion of overwriting current copy or selecting a new folder. Here - at will (anyway windows folders XP old versionif one was previously present will be saved).
Now it remains to wait for the copying of files to complete, after which a reboot will occur and the installation of the system will begin in normal graphics mode.
Setting initial parameters
In the next steps in the matter of how to install Windows XP from disk, user actions are quite simple. When rebooting, it is necessary to remove the optical media from the drive, otherwise you will again get the preliminary start screen.

After the installer starts, the language and region are selected (usually nothing needs to be changed if you have a Russian copy of the system), then, if required, the user name and organization name are entered (optional), after which the product key is entered (the installation will not continue without it ) Working keys, by and large, can easily be found on the Internet.
At the next stage, you need to register the computer name and specify the administrator password (this can be done later). Next, set the date and time (usually nothing needs to be changed), and at the end a screen with a choice of settings may appear network card. Feel free to select "Normal Settings" and indicate that the computer is not involved in the network (it is better to choose a group and a domain after installation).
Installation complete
Just now, device drivers will begin. Upon completion, several additional windows may appear. For example, the system will ask for consent to set the optimal screen resolution. We must agree with this.
Then the welcome blue screen starts, in which most of the actions can be skipped (for example, defer protection, check the Internet connection and register with Microsoft). Finally, it remains to enter the names of the accounts that will be registered in the system. You can enter only your data, after which a notification will appear on the completion of the installation.

Pressing the “Finish” button will lead to the appearance of the “Desktop” with all the familiar picture. On this, the installation can be considered completed (if service packs were present in the distribution, they will be installed automatically, otherwise they must be installed independently).
Common system installation errors
Infrequently, of course, but you can meet windows errors XP, moreover, during the installation process. The most common occurrence is BSoD ( blue screen) Installation is not possible due to an incorrectly set mode for the hard disk.

If a message about BIOS firmware mismatch appears, you must disable ACPI mode during installation.
Perhaps the disc itself is damaged or scratched. Just write the distribution to another medium and try to install the system again.
Initial setup of Windows XP
Initially, the system usually does not need special settings. But to reduce the load on computer resources, it is advisable to disable some background servicesactivated by default and starting with the system.
In the Run console (Win + R), enter the command to access the msconfig system configuration, go to the startup tab and disable everything that is there, leaving only the ctfmon process, which is responsible for displaying the language in the tray and changing keyboard layouts.
Additional software required
Then, be sure to install security software, since there is practically no protection in the "e-book" itself. Antiviruses for Window XP are quite diverse and do not cause installation problems. However, based on the fact that this version of the system is usually used on relatively low-power machines, do not install heavy packages like software products Kaspersky Lab. It is better to limit yourself to some lite versions (Avira, Panda Cloud, etc.).
Nevertheless, if you look at antiviruses for Window XP from the point of view of providing maximum protection, you can use the NOD32 or Smart Security packages from ESET. True, they will have to be activated monthly using special keys that are freely distributed on the Internet.
Finally, it remains to install the archiver, a set of codecs, a flash player for the browser, office suite and some other applications that the user may need in the process.
Often, when buying a finished computer with a preinstalled operating system, we don’t get a distribution disk on hand. In order to be able to restore, reinstall or deploy the system to another computer, we need bootable media.
The whole process of creating an XP disc with the ability to boot is reduced to writing the finished image of the operating system to an empty CD disc. The image most often has the ISO extension and already contains all the necessary files for download and installation.
Boot disks are created not only to install or reinstall the system, but also to check the HDD for viruses, work with the file system, and reset the password account. There are multiboot media for this. We will also talk about them a little lower.
Method 1: disk from image
We will create a disk from the downloaded network windows image XP using UltraISO. To the question of where to get the image. Since official support for XP has ended, you can only download the system from third-party sites or torrents. When choosing, you need to pay attention to the fact that the image is original (MSDN), since various assemblies may not work correctly and contain a lot of unnecessary, most often outdated, updates and programs.


The disk is ready, now you can boot from it and use all the functions.
Method 2: drive from files
If for some reason you have only a folder with files instead of a disk image, you can also write them to a blank and make it bootable. Also, this method will work if a duplicate is created. installation disk. Please note that you can use another option for copying a disc - create an image from it and burn it to CD-R.
In order to boot from the created disk, we need boot file for Windows XP. Unfortunately, it cannot be obtained from official sources for the same reason that support has ceased, so again you have to use a search engine. The file may have a name xpboot.bin specifically for XP or nt5boot.bin for all NT systems (universal). Search query should look like this: "Xpboot.bin download" without quotes.

Multiboot disk
Multiboot disks differ from the usual ones in that they can, except installation image operating system, contain various utilities for working with Windows without starting it. Consider the example of Kaspersky Rescue Disk from Kaspersky Lab.
- First we need to download the necessary material.

- Launch Xboot and drag the Windows XP image file into the program window.

- Next, you will be prompted to select a bootloader for the image. Will suit us "Grub4dos ISO image Emulation". You can find it in the drop-down list indicated in the screenshot. After selecting, click "Add this file".

- In the same way we add a disk with Kaspersky. AT this case bootloader selection may not be necessary.

- To create an image, click "Create ISO" and give a name to the new image, choosing a place to save. Click OK.

- We are waiting for the program to cope with the task.

- Next, Xboot will prompt you to run QEMU to verify the image. It makes sense to agree to make sure that it is working.

- A boot menu opens with a list of distributions. You can check each one by selecting the corresponding item using the arrows and pressing ENTER.

- The finished image can be recorded on a disc using the same UltraISO. This disk can be used both as an installation one and as a “medical one”.
Conclusion
Today we learned how to create bootable media with the Windows XP operating system. These skills will help you if you need to reinstall or restore, as well as in cases of infection with viruses and other problems with the OS.
You will also need device drivers installed on your computer (chipset, sound card, video card, webcam, etc.)
We write the Windows XP installation disc
To burn the Windows installation disc, we need a disk image, a program to burn discs from an image, a writable CD drive, and the actual CD itself.
Download the Windows XP SP3 Professional disk image
Any disc burning program that supports recording from an iso image, such as Nero or DeepBurner, which can be downloaded for free, is suitable.
So, we downloaded the disk image, installed the DeepBurner program. Now consider the process of burning a disc.
Insert a blank CD-R into the drive and start DeepBurner. After starting DeepBurner offers to choose the type of project to be created.
Choose Burn ISO image and click Next.
I don’t know about you, but my project window opened in a compressed form. Therefore, you need to stretch it by grabbing the mouse at the lower right corner or expand it to full screen so that it takes the form as in the figure below.

In the project window, click the button with three dots (Browse) and select the file of the downloaded iso-image of the Windows XP installation disk. In our case, this is a file ZverCDlego_9.2.3.iso.
Now you need to select the recording speed and press the button Burn ISO. In order for the disc to burn better, the speed should be chosen slightly less than the maximum. Now it remains to wait for the disc to be burned. After completing the recording of the Windows XP SP3 installation disc, the drive tray will eject itself. The disk is ready!
Windows XP (internal version - Windows NT 5.1) - operating system (OS) of the Microsoft Windows NT family. It was released on October 25, 2001 and is a development of Windows 2000 Professional. The name XP comes from the English. eXPerience (an experience).
Unlike the previous Windows 2000 system, which was delivered in both server and client versions, Windows XP is an exclusively client system.
According to web analytics, from September 2003 to July 2011, Windows XP was the most used operating system for accessing the Internet in the world. In February 2013, Windows XP was in second place after Windows 7 with a share of 19.1%. The maximum of this value was 76.1% and was reached in January 2007.
How to install Windows XP from disk via BIOS
Now it's time to review the process itself install Windows XP on a computer from a disk.
First of all, you need to configure the boot from the drive in the BIOS. To do this, go to the BIOS menu. How to do this may vary depending on the model of the motherboard. In most cases, this menu can be accessed by pressing the button Del (on some models of motherboards you need to press the key F2) after turning on the computer (during the startup screen saver). It is better to press this key several times for fidelity.
The BIOS menu differs depending on the manufacturer and version. There are two main types of BIOS: AMI and AWARD.
Below are screenshots of AWARD BIOS. You need to go to the menu Advanced BIOS Features.

Here in the menu item First boot Device press Enter and select CD-ROM

After that, press the Esc key to exit to the previous menu, where to select Save and Exit Setup. That's it, now the first device to boot the computer will be a DVD drive. You can go to the process windows installation XP from disk.
Now consider how to set the boot from disk to AMI BIOS
Select tab Boot, and in it we go to the menu Boot device priority

We put the first boot device (1st Boot Device) CD-ROM or DVD-ROM (model of your drive)

In some versions of BIOS, the first device is selected after pressing the Enter key on the desired item and selecting the device, in other devices they are moved up and down using the F5 and F6 keys or + and -
After that, go to the main menu with the Esc key and go to the tab Exit. Select item Exit and Save Changes to save changes and exit.
Now consider the process itself install Windows XP from disk to computer.
We insert the installation disk into the drive and reboot the computer. The disc menu below appears.

Select item Installing Microsoft Windows XP SP3 in manual mode and press Enter.
It should be warned that installing Windows XP SP3 on a computer takes about 40 minutes. So be patient.
On the first screen, press Enter to continue the installation.

Read the next step. license agreement and press F8
Now select the disk partition on which you want to install Windows XP. If the hard drive is new and not yet formatted, you need to create a partition by pressing C.
Select the section and press Enter. If the section already existed, you need to confirm the installation in this section by pressing WITH.

At the next stage, the installation program offers to format the disk. Select item Format Partition on NTFS (Fast) and press Enter.

To confirm formatting, press F
After formatting, the copying process will begin. required files to the hard drive.

After the file copy is complete, the computer will restart.
When the computer boots up, it will start again from the bootable CD. In the disc menu, select
A window for selecting driver packages for unpacking and installation will open. These are the built-in drivers for many devices included in this assembly. If you are installing Windows XP from a distribution package from Microsoft, this window will not appear.

We select the necessary driver packages, ticking off and click OK. If you do not know exactly which drivers neededand which are not, select all. If you have driver disks for all devices ( motherboard, video card, etc.), then uncheck all the boxes to speed up the process of installing the OS. In this case, you will need to install the drivers manually from the disks after the installation of Windows is completed. Read more here: How to install Windows XP drivers.
After clicking the OK button, the unpacking of the driver packages will begin, and when it finishes, the installation of Windows will continue.
The following window will appear for choosing a language and regional standards. If the distribution kit is the Russian version of Windows XP, then nothing needs to be changed here.


In the next window, enter the product key and click Further.
A window appears in which you need to enter the computer name and administrator password. You can not change anything in this window. Then the administrator password will not be set.
In the time and date settings window, set the correct date and time, as well as the time zone.

In the network settings window of the OS, select Common Options and click Further.

In the window working group write the name of the workgroup or domain in which the computer participates. If you do not have a home or office network, you can leave everything unchanged and click Further.

After that, the installation of Windows will continue, after which the computer will automatically restart.
We go into the BIOS and put the first boot from the hard drive, as described at the beginning of the article. Exit BIOS with saving changes.
Now before how to completely install Windows XP on a computer last minutes left.
At boot, the system will prompt you to automatically adjust the screen resolution. Click OK.
In the window windows greetings XP click Further.

A window appears prompting you to select the Windows update mode.

Choose Snooze this action to disconnect auto update system and press the button Further.
The next window will prompt you to configure your Internet connection. Push Skip.
We refuse the offer to register by selecting No, some other time and click Further.

In the final window, click Done.
That's all! Now you know how to install Windows XP from the installation disk to your computer.

It remains to install drivers and programs, but this is already beyond the scope of this article.