
Clickteam produces simple and friendly products for developers: for example, Clickteam Fusion, The Games Factory, Multimedia Fusion. In the same row is the Install Creator program. The main advantage of the product is the quick creation of a distribution using a step-by-step wizard.
The settings sections are arranged in such a strict sequence in the form of tabs. First, the data (Files), the text content of the dialogs (Wizard Text), the window format (Window), additional settings (Options), the uninstaller settings (Uninstaller), the size of the distribution kit (Build) are specified. After clicking on Build, the compilation of the installer starts, all that remains is to specify the location of its location.
The installer takes up 65 KB, including the uninstaller, this is 105 KB. In addition to this, Install Creator uses one of two compression algorithms (zipper / differentiator), the optimal variant is determined automatically. If necessary, the data can be placed in a package separately from the installer.
The functionality of Clickteam Install Creator is unified, some important options are missing. So, multilingualism is not supported, the Russian language is not in the list of localizations at all. Integration with third-party solutions is not provided, so working with large projects (implying many connections in the system) will be inconvenient. The program does not allow you to create updates, patches. However, in the latter case, you can use - the development of Clickteam.
The unregistered version of Install Creator contains ads. The professional version, in addition to removing this limit, allows you to include several editions in the distribution kit, set a license limit for the installer user.
Summary. Install Creator features will be in demand when working with simple projects. The resulting installers contain a basic set of user options, among which there is no choice of languages or installation profile. Definitely, this is the simplest solution among all the installation complexes mentioned in the review.
Actual Installer

Actual Installer is a program for creating fairly complex Windows Installers without the use of scripts. The basic set of features includes multilingualism, effective compression, detailed interface customization, command line and other functions listed below.
A step-by-step wizard is not supposed to be used, but the options window for the new project is available. After defining the basic product information, you can go to the main program window. Options are located in 5 sections - "General", "Installation", "Dialogues", "System" and "Registry".
In the General section, information about the project is indicated, and the appearance of the installation wizard is also configured here. During the process, the installer can check system requirements (such as OS version, user privileges) and dependencies (Microsoft .NET Framework, Internet Explorer, Adobe Reader, Java, SQL Server, and others). If these components are missing, the installer will require the user to download and install them.
In Installation ("Installation") - the location of files and folders, the location of the executable file, the settings for the installation, update and uninstallation processes. Both processes can run silently without requiring user intervention. In addition to the installer, it can be used (Actual Updater).
Dialogs ("Dialogs") provide access to the "stuffing" sections, including the text of the license agreement, readme file, including in RTF format. Here - the choice of localization languages, and the Russian language is on the list. Unnecessary sections of the installer are easy to disable.
System (“System”) - setting up system changes made during installation: shortcuts, registry keys, variables and user commands.
Register ("Registry") - setting file associations, environment variables, libraries.
After setting the necessary options, just click on the Build Project button - the installer is ready to run. If an important option was missed when creating the installer, Actual Installer will let you know about it during compilation and indicate an error.
Summary. Actual Installer includes almost all standard options and project options. This is an "intermediate" option between very simple ones (like Clickteam Install Creator) and more heavy-weight solutions, which will also be discussed.
CreateInstall

CreateInstall is a toolkit for creating installers. It is based on two features - control over the installation process and unlimited extensibility. Both features are implemented thanks to the scripting tool.
The CreateInstall interface is divided into 3 tabs - "Project", "Installation script" and "Uninstallation script". The first section allows you to set general installer settings: product information, supported languages, paths, appearance. Additionally, the installer can be digitally signed and a password can be set.
"Project" is not an equivalent replacement for the next two sections, i.e. to create a distribution, you need to carefully configure the installation and uninstallation scripts. Relevant parameters are displayed as groups, you can display them in a single list.
An add-on for CreateInstall is the Quick CreateInstall utility. It greatly simplifies the creation of an installer, providing only basic project settings. From Quick CreateInstall, the project can later be imported into CreateInstall.
The project code is not intended for independent editing, transfer to the IDE environment, export. Although the Gentee language has great potential: at a minimum, these are variables and functions, conditional expressions and syntax based on C, C ++ and Java.
There are 3 editions of the program - full, light (simple) and free. The list of differences between them is published. For the most part, the missing features of the free edition of the program are visible when navigating through groups of script settings.
The interface and help are available in Russian.
Summary. CreateInstall is a functional and easy to understand environment. The CreateInstall toolkit is not so poor and allows you to manage on your own. But the disadvantages still include the isolation of the program "in itself", meaning the functions of import and export.
Advanced Installer

Advanced Installer is based on Windows Insaller technology, allowing you to create msi-, exe- and other types of distributions. This is facilitated by a thoughtful interface and work with projects. In Advanced Installer, you can find many features that are not found in other similar complexes, as discussed below.
First of all, the variety of projects is noteworthy: this includes installers, Java installers, updates, add-ons, merge modules, and others. The Installer menu section contains commands for importing projects from Visual Studio, RAD Studio, Real Studio, Visual Basic. Here, the potential of Advanced Installer in interaction with IDEs is revealed.
A detailed configuration wizard is provided for each of the selected project types. There are common templates - Simple, Enterprise, Architect or Professional. Most of the projects are available only for certain types of license, public projects are indicated as None in the License Required column.
As already mentioned, when creating a project, you can use a step-by-step wizard, where, in particular, you can select the distribution method for the package, localization languages, customize the user interface, enter the license text, and other options. Advanced Installer allows you to choose the distribution option for the program - leave the data without compression, split into CAB archives, save to MSI, etc., add a digital signature, require a serial number, etc.
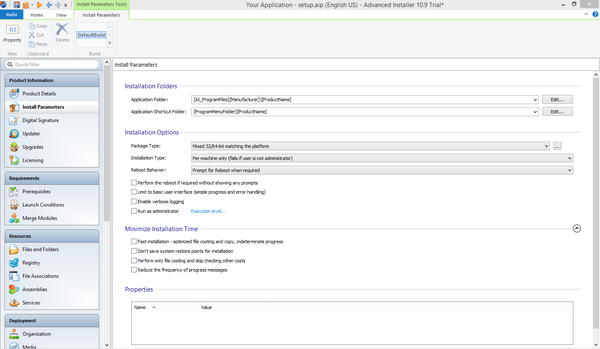
The main window of the Advanced Installer (project editor), in simple display mode (Simple), contains several sections:
- Product Information - enter product information, installation options.
- Requirements (Requirements) - an indication of hardware and system requirements, software dependencies. It is also possible to create custom conditions.
- Resources (Resources) - editor of resources (files and registry keys).
- Deployment - Select the type of product distribution. It can be MSI, EXE or web installer. For MSI, EXE resources can be placed separately from the installer.
- System Changes - environment variables.
Resource selection can include files, registry keys, environment variables, configuration ini's, drivers, databases, and translations. You can also add other resources, such as services, permissions, associations, and more, with federation modules.
For more complex tasks, you can use custom actions, EXEs, DLLs, or scripts written in C, C++, VBS, or JS. A convenient editor is provided for creating scripts.
However, it should be noted that only a small part of the sections is available in Simple mode. When working with the Advanced Installer in trial mode, it makes sense to go into the settings and switch to another mode of working with the project. After these actions, new subsections of the editor become available.
Summary. Thanks to various editions of the product (including free), import options, many templates and schemes, the project editor - Advanced Installer will be of interest to a wide audience.
BitRock InstallBuilder

InstallBuilder is a cross-platform environment for creating installers. Supported systems include: Windows ME - Windows 8, Mac OS X, FreeBSD, OpenBSD, Solaris (Intel & Sparc), AIX, HP-UX, IRIX, Linux (Intel x86/x64, Itanium, s390 & PPC). Installers are available for both desktop and network software. The first part of the guide has already covered the IzPack product, but InstallBuilder is characterized by support for writing languages, including not only Java, but also PHP, Perl, Python, Ruby, C / C ++ and .NET / Mono.
The program interface is available in Russian. A very simple graphical shell is used to work with the project. There are the following sections with settings:
- Product Details - information about the project.
- Files ("Files") - explorer interface for adding files
- Advanced ("Advanced settings") - the most interesting section, where, perhaps, the full power of BitRock Installer is revealed. To work with projects, the XML format is used (see the WiX overview in the first part), collaboration is possible, manual configuration of projects with scripting support. Built-in actions allow you to automate installation processes and combine tasks, making them available in a few clicks. In this way, you can check dependencies, add environment variables, change the registry and file system, and so on. Scripts are edited using a built-in, very simple XML editor.
- Customization - Customize the installer's user interface, environment variables, post-installation actions, platforms, permissions, and compression. ZIP/LZMA compression is used for compression. You can create a silent installer that runs in text mode.
- Packaging ("Packaging") - there is a built-in debugger for tracking errors. When building, it is easy to create a cross-platform installer. At the output, it uses the "native" OS environment (this applies to Windows, KDE and Gnome graphic systems).
Summary. BitRock InstallBuilder is recommended primarily for building cross-platform products. The script based on XML specifications is easy to handle, the project is easy to import and export for editing in an external environment. Thus, based on this XML script, you can quickly generate installers for all required platforms.
InstallMate

InstallMate is a toolkit for creating distributions based on the Windows Installer. Main features: intuitive graphical environment, wide selection of installation elements, dependency checking, detailed customization of the installer appearance, support for components, localizations and extensions. Distributions created with InstallMate are compact and fast.
The wizard for creating a new project allows you to select an existing template and specify the initial parameters - localization languages (one or more), product name.
You can import the created project or use the InstallMate editor. By the way, the import capabilities are not impressive: Tarma products and Visual Basic projects are supported.
The main window of the program contains sections with parameters, conditionally divided into three sections:
- General settings: detailed information about the project, software dependencies, system requirements, components, and installer options. In the Package sidebar, you can also specify the type of installer, compressions, download link (in the case of a web installer), installation password. You can add multiple packages to one installer.
- Components: inclusion of elements and links in the distribution kit: these are files and folders, registry keys, ini-configs, environment variables, file associations, COM classes, services.
- Installer options: using the editor, you can edit the text of the dialogs. Flexible localization settings are provided, InstallMate supports 19 languages by default. You can create a single distribution with multiple localizations, or multiple projects with the same language. In the same section, user actions are available, as well as variables - including 250 . You can extend the functionality of the package using extensions and DLLs.
As noted, when creating an installer, you can use templates. In addition to project templates, it is possible to create packages based on components by defining groups of elements. Of the other options, it is worth noting hidden and silent installation and uninstallation, two types of compression (Deflate or LZMA).
The full list of features is presented.
Summary. A professional environment for creating installers with a really user-friendly interface and quick tools: you can quickly switch from one localization language to another when creating a distribution kit, test the project. Lacks a functional step-by-step setup wizard, import capabilities. The strong side is the presence of all standard functions, work with variables and actions.