
Suppose a colleague sent your colleague by e-mail a document that should serve as the basis for his document. Therefore, it saves this document under a new name and configures in accordance with his needs. He never comes to mind that the colleague could leave his notes in the original document, because they are not visible in his document.
Imagine another situation. You used the registration feature of changes in Word to track changes made to your resume. Now you want to send a resume to the future employer who should see the result of editing, and not follow the progress of your thoughts.
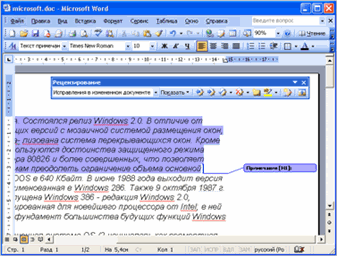
Be that as it may, it will be unpleasant when the addressee is reporting that due to all these crossings, emphasizing and carrying a document with difficulty reading. See: In one paragraph there were three stricken wording, and the final formulation is displayed in the form of an underlined text. Hardly the resume will enjoy the employer.
However, at the time of sending a document of this text there was not. Where did he come from and why was it displayed in Word? What needs to be done so that the Word application functions exactly as the user needs?
Function registration function
Perhaps the user, without conscious, works with Word application when the changes in the registration function or notes is enabled. As a rule, if this function is enabled, the remote items are displayed in the form of calls on the page fields, and the inserted are underlined. Remote items, as well as notes (notes), can also be displayed directly in the text.
You can hide fixes and notes in various ways, but all changes made when the change in the registration function is enabled, as well as all the inserted notes will remain in the document until the corrections are accepted or rejected, and notes are removed.
Note: Hide recorded fixes and notes and remove them from the document - this is not the same thing. Hiding recorded fixes simply allows you to view a document without fading in overclocking, underscores and callouts.
How to check the document for fixes and notes?
In Word 2010, the possibility is available entitled "Inspector of Documents", which allows you to check the document for the presence of corrections, notes, hidden text and other personal information. To check the document, follow these steps:
Open the document you want to check for corrections and notes.
Open tab File.
On the tab Intelligence Press the button Search for problems And select Team Inspector documents.
In the dialog box Inspector documents Press the button Check.
View the check results. If notes and recorded fixes are found, it will be proposed to click Delete all recorded fixes Near Notes, corrections, versions.
Press the button Repeat check or Close.
How to get rid of recorded fixes and notes?
In order for the document does not remain recorded fixes and notes, the corrections must be taken or reject, and the notes are to delete. Perform the following steps.
If this or that checkbox is not installed, click the appropriate item.

How could record fixes and notes could be in the document?
Could the user think that removed notes and recorded corrections, or received a document, absolutely not assuming that it contains them? Why are these elements are saved by the Word application, and he does not even suspect about it?
Perhaps he or the sender of the document made corrections or notes hidden so that it was easier to read the document. However, hidden notes are not deleted from the document. They remain in it until certain actions are performed. Depending on the version of the Word application and the settings used, these fixes and notes can be displayed again when someone else opens the document.
If it is necessary that the corrections and notes are not visible to other users, you need to accept or reject fixes and delete notes.
How to identify hidden fixes and notes?
There are several ways to hide fixes and notes so that the user does not notice their presence in the document.

Why in Microsoft Office Word recorded fixes and notes are displayed by default?
Displaying fixes and default notes allows you to avoid unwanted dissemination of documents containing such corrections and notes. Parameter Corrections in a modified document Installed in the field Display for verification default.
How to save corrections and at the same time hide them from strangers?
Create a shared copy to distribute and leave a private copy to yourself. In the general version of the document, accept or dismiss all the fixes and delete all the notes as described in this article. In the private version of the correction and notes can be saved.
Reviews
For collaboration on documents in Word 2010, the Review Tab is used. On it we use two main features: corrections and notes.
Figure 1 - corrections and notes on the "Review" tab
Notes are used for comments to the text. If the editor sees a repeating error, it leaves a note asking it everywhere. Notes also offer alternative options for phrases recommended by the editor. In addition, in the notes, we sometimes ask more details to highlight any aspect to make an article more interesting, or reduce the text to simplify its understanding.
Corrections serve to make changes to the article. We use the correction tracking mechanism, so the author can see its version of the edited text fragment along with the editorial editor. As a rule, the correction made means that the editor strongly recommends that the author accept it. In this case, the ability to reject the correction, of course, is preserved. Edit text We mainly use to correct obvious errors - grammatical and stylistic (for example, rephrase of unsuccessful or long proposals). It is also not necessary to correct fixes that improve the perception of text, such as replacing the long listing of the same type points on the marker list.
Review of the eyes of the editor
Let's see how these opportunities work in practice when the document enters reliable hands editor.
Notes
With notes, everything is very simple. You need to highlight the text, click the "Create Note" button and add your comment.
Figure 2 - Note to text
Notes are located in the calls, which are placed by default on the right field of the document. Each note is automatically signed by the user's initials that left it. All these parameters can be changed, and this will be discussed slightly below.
Corrections
At first glance, in the "Tracking" group only four buttons. But each of them opens a list with additional features.

Figure 3 - Tracking changes and correction parameters
Patch tracking is turned on by pressing the "Fix" button, which immediately acquires golden color, thereby signaling the on mode. In it, Word 2010 remembers all inserts and deletes, as well as changes in document formatting. Press low part The buttons will open the additional menu, the first paragraph of which includes or disables tracking.
By clicking the "Parameters" button, you can adjust the type of your edit - colors, types of lines, document marking. Here is the location of the notes - you can put in their left document field and set the width of the callouts, as well as disable the display of the lines that bind them with the text.
All corrections are associated with the name of the user, which is specified in the Word 2010 personal settings. The "Change User" button leads to them.

Figure 4 - Personal user parameters
In notes, as you have already seen, initials are used, and in deletions and inserts the full name is indicated.
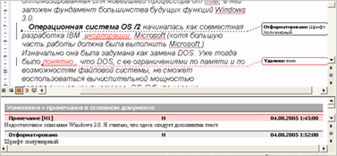
When in the document a lot of fixes, it becomes much more difficult to perceive it, because by default it is displayed both the original text and the corrected.
Figure 5 - corrected text by default is highlighted in red
A much more pleasant to the eye editor would be the final version, is not it? And this opportunity is available. To facilitate perception in Word 2010 there are four modes.

Figure 6 - Display Modes Corrected Document
In order not to be lost in editors, the editor includes the "Changed Document" mode. At the same time, all text fix and tuning indicators are immediately stopped displayed. If the editor, tired of numerous fixes, is still confused, it can always switch to the "original document" mode and see what was written in originally.
In addition to the document mode, you can flexibly configure the display of corrections in the callouts. Show Correction Button opens a list of all possible fixes that Word 2010 displays by default.

Figure 7 - setting up the display of corrections and notes
For example, I often disable the display of fixes (formatting, as well as add and delete), but leave notes. Please note that you can easily choose edits and comments only a specific reviewer.
Another element of the tracking group is the "Check Area" button. It, as in the case of the "Correction" button, acquires a golden color when the area is turned on, although it is difficult to notice it. It is convenient to use it in combination with the display modes of the document and corrections.

Figure 8 - Check area can be displayed left or lower
For example, in Figure 8, it can be seen that the "Modified Document" mode is selected. In it, fixes and notes are not displayed in the callouts. However, when adding a note, the check area automatically opens, in which all edits are visible in accordance with the parameters specified by the "Show corrections" button. I disconnected the display of fixes in formatting, so only notes, removal and inserts are displayed.

Figure 9 - Checking area with patches. To change its scale, press and screw the mouse wheel.
From the report you can see the total number of corrections, however, note that the counting is "with a filter". It reminds me that some fixes are not displayed. Since formatting cases are not recorded, I can guess that they are disabled without pressing the "Show corrections" button. Useful viewing area can be enlarged, scissors using the arrow buttons in the upper right corner.
In my opinion, the summary would have become more convenient if directly in it could be hidden or displaying various fixes, going around without the "Show corrections" button on the ribbon. However, the display of inserts and deletes is combined, so the interface would be non-trivial.
On this story about the possibilities of reviewing the eyes of the editor, you can finish. The reviewer has enough tools to correct the document and convey to the author of the wishes for its content and design. Now let's see what the author will do when he receives a review on his article.
Opening a document with editorial plants and notes, the author may experience a wide range of senses - from deep satisfaction to full shock. In part, it depends on the picky editor, but to a greater extent - on the quality of the original article sent by the author. If it was not very successful, in each paragraph, the picture may be like in Figure 10.
Figure 10 - Fragment of a document with numerous edits
To quickly bring the material to mind, the author must take two postulates. First, the editor is the ultimate authority, so it makes sense to argue with him because of each editing (although you need to be able to defend your opinion). Secondly, the editor will not spend time on making edits if they do not improve the article. After all, one of the golden review rules is to make only those changes that make the material better.
Evaluation of the scope of work and selection of the mode to display the document
When the editorial editor is not enough, the author requires minimal efforts, so the procedure of particular importance does not matter. If there is a lot of edit, the document looks completely unreadable. But do not despair. First of all, you need to assess the amount of work, i.e. Determine how many changes made to the document editor. This will help the area of \u200b\u200bverification.
In the summary (Fig. 9 above) it can be seen that a number of corrections are made to the document, and 19 notes are added. In this case, it is better to display a document as you saw the editor.

Figure 11 - Displays the changed document only with notes
Instead of viewing "Changed Document", you can use "Changed document: Show corrections" - then all fixes and notes will be displayed as a callout. It is from the notes in which the editor expresses wishes to the document, and it is necessary to start work, and the corrections can be left for dessert.
Notes
With each note will have to be dealt with separately. The easiest way to use navigation by notes, thus kills two hares.

Figure 12 - Navigation by Notes
First, the displacement of the document is accelerated, and secondly significantly reduces the likelihood of skipping important note. I note that you can navigate from the note to the note using the new Office 2010 search, but it will be a separate story.
When a note concerns the refinement of the article, you can agree with it and make the necessary changes to the document, or disagree and explain its position. Often, the editor's note makes sense to answer that when viewing the next revision of the document it was clear what the author did. To do this, just click on the note, and then click the "Create Note" button on the panel. In this case, Microsoft Word clearly denotes the connection between the notes.
Figure 13 - Reply to Note
As can be seen in Figure 13, both notes lead to one dedicated fragment of the text. In addition, VS 27R 26 in the response note means: "Note 27 left VS in response to Note 26 from A" (R - means reply, i.e. answer).
You can delete any response to response, using the appropriate item in the context menu of the Notes or the "Delete" button (Fig. 12) located on the tape, with which you can delete all notes immediately. Having finished with notes, you can go to corrections.
Corrections
Corrections are two types:
- Additions and deletions united accidentally (Figure 7 or 11), because This is the links of one chain. Imagine that the editor rearranged part of the offer in places, first cutting out the tex fragment, and then inserting it. At the same time, two corrections are fixed - first removal, and then add.
- Formatting includes a change in the type and size of the font, transformation into lists and all other features of the "font" group, "paragraph" and "styles" on the Home tab
Working with changes in the text of the article is carried out by analogy with notes - you can navigate from one correction to another. The only difference is that corrections can be taken and rejected.

Figure 14 - Corrections can be taken and rejected, as well as move from one to another
Buttons "Accept" and "reject" make a little more than fit into their brief names. After performing the action, they automatically move you to the next note, which is very convenient. IN context menu Notes of such an opportunity, however, no.
To simplify work and unload a document, you can safely trust the editor in formatting. It is enough to enable only their display by the "Show corrections" button (Fig. 11), and then click the bottom of the "Accept" button and apply all displayed changes (Fig. 14). As you can see, the ability to configure the display of corrections acquires an additional meaning.
Now, returning removal and corrections, you can quickly move on them up and down the document. If you need to quickly compare the corrected text with the original, you can switch to the "Source Document" mode. It is not necessary to make corrections one by one. It is easier to view them and reject those with which you disagree and then take immediately all the remaining (Fig. 14).
Conclusion
By completing this article, I want to emphasize that the review is not at all the confrontation of the author and editor, but a means of joint work on the document. At the same time, the article is improving, and both parties remain in win. Carefully reading the article, the editor is voluntarily or involuntarily expanding its horizons. And even if immediate practical application This knowledge does not occur, the information is remembered, and if necessary, it is always possible to return. For novice authors, a good review is very valuable because it opens eyes to various flaws of your letter, whether it is the structure of the article or the style of presentation. Yes, and an experienced author will never refuse to look at his work through the eyes of a competent reviewer.
So, all comments are taken into account, and corrections are accepted. Article ready? Do not hurry, but better check the spelling. After numerous corrections, linings may occur, and once again make sure that the text literacy does not hurt. The audit of spelling will be discussed in the next article.
Easy to fix the text on paper. Taking a red handle, you can always strike out the incomprehensible fragment of the text, and on top to write something more recently. You can leave your comments, showing the author of the text of its flaw. And most importantly - when editing and original text does not change, and to solve the author himself, to make corrections or not. But it is not enough: such corrections will not show the person who is far from you. And if they make dozens of persons, what will the printout of the draft document turn?
If you are using review in the Word text editor, you can post comments on the fields and correct the text by jumping the source code. The document with all the corrections and marks will exist in electronic form, and it can be sent by the World Wide Web. Well, the author of the document, after studying the correction, one pressing the button can take them (all or selectively). For such work on documents in Word`e uses the Review Tab. It has two main features: corrections and notes.
Rules text
Notes
Rimets are used to leave a comment on the text. It is very important not only to make corrections, but also convince the author of the document to agree with them. Or, for example, you see repeating many times an error. Then you can leave a note asking for it in the whole text, offer alternative options for phrases. You can ask more than to highlight any aspect, bring the arguments, otherwise structure, add or, conversely, reduce text.
Program Microsoft Word. Uses the correction mechanism, so the author can see his version of the edited text fragment along with the edit of another person. Let's see how these capabilities work in practice when the document falls into the reliable hands of the reviewer.
Picture 1
Collapse
With notes, everything is very simple. You need to highlight the text, click the "Create Note" button and add your comment to the dedicated fragment.
Notes are located in the calls, which are placed by default on the right field of the document. If notes changed by several users, they are marked with different colors. The authorship of this or that note is always visible on the screen (see Figures 4 and 6).
Corrections
Patch tracking is activated by pressing the "Fix" button, which immediately becomes selected, thereby signaling about the mode. In it, Word shows all inserts and deletes, as well as changes in document formatting. If you right-click on it, the optional menu will open, the first paragraph of which includes or disables tracking.
By clicking the "Parameters" button, you can adjust the type of your edit - colors, types of lines, document marking. However, by default, the corrected text is highlighted in red. Here you can also see the location of the notes, you can set the width of the callouts. See Figure 3.
When a lot of fixes in the document, it becomes harder to perceive it, because by default it is displayed as the original text and the corrected. In order not to be lost in editing, you can enable the "Source Document" mode (see Figure 10). At the same time, all indicators of text fixes and tuning are stopped displayed. So if you, tired of numerous fixes, confused, you can always leave on the screen only what was written initially.
You can flexibly configure the display of corrections in the calls, for example, select only formatting or adding and removing fragments. Show Correction Button opens a list of all possible fixes that Word shows the default. Here you choose the desired you, incl. You can easily select edits and comments only a specific reviewer.
Figure 2.
Collapse

We agree or reject
Opening a document with edits and notes, the author may experience a wide range of senses - from deep satisfaction to full shock. To a greater extent, it depends on the quality of the source document. If it was, to put it mildly, unimportant, in every paragraph the picture can be about this:
When the revision of the reviewer is not enough, the author needs minimal efforts and the procedure for specific importance does not matter. If there is a lot of edit, the document looks completely unreadable. But you do not need to fall into the despondency. First you need rate work , determine how many changes made to the Reviewer document. This will help "check area":
Choose a way to display the "Correction in the source document" document - then all the corrections and notes will be displayed as callouts. S. notes In which the reviewer expresses wishes to the document, and it is necessary to start work, and the corrections can be left for later.
With each note will have to be dealt with separately. The easiest to use navigation. In the "Review" mode, there is a paragraph as "Next Note" or "Previous Note". When choosing this item, you will never betray and make everything in order: the movement is accelerated by the document and the likelihood of missing something important is reduced.
Figure 6.
Collapse

When a note concerns the finalization of the text, you can agree with it and make the necessary changes to the document either disagree and explain its position. Often it makes sense to answer that when viewing the next revision of the document it was clear what the author did. You need to click on the note, and then click the "Create Note" button on the panel. In this case, Microsoft Word clearly denotes the connection between the notes.
You can delete any response to response, using the appropriate point in the context menu of the Notes or the "Delete" button located on the tape, with which you can delete all the notes at once. Having finished with notes, you can go to corrections.
Corrections There are two types:
- additions with removal and
- text formatting.
Additions and removal we combined into one group, since it is the links of one chain. Imagine that parts of the sentence are rearranged by places, first the fragment of the tex was cut out, and then rearranged to another place. In this case, two corrections will be recorded - first removal (in Figure 7, this is a stressed text), and then add (there, underlined text):
Formatting is a change in type and size of the font, transformation into lists and all other capabilities of the "font" group, "paragraph" and "styles" on the Home tab.
Working with changes in the text is carried out by analogy with notes - you can navigate from one fix to the other. The difference is that corrections can be taken and rejected.
Buttons "Accept" and "reject" make a little more than fit into their brief names.
In addition, it is not necessary to make corrections one by one. It is easier to view them and reject those with which you disagree and then take immediately all the remaining.
There are two buttons with blue arrows on the toolbar (called "back" and "Next", see Figure 9). They are used for quick navigation and corrected, and notes.
Switching between possible ways to display a document, you can see:
- then the author's initial document (without "creativity" of subsequent persons);
- then the initial document, but already with the allocation of the proposed corrections and with notes;
- then a new document ready for a printout in the version in which it proposes to make a match;
- then a new document, but with a visual demonstration of the proposed changes.
All these document display options are selected in the top menu:
If, at the end of the consideration of the proposed edits, you need to quickly match the corrected text with the original, you can switch to the "Source Document" mode.
Compare
When several users work on one text, find and sort out all the changes made much more difficult than seem at first glance. Especially if they did not bother to allocate the changes made (perhaps, in the hope that you "swallow something without noticing")! Alone manually look for them very laborious.
However, in Word 2007, everything is arranged much easier and more pleasant. It is enough to make a few clicks "Mouse" to get an idea of \u200b\u200bthe changes made. So select the "Compare" function on the "Review" tab, then the program will offer you to specify the two Words files that you wish to compare with each other. Select a file with your original text and new file.obtained after coordination. After downloading them, Word will deploy several windows at once (see above):
- on top to the right will be the source document,
- from the bottom right - changed,
- and in the center - a virtual document, which includes all changes made on the document;
- left - panel with statistics and list of changes.
Clicking to absolutely any element in the list will allow you to switch to this change in the central window. In the windows of the compared documents, the user can see the location of the changed fragment.
Attention! When you compare two documents, you can only edit text in the central window.
The order of comparing documents is elementary: choose from the left panel some item and view it in the central window. If the change is received, click the "Accept" button, and if you deflect, then the "Reject and Go to the next" button. All actions are visually displayed in the central window.
Finally, the last step to be taken after review is to maintain the results of your work as a new document. Congratulations, you have successfully coped with the task.
Protection against changes
If you want no one, besides you, to make changes to the document, then you will help the "Protect" panel. After clicking on the "Protect Document" button, the right edge of the window appears the vertical panel "Limit formatting".
Figure 12.
Collapse

Check the Limit Set Style Set checkbox and specify which text items can be formatted if you need to work with the document. In those that you do not choose, a person will not be able to make changes.
To limit edit, you must check the "Allow only specified document editing method" and select "Record Patch" from the drop-down list. This most you allow adding comments to the document, delete, insert and move the text. If you want other users to allow only to leave notes, then you need to select "Notes". If you are very "strict", you can only allow you to read the document you create, without the right to make anything in it.
To enable protection, click on the "Yes, Turn on Protection".
To remove the protection, you must click the "Protect Document" button and in the list that appears, select the checkbox next to the "Limit formatting and editing" inscription.
Figure 13.
Collapse

In conclusion, we note that the review in the Microsoft Word program is an excellent tool for working together on the document. The content of the written is improved, and all directions remain in win. For novice employees, such a process is very valuable because it opens eyes to various disadvantages of the compiled document or text, be it structure, argument or style of presentation. And an experienced worker will never refuse to look at his work through the eyes of another person.
Involves sharing documents. Written text you can send the editor, and after checking it, see all comments and comments directly in the file. Using edit mode in the Word, you can reduce the time on the material discussion and clearly specify the author on its errors.
Review tools allow you to insert comments in fact "red handle", crossing the source text. The creator of the document can take all the fixes literally one button or reject them, remaining in its opinion.
When working with edits, two parameters are involved in the Word:
- Notes - allow you to leave the editor comments: if he sees a repetitive error, then it can allocate it once and ask for it everywhere. There may be alternative options for words and phrases, please more detailed lighting aspects or opposite - abbreviations.
- Corrections - allow you to change the article while maintaining its original. This is necessary for editing obvious errors - stylistic or grammatical.
How to enable edit mode in Word 2013, 2010, 2007?
In order to start working in this mode, it follows: Go to the Word text editor to the "Review" tab and select "Correction".

Word tools in this mode work as follows:

Turn on the edit mode in the Word 2003 version
In this Word release, you can correct errors from the "Service" menu, and the notes are located in the "Insert" item. Other settings work as the same principle.
How to remove corrections in the Word
When this function is disconnected, you can change the text without letting it up. Deactivation of editing mode occurs after pressing the button with the corresponding name in the "Review panel". To remove corrections in, press the combination Ctrl + SHIFT + E.
Video instruction
It sometimes happens that with the same document you have to work simultaneously to work several users. In this case, we will help the reviews and editing tools. text editorcollected on the ribbon "Review.
On the panel "Tracking" There are tools that allow you to track changes made to the document. To do this, install the button. "Corrections" In the "pressed" state.
Button "Takes":
- "Show corrections in the callouts" - Notes and fixes will be displayed as callouts;
- "Show all fixes in the text" - all fixes and notes will be displayed directly in the text;
- "Show only notes and formatting in the callouts" - Only notes and formatting of the document will be displayed in the callouts.

"Checking Area" button opens additional panelwhich displays the chronological order to make corrections and add notes.

Using the top drop-down list, you can configure the display of changes in the document:
- source document;
- corrections in the source document;
- modified document;
- corrections in a modified document.
To exit the change mode, you need to "press" the button "Corrections".
If you need to hide the corrections made in the document, you must remove the corresponding checkboxes in the drop-down list. "Show corrections".
On the "Change" panels Collected buttons allowing to move between edits entered into a document, as well as accept or reject the changes made.


To add (and subsequent control) notes to the document intended panel. To create a note, you need to install the cursor to the desired document place and click the button. "Create Note". In this case, the text fragment is highlighted in red, and the field appears on the fields to enter the note and the navigation buttons and removal buttons are available on the panel.

To protect the document from the changes, the panel serves "Protect". After pressing the button "Protect Document" The right edge of the window appears a vertical panel "Limit formatting".

Check the box and in options "Settings .." Specify which design items can be formatted with further work with the document.

To restrict editing you need to check the box "Allow only the specified way to edit the document" and from the drop-down list to select item "Record fix". With this, we allow you to add comments to the document, delete, insert and move the text. If we want other users to allow only to leave notes, then you need to choose .
To enable protection, click "Yes, to include protection".
To remove the protection, you must click "Protect Document" And in the list that appears, uncheck the checkbox "Limit formatting and editing".

Panel "Compare" Designed to compare documents in which changes were made by different users.
To combine patches, you need to select the option "Combine ..", Specify the original file, document with correctness, select in which document changes will be displayed.
To compare documents, select the option "Compare ..". After similar settings, a third document will be created in which all the corrections made to the source document will be.
»The authors send their work in microsoft format Word. All articles are reviewed before publishing, i.e. We check them for compliance with our style leadership, which includes the setup requirements, terminology and document design. We also provide recommendations on improving the structure and content of the article. Our authors dialogue is conducted using Microsoft Word 2010 reviewers. This article describes how it happens.
Reviews
For collaboration on documents in Word 2010, the Review Tab is used. On it we use two main features: corrections and notes.
Figure 1 - corrections and notes on the "Review" tab
Notes Used for comments to the text. If the editor sees a repeating error, it leaves a note asking it everywhere. Notes also offer alternative options for phrases recommended by the editor. In addition, in the notes, we sometimes ask more details to highlight any aspect to make an article more interesting, or reduce the text to simplify its understanding.
Corrections Serve to make changes to the article. We use the correction tracking mechanism, so the author can see its version of the edited text fragment along with the editorial editor. As a rule, the correction made means that the editor strongly recommends that the author accept it. In this case, the ability to reject the correction, of course, is preserved. Edit text We mainly use to correct obvious errors - grammatical and stylistic (for example, rephrase of unsuccessful or long proposals). It is also not necessary to correct fixes that improve the perception of text, such as replacing the long listing of the same type points on the marker list.
Review of the eyes of the editor
Let's see how these opportunities work in practice when the document enters reliable hands editor.
Notes
With notes, everything is very simple. You need to highlight the text, click the "Create Note" button and add your comment.
Figure 2 - Note to text
Notes are located in the calls, which are placed by default on the right field of the document. Each note is automatically signed by the user's initials that left it. All these parameters can be changed, and this will be discussed slightly below.
Corrections
At first glance, in the "Tracking" group only four buttons. But each of them opens a list with additional features.

Figure 3 - Tracking changes and correction parameters
Patch tracking is turned on by pressing the "Fix" button, which immediately acquires golden color, thereby signaling the on mode. In it, Word 2010 remembers all inserts and deletes, as well as changes in document formatting. If you press the bottom of the button, the optional menu will open, the first paragraph of which includes or disables tracking.
By clicking the "Parameters" button, you can adjust the type of your edit - colors, types of lines, document marking. Here is the location of the notes - you can put in their left document field and set the width of the callouts, as well as disable the display of the lines that bind them with the text.
All corrections are associated with the name of the user, which is specified in the Word 2010 personal settings. The "Change User" button leads to them.

Figure 4 - Personal user parameters
In notes, as you have already seen, initials are used, and in deletions and inserts the full name is indicated.
When in the document a lot of fixes, it becomes much more difficult to perceive it, because by default it is displayed both the original text and the corrected.
Figure 5 - corrected text by default is highlighted in red
A much more pleasant to the eye editor would be the final version, is not it? And this opportunity is available. To facilitate perception in Word 2010 there are four modes.

Figure 6 - Display Modes Corrected Document
In order not to be lost in editors, the editor includes the "Changed Document" mode. At the same time, all text fix and tuning indicators are immediately stopped displayed. If the editor, tired of numerous fixes, is still confused, it can always switch to the "original document" mode and see what was written in originally.
In addition to the document mode, you can flexibly configure the display of corrections in the callouts. Show Correction Button opens a list of all possible fixes that Word 2010 displays by default.

Figure 7 - setting up the display of corrections and notes
For example, I often disable the display of fixes (formatting, as well as add and delete), but leave notes. Please note that you can easily choose edits and comments only a specific reviewer.
Another element of the tracking group is the "Check Area" button. It, as in the case of the "Correction" button, acquires a golden color when the area is turned on, although it is difficult to notice it. It is convenient to use it in combination with the display modes of the document and corrections.

Figure 8 - Check area can be displayed left or lower
For example, in Figure 8, it can be seen that the "Modified Document" mode is selected. In it, fixes and notes are not displayed in the callouts. However, when adding a note, the check area automatically opens, in which all edits are visible in accordance with the parameters specified by the "Show corrections" button. I disconnected the display of fixes in formatting, so only notes, removal and inserts are displayed.

Figure 9 - Checking area with patches. To change its scale, click
From the report you can see the total number of corrections, however, note that the counting is "with a filter". It reminds me that some fixes are not displayed. Since formatting cases are not recorded, I can guess that they are disabled without pressing the "Show corrections" button. Useful viewing area can be enlarged, scissors using the arrow buttons in the upper right corner.
In my opinion, the summary would have become more convenient if directly in it could be hidden or displaying various fixes, going around without the "Show corrections" button on the ribbon. However, the display of inserts and deletes is combined, so the interface would be non-trivial.
On this story about the possibilities of reviewing the eyes of the editor, you can finish. The reviewer has enough tools to correct the document and convey to the author of the wishes for its content and design. Now let's see what the author will do when he receives a review on his article.
Review of the eyes of the author
Opening a document with editorial plants and notes, the author may experience a wide range of senses - from deep satisfaction to full shock. In part, it depends on the picky editor, but to a greater extent - on the quality of the original article sent by the author. If it was not very successful, in each paragraph, the picture may be like in Figure 10.

Figure 10 - Fragment of a document with numerous edits
To quickly bring the material to mind, the author must take two postulates. First, the editor is the ultimate authority, so it makes sense to argue with him because of each editing (although you need to be able to defend your opinion). Secondly, the editor will not spend time on making edits if they do not improve the article. After all, one of the golden review rules is to make only those changes that make the material better.
Evaluation of the scope of work and selection of the mode to display the document
When the editorial editor is not enough, the author requires minimal efforts, so the procedure of particular importance does not matter. If there is a lot of edit, the document looks completely unreadable. But do not despair. First of all, you need to assess the amount of work, i.e. Determine how many changes made to the document editor. This will help the area of \u200b\u200bverification.
In the summary (Fig. 9 above) it can be seen that a number of corrections are made to the document, and 19 notes are added. In this case, it is better to display a document as you saw the editor.

Figure 11 - Displays the changed document only with notes
Instead of viewing "Changed Document", you can use "Changed document: Show corrections" - then all fixes and notes will be displayed as a callout. It is from the notes in which the editor expresses wishes to the document, and it is necessary to start work, and the corrections can be left for dessert.
Notes
With each note will have to be dealt with separately. The easiest way to use navigation by notes, thus kills two hares.

Figure 12 - Navigation by Notes
First, the displacement of the document is accelerated, and secondly significantly reduces the likelihood of skipping an important note. I note that you can navigate from the note to the note using the new Office 2010 search, but it will be a separate story.
When a note concerns the refinement of the article, you can agree with it and make the necessary changes to the document, or disagree and explain its position. Often, the editor's note makes sense to answer that when viewing the next revision of the document it was clear what the author did. To do this, just click on the note, and then click the "Create Note" button on the panel. In this case, Microsoft Word clearly denotes the connection between the notes.

Figure 13 - Reply to Note
As can be seen in Figure 13, both notes lead to one dedicated fragment of the text. Moreover, VS 27R 26. In the response note means: "Note 27 left VS in response to Note 26 from A" (R - means Reply, i.e. answer).
You can delete any response to response, using the appropriate item in the context menu of the Notes or the "Delete" button (Fig. 12) located on the tape, with which you can delete all notes immediately. Having finished with notes, you can go to corrections.
Corrections
Corrections are two types:
- Additions and deletions united accidentally (Figure 7 or 11), because This is the links of one chain. Imagine that the editor rearranged part of the offer in places, first cutting out the tex fragment, and then inserting it. At the same time, two corrections are fixed - first removal, and then add.
- Formatting Includes a change in type and font size, transformation to lists and all other features of the "font", "paragraph" and "styles" on the "Home" tab
Working with changes in the text of the article is carried out by analogy with notes - you can navigate from one correction to another. The only difference is that corrections can be taken and rejected.

Figure 14 - Corrections can be taken and rejected, as well as move from one to another
Buttons "Accept" and "reject" make a little more than fit into their brief names. After performing the action, they automatically move you to the next note, which is very convenient. In the context menu, notes such an opportunity, however, no.
To simplify work and unload a document, you can safely trust the editor in formatting. It is enough to enable only their display by the "Show corrections" button (Fig. 11), and then click the bottom of the "Accept" button and apply all displayed changes (Fig. 14). As you can see, the ability to configure the display of corrections acquires an additional meaning.
Now, returning removal and corrections, you can quickly move on them up and down the document. If you need to quickly compare the corrected text with the original, you can switch to the "Source Document" mode. It is not necessary to make corrections one by one. It is easier to view them and reject those with which you disagree and then take immediately all the remaining (Fig. 14).
Conclusion
By completing this article, I want to emphasize that the review is not at all the confrontation of the author and editor, but a means of joint work on the document. At the same time, the article is improving, and both parties remain in win. Carefully reading the article, the editor is voluntarily or involuntarily expanding its horizons. And even if the immediate practical application does not occur by this knowledge, the information is remembered, and if necessary, it is always possible to return to the article. For novice authors, a good review is very valuable because it opens eyes to various flaws of your letter, whether it is the structure of the article or the style of presentation. Yes, and an experienced author will never refuse to look at his work through the eyes of a competent reviewer.
So, all comments are taken into account, and corrections are accepted. Article ready? Do not hurry, but better check the spelling. After numerous corrections, linings may occur, and once again make sure that the text literacy does not hurt. The audit of spelling will be discussed in the next article.
Text microsoft Editor Word is not only an excellent tool for setting and formatting text, but also the most convenient tool for its further correction and editing. A few people know about this true "editorial" function, so we decided to reveal this secret to you.
The easiest way to edit the text on paper - many readers will be rewicing to me. Indeed, taking the red handle you can always cross the incomplete phrase, and write something better from above. You can leave gloaming comments, showing the author of the text of its wrong. And most importantly: with this editing, the source code does not change, and to decide the author himself, to make corrections or not. But such corrections will not send e-mailAnd they exist in the only form.
Using tools to review the Word text editor, you can in the same way to insert comments with a practically red handle on the fields and correct what the author wrote, crossing the source text. But at the same time, the document with all the corrections and marks will exist in in electronic formatSo, will be available for shipment by email. And the author of the document, having studied the corrections, literally at the touch of the button can take them, and not correct each litter manually, or, on the contrary, reject, remaining with its opinion.
Insert tools marked and fixes are placed on the toolbar "Review. You can display it by selecting " View (View) -\u003e Toolbars (Toolbars) -\u003e Review (Reviewing). "
If suddenly, reading the text, you have a desire to comment on a particularly liked or vice versa, a bad moment, you can use the tool "Note". To do this, highlight the desired fragment of the text and click "Add Note" (INSERT COMMENT) on the toolbar. In the field to the right of the main text, a window will appear for entering notes. After you have typed text, press the mouse away from the window to enter notes.
The notes input field appear to the right of the document text.
After saving and re-opening text, a fragment on the screen, which has a note, will be highlighted in different color. And if you bring the mouse to it, you can see the text of the note, its author and the time of its addition. Move between the added notes is conveniently using the special buttons located on the Review toolbar.

View text Notes
The following tool is available for editing is the correction mode.
When this mode is enabled, all changes made to the document are written. Moreover, as changes regarding its contents (the deletion and adding text) and the change in the document format (fonts, page parameters, etc.) will be recorded. Go to fix recording mode is very simple - just double click on the button with the inscription "Act"which is posted in the text editor status bar. The second way: Press the (Track Changes) button on the Review Toolbar.
Depending on the settings Word.Corrections will either appear to other color, or not to display at all, but necessarily next to each correction will be posted a note in which it will be indicated which changes were made to the document.

All fixes and notes are visually displayed on the right field of the document.
To view all the fixes, you should display the change view window on the screen. To do this, click the button. "View window" On the Review Toolbar. At the bottom of the screen, all the fixes and notes contributed to the document. Using this window, you can select Added Notes and Corrections in the text of the document. To do this, double-click the mouse on the line separating one note from the other.
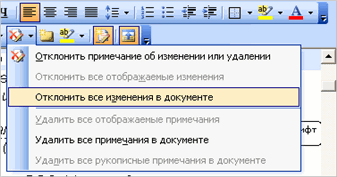
The next step after viewing the changes made will be the decision on their conservation. Lists are designed for this. "Take a selected correction" and "Reject the selected correction". By pressing the appropriate button, you can open the list and select the desired item with which you can accept or reject this specific correction. And selecting "Reject all changes" or "Apply all changes", you can make a decision regarding the edit of the entire document.
The MS Word program has a special mode of operation that allows you to make edits and edit documents without changing their content. Roughly speaking, this is a good opportunity to point out mistakes without correcting them.
In edit mode, you can make corrections, add comments, explanations, notes, etc. It is on how to activate this mode of operation, and will be discussed below.
1. Open the document in which you want to enable edit mode and go to the tab. "Review.

Note: In Microsoft Word 2003, to turn on the edit mode, you must open the tab. "Service" And there choose the item "Corrections".
2. Click on the button "Corrections"located in the group "Record fix".

3. Now you can proceed to edit the text in the document. All changes made will be recorded, and the type of editing with the so-called explanations will be displayed to the right of the workspace.

In addition to the buttons on the control panel, activate the edit mode in the Word can be used using the key combination. To do this, just click "Ctrl + SHIFT + E".
If necessary, you can always add a note that the user who will continue to work with this document to be easier to understand where he made a mistake that it is necessary to change, fix, remove at all.

Unable to remove changes in edit mode, they can be accepted or deflected. You can read this in more detail in our article.

Here, in fact, all, now you know how to turn on the edit mode in WORD. In many cases, especially joint work With documents, this feature of the program may be extremely useful.