
It is often necessary to be aware of what is happening at the computer in your absence. There can be a lot of reasons: from simple curiosity to trying to track down random errors in the system, from parental control for a child to tracking employees during working hours. In general, there are many such examples, and all of them are related to the need for covert surveillance of computer users.
It is better to visually see something than to delve into text reports for a long and tedious time. It is about the possibility of creating hidden screenshots(screenshots, screenshots). The ScreenMaster covert surveillance program will help you solve this problem.
The main interface of ScreenMaster is extremely simple and consists of several tabs, from which we need "Main Window" and "Settings":

ScreenMaster allows you to take hidden screenshots at a specified frequency and picture quality. Screenshot files are saved to HDD or to a network shared folder. Snapshots can include the entire screen or only the active window. It is possible to capture the mouse pointer when taking a screenshot, as well as add the date and time of the screenshot to the picture.
V stealth mode the program is not displayed in the panel Windows tasks, and its icon is missing from the system tray.
Consider the ScreenMaster settings required for full-fledged covert monitoring of your computer.
On the "Settings" tab, we configure the ways to launch and manage the program:

With these settings, ScreenMaster should start in stealth mode along with the operating system, and immediately after launch, start stealth screen capture. If the computer is idle for more than 60 seconds, you can stop capturing the screen because nothing changes on the desktop and the pictures will be the same.
Also, do not forget to set up a keyboard shortcut to switch the program between visible and hidden modes.

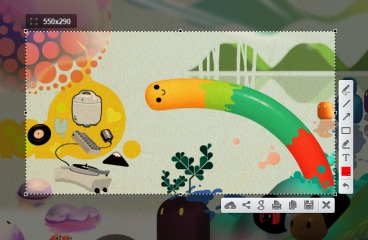
Go to the "Main Window" tab. In the following figure, the optimal settings for covert monitoring of a computer are marked in red:

Hidden screenshots will be saved to files with the date/time of shooting added to the name (an example of a file name is “Screen_20120505_141045.png”). It is advisable to capture the entire screen, the mouse pointer and put down the date / time on the picture itself. The shooting interval is adjustable from 1 second to 1 hour.
When using the program in corporate networks it makes sense to save screenshots on remote computer to the shared folder.
After all the settings, close the program. Then we start ScreenMaster again, and the screen of the program does not appear, because. she's already doing her job in stealth mode. Open the folder with screenshots and see that screenshot files appear there:

To switch the program screen between visible and hidden modes, you must press a combination of keys ("hot button"). The default is Alt+F2.
In conclusion, I would like to say that such spyware can be used for not very noble purposes. In most cases, everyone has the right to know that they are being monitored. To avoid abuse in the trial version of ScreenMaster, the duration of the hidden mode is limited to 1 minute. After purchasing and entering the registration key, the hidden mode starts working without restrictions. For residents of the CIS countries, the cost of a full ScreenMaster license is only about 200 rubles.
We hope you will use the program only for positive reasons.
ScreenMaster official website - http://seasoft24.com
Russian section on the site -
Hello.
Who among us did not want to capture some episode on the computer screen? Yes, almost every novice user! You can, of course, take a picture of the screen (but this is too much!), Or you can take a picture programmatically - that is, as it is correctly called, a screenshot (the word came to us from English - ScreenShot) ...
You can of course take screenshots. (by the way, they are also called “screens” in another way) and in "manual mode" (as described in this article:), or you can set up one of the programs presented in the list below once and get screenshots by pressing just one key on the keyboard!
It is about such programs (more precisely, about the best of them) that I wanted to talk about in this article. I will try to give some of the most convenient and multifunctional programs of a kind…
FastStone Capture

FastStone Capture window
One of the best programs to take screenshots! She has helped me out more than once and will still help me out :). Works in all versions of Windows: XP, 7, 8, 10 (32/64 bits). Allows you to take screenshots from any windows in Windows: be it a video player, a website, or some program.
I will list the main advantages (in my opinion):
- the ability to take a screenshot of the screen by setting up hotkeys: i.e. press the button - select the area to be screened, and voila - the screen is ready! Moreover, hot keys can be configured to save the entire screen, a separate window, or select an arbitrary area to the screen (i.e. very convenient);
- after you have made a screen, it will open in a convenient editor where it can be processed. For example, change the size, add some arrows, icons and other elements (which will explain to others where to look :));
- support for all popular image formats: bmp, jpg, png, gif;
- the ability to auto-load at Windows startup - thanks to which you can immediately (after turning on the PC) take screenshots without being distracted by launching and configuring the application.
S nagit
![]()
A very popular screen capture program. It has a huge number of settings and all kinds of options, for example:
- the ability to take screenshots of a specific area, the entire screen, a separate screen, scrolling screenshots (i.e. very large high screenshots 1-2-3 pages high);
- converting one image format to others;
- there is a convenient editor that will allow you to accurately trim the screen (for example, make it with jagged edges), overlay arrows, watermarks, resize the screen, etc .;
- Russian language support, all Windows versions: XP, 7, 8, 10;
- there is an option that will allow you to take screenshots, for example, every second (well, or after the time interval that you set);
- the ability to save screenshots to a folder (moreover, each screen will have its own unique name. The template for setting the name can be customized);
- the ability to customize hot keys: for example, set up buttons, click on one of them - and the screen is already in the folder, or opened in the editor in front of you. Convenient and fast!

Screenshot options in Snagit
The program also deserves the highest rating, I recommend it to absolutely everyone! Perhaps the only negative - full functional program worth some money...
Green Shot
One more cool program, which allows you to quickly get a screen of any site (almost in 1 second! :)). Perhaps it is inferior to the previous one only in that it does not have such a large number of options and settings (although, perhaps, for someone this will be a plus). Nevertheless, even those that are available will allow you to quickly and easily make quite high-quality screenshots.
In the arsenal of the program:
- a simple and convenient editor, in which screenshots fall by default (you can save automatically immediately to a folder, bypassing the editor). In the editor, you can resize the picture, crop it beautifully, change the size and resolution, apply arrows and icons to the screen. In general, very convenient;
- the program supports almost all popular image formats;
- practically does not load your computer;
- made in the style of minimalism - i.e. there is nothing superfluous.
By the way, the view of the editor is shown in the screenshot below (such is the tautology :)).

f raps
(Note: special program to take screenshots in GAMES)
This program is designed specifically for creating screenshots in games. And not every program can make a screen in the game, especially since if the program is not designed for this, the game may freeze, or brakes and friezes will appear.
Using Fraps is very easy: after installation, launch the utility, then open the ScreenShot section and select a hotkey (using which screenshots will be taken and sent to the selected folder. For example, the photo below shows that the F10 hot button and screenshots will be saved to the “C:\Fraps\ScreenShots” folder).
In the same window, the screenshot format is also set: the most popular are bmp and jpg (the latter allows you to get screenshots of a very small size, however, they are slightly inferior in bmp quality).

Fraps: ScreenShot Customization Window
An example of how the program works is shown below.

Screenshot from computer game Far Cry (small copy).
By the way, in order for screenshots to be saved on your desktop and not uploaded to the Internet, you only need to correct one switch in the program settings. Click on the program icon in the lower right corner of the screen and select the "where to save" option.

Where to upload screenshots - ScreenCapture
In addition, if you save pictures to your desktop, you can choose the format in which they will be saved: "jpg", "bmp", "png". Too bad the "gif" is missing...

How to save screenshots: format selection
Generally, great program suitable even for complete beginners. All the main settings are placed in a prominent place and can be easily changed. In addition, it is completely in Russian!
Among the shortcomings: I will single out a rather large installer - 28 mb * (* for this kind of programs - this is a lot). As well as the lack of support for the gif format.
Light Shot
(Russian language support + mini-editor)
A small and simple utility for creating and easily editing screenshots. After installing and launching the utility, to create a screenshot, just click on the “Preent Screen“, and the program will prompt you to select an area on the screen, as well as where you save this picture: on the Internet, on your hard drive, in a social networks.
Light Shot - selection of the area for the screen.
In general, the program is so simple that there is nothing more to add :). By the way, I noticed that with the help of it it is not always possible to screen some windows: for example, with a video file (sometimes, instead of a screen - just a black screen).
J Shot
Developer site: http://jshot.info/
A simple and functional program for creating a screenshot of the screen. What is especially pleasing, in the arsenal of this program is the ability to edit the image. Those. after you have taken a screenshot of the screen area, you are offered a choice of several actions: you can immediately save the picture - “Save”, or you can transfer it to the editor - “Edit”.

This is what the editor looks like - see the photo below

Screenshot Creator
Very "light" (weighs only: 0.5 MB) program for creating screenshots. Using it is very simple: select a "hot" key in the settings, then click on it and the program prompts you to save or discard the screenshot.

Screenshot Creator - screenshot taken
If you click save: a window will open in which you will need to specify the folder and file name. In general, everything is quite simple and convenient. The program works very fast (even if the entire desktop is captured), besides, it is possible to capture part of the screen.
P icPick (in Russian)
A very handy program for editing screenshots. After launch, it offers several actions at once: create an image, open it, determine the color under your mouse cursor, and capture the screen. Moreover, what pleases especially - the program is in Russian!

PicPick Image Editor
How do you proceed when you need to take a screenshot and then edit it? First, screenshot, then open some editor (Photoshop for example), and then save. And imagine that all these actions can be done with a single button: the picture from the desktop will automatically be loaded into a good editor that can handle most of the most popular tasks!

PicPick image editor with added screenshot.
S hotnes
(With the ability to automatically post screenshots on the Internet)
A very good screen capture utility. After you remove the desired area, the program will offer several actions to choose from:
- save the image to your computer's hard drive;
- save the picture on the Internet (by the way, it will automatically place the link to this picture in the clipboard).
There are small editing options: for example, highlight some area in red, paint on an arrow, etc.

Shotnes Tools - Shotnes Tools
For those who develop websites - a pleasant surprise: the program has the ability to automatically translate any color on the screen into code. Just click the left mouse button on the square area, and without releasing the mouse, move to the right place on the screen, then release the mouse button - and the color is defined in the line "web".

Define color
S-creen Presso
(scrollable page screenshots, to create high-altitude screenshots)
A unique program for creating high-height screenshots (for example, 2-3 pages high!). At least, given function, which is in this program, is rare, and not every program can boast of similar functionality!
I will add that the screenshot can be made very large, the program allows you to scroll the page several times and capture everything completely!

Screenpresso Workspace
As for the rest standard program of this kind. Works on all major operating systems: Windows: XP, Vista, 7, 8, 10.
By the way, for those who like to record video from the monitor screen, there is such an opportunity. True, there are more convenient programs for this matter (I wrote about them in this note:).

Video recording / Snapshot of selected area.
S upper Screen
(Note: minimalism + Russian language)
A very small screen capture program. It requires Net Framework 3.5 to be installed. Allows you to perform only 3 actions: save the entire screen as a picture, or a pre-selected area, or the active window. The program does not fully justify its name ...

SuperScreen - program window.
E asy Capture
But this program fully justifies its name: in it, screenshots are taken easily and quickly, just by pressing one button.
By the way, what pleases, in her arsenal immediately there is a mini-editor, reminiscent of the usual paint - i.e. you can easily edit your screenshot before posting it to the public ...
Otherwise, the functions are standard for programs of this kind: capturing the entire screen, the active window, the selected area, etc.

EasyCapture: main window.
C lip2Net
(Note: easy and fast adding screenshots to the Internet + getting a short link to the screen)
Quite a popular program for creating screenshots! Probably, I will say a banality, but "it is better to try once than to see or hear 100 times." Therefore, I recommend that you run it at least once and try to work with it.
After launching the program, first select the function of capturing part of the screen, then select it, and the program will open this screenshot in the editor window. See below picture.

Clip2Net - screenshot of a part of the desktop.

The results of the publication of the screen on the Internet.
-----------------------
This review of the best programs (in my opinion) for capturing the screen and creating screenshots has come to an end. I hope that at least one program for working with graphics will come in handy for you. For additions on the topic - I would be grateful.
What does it show us:
- Total space used: 2.09mb- total disk space used for snapshots - 2.09mb
- Total files: 13- total created on this moment screenshots
- Saving to: C:\Users\Dim\Documents\DonationCoder\AutomaticScreenshotter\Screenshots- folder where screenshots are saved
- THIS RUN: - this program start
- Uptime: 1 minutes 3 seconds- operating time from the start
- Captured: 0 screenshots (Ob total)- created screenshots from the beginning of this run
- Skipped capturing: 0 due to duplicate content- number of missed shots due to duplicate content
- Skipped capturing: 0 due to blank window content- number of missed shots due to empty window contents
- Skipped capturing: 1 due to ignored windows, screensaver, idle. etc- number of shots missed due to ignored windows, screensaver, standby, etc.
- Deleted: 0 (Ob) during pruning- removed during trimming
- Last window exe: AutomaticScreenshotter.exe (ignoring)- last executable window on monitor AutomaticScreenshotter.exe (ignore)
Setting Automatic Screenshotter
To access the program settings, right-click on the tray icon, a list will open quick settings. You can quickly change the screen capture frequency (Cature rating, default is 1 minute), suspend capturing (Suspend capturing), perform a capture right now (Perform a capture now), etc.
Quick settings.
To launch the settings window, click on the line Edit Options. We are presented with the first screen of settings options
General:

Basic settings for taking screenshots.
Here you can schedule the launch of the program along with Windows start(check the Start with windows checkbox), automatically check for updates at program startup (Check for updates at startup), adjust memory usage, assign tray icon display, etc. In general, the following windows are more interesting.
The next screen is the capture options:

Customize options for capturing screens or application windows.
Here we can change the capture rate in seconds Capture rate (seconds), however. this can also be done from the quick settings menu.
The important option for me is Also capture whenever the active window changes- also a screenshot is created not only for a given period of time, but also when the active window changes.
- ask maximum amount saved files (option Preserve no more than this number of screenshots, default 500)
- set a disk space limit for snapshots, upon reaching which old files will be deleted (parameter Delete older screenshots to ensure disk space usage is below, default 100 Mb)
- set the storage time for screenshots, after which they will be deleted (parameter Delete screenshots older than this many days, default 500 days)
Next comes important parameter - What should be captured?- set what should be captured, the whole monitor (Full desktop), active monitor(Active monitor, this seems to be relevant when working with multiple monitors) or the default option is to capture the active window or, in its absence, the entire monitor (Active window or desktop if none (default)).
The third settings screen is called Capture rules, i.e. image capturing rules:

Here we can set up:
Dont capture screensaver- do not capture intros (enabled by default)
Dont capture full-screen apps- do not capture full screen applications (enabled by default)
Ignore changes of less than this many pixels- ignore when changing less than the specified number of pixels, default 1000
Only capture when there is a foreground active window- capture only when there is an active window in the foreground
Dont capture if computer is IDLE for this many minutes- do not capture if the computer has been idle for this many minutes, default is 10
Check for and ignore blank window contents- Check for and ignore empty window content
Dont capture if either dimension is less than this many pixels- do not capture if the dimensions are less than the specified number of pixels, by default 80
fourth screen - Application Rules, application rules.

You can make a list of applications whose windows should not be captured (list of ignored applications). To activate the list, check the option checkbox Dont trigger a capture when one of these applications is the active window, checked by default. You can insert the entire path or just the name executable file, for example, if you want to ignore the capture of the AutomaticScreenshotter program, paste into the window autoscreenshotter.exe or full path C:\Program Files\AutomaticScreenshotter\automaticscreenshotter.exe. This is a kind of "black list" of applications.
Below is the Only capture these applications option, this is a "white list", check the box Only ever capture if one of these applications is the foreground active window and make a list in the same way.
Fifth settings screen - File Saving, options for saving files.

It is possible to override the directory for saving files, for this you need to insert the full address of the new directory in the entry period under the inscription Override this default directory with a custom one(do not store other files here!). This new directory must be completely empty. By default, as I wrote above, the directory is set C:\Users\Dim\Documents\DonationCoder\AutomaticScreenshotter\Screenshots
You can then redefine the name. automatically assigned to the file. By default, it consists of %Y%m%d%exe_%H%M%S, which means the file is called "active window application name, underscore, hours, minutes, seconds of file creation", and it lies in the directory by number day of creation, it lies in the directory by the month of creation, it, in turn, lies in the directory by the year of creation. Example of saving a window photo Photoshop programs: the file is named photoshop_185516_as.png, i.e. it was created at 18 hours 55 minutes 16 seconds, and it is located in the directory C:\Users\Dim\Documents\DonationCoder\AutomaticScreenshotter\Screenshots\2016\10\02, i.e. it was created on October 2, 2016.
Below you can set the format and quality of the graphic file.
Next screen - Miscellaneous Options- other. Here is a useful option hot key for instant capture and saving a screenshot (Hotkey for manually taking (and saving) a new screenshot), not assigned by default. You should also uncheck the Play sound on each capture (useful for testing) option, this is a stupid signal every time you capture an image, but it’s useful for debugging, yes.
) - program for automatic creation screenshots (screenshots) and saving them to a file JPEG format, BMP, TGA, TIFF, GIF, PNG to the specified folder. That is, press the button Print Screen on the keyboard and continue to work / play calmly, since the picture was saved without any effort on your part. No need to minimize the program, open another program, etc., etc. Now all this is done automatically, without spending precious time user and without loading the computer! By the way, the program was specially developed for games
Opportunities:
- saving to the most popular formats
- overlay up to nine effects
- watermark overlay
- multilingual, there is a Russian interface
- work on keyboards where there is no Print Screen key (see Settings)
- you can open the last screenshot taken in an external editor
- there is a built-in Screenshot Review - convenient for quick viewing of pictures
- flexible settings for naming the screenshot file - determining the title of the current window, substituting time and date, etc. (for example: 8. Crysis - 16.40.32)
- you can take a picture of the cursor when removing a separate window (handy for specifying something)
- scoring of events
- automatic capture of multiple shots in a row
- applying effects and saving the resulting image to the clipboard
System requirements:
Computer with 32-bit Windows 98/ME/2000/XP/2003/Vista and established .NET Framework version 2.0 or higher. Unfortunately, there is no version for 64-bit systems and is not expected in the near future.
Frequently asked Questions:
Question: Where is the Print Screen button?
Answer: On the right side of the keyboard, look at the Delete, Insert keys - the button above is called PrtScr - this is it.
Question: I don't have this button on my keyboard. What to do?
Answer: Partially, the situation can be corrected by calling the main AutoScreen .NET window and on the Settings tab, check the box next to "Take a screenshot also by F12". Unfortunately, the auto-capture of several screenshots in a row will not work.
Question: How to make the program take several pictures in a row automatically?
Answer: Open the main window of the program, tab Settings - Set up auto-capture of screenshots. There, adjust the settings for yourself. To remove, press Ctrl + Print Screen, to stop, press this combination again.
Question: How do I know if I have the .NET Framework installed?
Answer A: Just run the setup_autoscreen.exe installer - if the welcome window pops up right away, then everything is fine. Otherwise, the installer will ask you to download the .NET Framework and even direct you to the correct download page.
Question: When installing the program, a window appears that says that I do not have the .NET Framework. But I am sure that I have it installed! What to do?
Answer: The installer checks for the presence of the Framework version - if the version is 1.0 or 1.1, the installation cannot be continued, because. AutoScreen .NET will not run on these Frameworks. Download new version Framework.
Question: Your program does not know how to take a picture of a video! Instead of a video on the screenshot, there is a black square!
Answer: Not true, my program can take a picture of a video. To take a picture of a video image, do the following (applicable to Windows Media player):
Program menu -> Tools -> Options -> Performance -> "Video acceleration" move to the left until it stops
In other players, you can “play around” with the image output settings (look in the overlay settings (overlay, video rendering or something like that))


