
Due to the fact that there are several operating systems (OS) that are conceptually different from each other, the user at some point will want to install another. Especially this action can be done without removing the previous OS. Further in the text will tell you how to install Linux from under Windows and vice versa. Finally, you will also learn how to install a complete operating system on a Flash drive.
Installing Linux from under Windows
In most cases, users install Windows as the main OS on a computer, so the topic of installing Linux from under Windows is more relevant, and we will consider this situation. Looking ahead, we will say that there are two ways: the traditional one, which implies using the drive with the Linux installer image, and the special one, using the Wubi program.
Method 1: via a bootable USB flash drive
If you want Mint from under Windows using the traditional method, the first thing you need to do is create bootable USB drive with the desired distribution. For this we will use the Rufus program.
- Run the application.
- Click on the button with the disk image.
- In the "Explorer" select the Linux image that you want to download to your computer.
- Select your USB flash drive from the list of "devices".
- Leave the partition scheme and system interface type as default.
- Also, keep the file system and cluster size by default.
- Do not change all other settings.
- Click the "Start" button.
The recording process will then begin. Wait for it to finish and close the program. The flash drive is ready, now you need to start from it. To do this, restart your computer and press the F9 or F8 button at the time it starts up until a special menu appears. In it, select your USB flash drive. This will launch the installer for Linux Mint or another distribution of your choice.
- In the menu, select the line "Run".
- After entering the OS desktop, launch the Install Linux shortcut.
- The installer will open, in which, following the instructions, install the operating linux systems.
It's so easy to install Linux under Windows 10 or any other OS version from microsoft.
Method 2: using the Wubi program
Having finished figuring out how to install Linux from a USB flash drive, let's move on to a non-standard method that involves using special program, which, in fact, will do everything for you, you just need to set the necessary parameters. This application, as you might guess, based on the subtitle, is called Wubi, so download and install it on your computer before following the instructions.
It should be said right away that with its help you can install from under Windows Linux Ubuntu, unfortunately there are no other distributions. But without getting hung up on the nuances of the application, let's go directly to its usage guide.
After launching the application, you will see six settings that you are invited to change or set. Let's take a closer look at them:

- Installation disk. Here you need to select the disk or partition where Linux will be installed. It is noteworthy that you can even choose the system one, no failures in running Windows will not be observed.
- Installation size. Many will be surprised that a maximum of 30 gigabytes can be allocated for Linux on the previously selected disk, but this amount can be increased in the future.
- Desktop environment. Those familiar with Linux will figure it out right away, the rest are recommended to choose Unity.
- Language. Here you select the OS localization.
- Username. Enter your name, which will be displayed in the system.
- Password. Enter and confirm the password that is required to log in to the system.
After that, click the "Install" button, and then give permission for this action. Wait for all necessary processes to complete and restart your computer. After that, the Linux desktop will appear, on which all OS files will be unpacked. When finished, the computer will reboot and the bootloader will offer you the choice of starting Linux.
Installing "Windows 7" from Linux
Now let's move on directly to how to install Windows from under Linux. As in the above method, this can be done through a bootable USB flash drive, however, the method of creating it differs in many respects from the previously discussed method. In any case, if it seems to you that it is difficult to follow all the steps of the instructions, you can use the second method, which is also provided. It implies the use of another application, which is called Qemu.
Method 1: via bootable drive
Considering how to install Linux from under Windows, we outlined a method using a USB flash drive. Let's consider it, only inside an operating system based on the Linux kernel. You will need a program called ROSA Image Writer for this, so download it to your computer and install it. Also, do not forget to download the Windows operating system image that you will be installing.
- Run the program.
- In the Image field, enter the path to the Windows image. The same can be done through file managerby clicking on the button with the folder image.
- From the list "USB disk" select the flash drive, which at this stage should already be inserted into the computer.
- Click the "Record" button.

After that, the creation of the flash drive will begin. Wait for this process to complete and close the program. Restart the computer and press the F9 or F8 button while it boots, and in the menu that appears, select the drive as the device from which the computer will start. Will appear windows installerby following the instructions in it, you will install the OS.
Method 2: using the Qemu program

What if you are using a specific distribution that does not run ROSA? In this case, you can use the Qemu app. It is he who is recommended on the Habr website for installing Windows from under Linux. Looking ahead, it should be said that for many users this method may not be suitable, since it does not imply the use of a graphical environment, on the contrary, all actions will be performed directly in the "Terminal".
- Install the program by writing the command sudo apt install qemu in the "Terminal".
- Download the Windows image to your computer.
- Get superuser rights in the "Terminal" by running the sudo su command and then entering your password.
Installation
Now you can go directly to the main process. All you have to do is execute one command: qemu -boot d -cdrom<путь к образу windows> / dev / sdb -m 1536. Note that / dev / sdb is the partition where the proprietary software will be stored, and m 1536 is the volume random access memory, which will be allocated under the control of the operating system.
After executing the required command, the copying process will start installation files, after the end of which you need to restart the computer and disable the Qemu program, you can do this, for example, through the "System Monitor".

Now you need to update the GRUB bootloader, this is done with one command: update-grub, after which it will appear new entryrequired to run on windows computer... However, sometimes this is not enough for it to appear, this happens in cases when windows bootloader overwrites GRUB. In this case, run one of the commands: grub-install or dpkg-reconfigure grub.
After all that has been done, you must restart the computer again, and select the line with the mention of Windows in the GRUB menu. The installer of the operating system will start directly, in which, following all the instructions, you will install the OS.

Installing Linux on a USB flash drive from under Windows
So we looked at how you can install Linux from under "Windows" or "Windows" from under Linux, but what if you want to have, so to speak, a portable operating system? In this case, you can easily install Linux on your USB flash drive and boot from it whenever you want. Unfortunately, it is much more difficult to do the same with Windows, at least by official methods.
So, to install Linux on a USB flash drive, you need to do the following:
- Prepare two flash drives. One must be at least 2 GB, and the second must be more than 8 GB, since it will be installed on it operating system.
- On a flash drive with a volume of 2 GB or more, write down the image of the desired linux distribution.
- Start your computer from this flash drive and start installing Linux.
- When partitioning the disk, specify as the installation location your USB flash drive with a size of 8 GB or more.

After that, the files will start unpacking to the USB flash drive. Wait for it to finish and restart your computer. This is how easy it is to install an OS onto a USB stick.
It is quite popular among new Linux users to use two operating systems on a computer - Windows as an additional system just in case and Linux for study as the main system. One of the most popular systems for beginners is Ubuntu, and most users still use Windows 7 and consider it the best operating system. Despite all the problems, it remains popular.
In this article we will look at how to install Ubuntu alongside Windows 7. If you think that this is the simplest option that could be.
Installing Ubuntu alongside Windows 7
This is Windows 7, it uses a regular bootloader and does not yet know what UEFI is, so there will be no problems during installation. I am assuming that you already have Windows 7 installed on your computer and you are going to install Ubuntu on the second system.
Preparing a hard drive in Windows
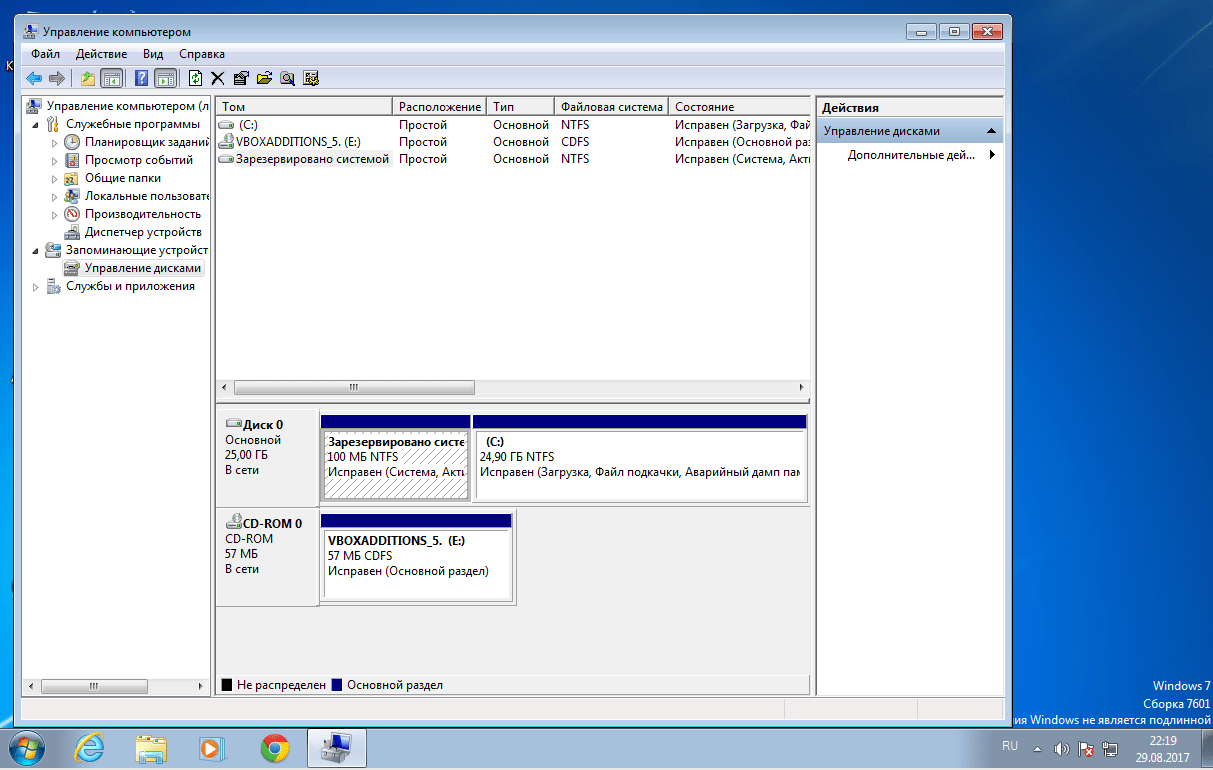
I have already written in more detail about what partitions and what are needed in the article disk partitioning for Linux. But that's not the point. Now you have Windows and it takes all tough disk. We need to separate a little space from it, and at the same time do it so that nothing breaks and everything works. We could have used Gparted directly from a Linux or Acronis boot image, but the safest way is to use standard Windows tools. Click on the icon "My computer" right click and open "Control":
Then select in the left column "Disk Management":

This is where you need to find a way to allocate some memory for Linux. Usually Windows has two disks, let's switch to Linux terminology and call them partitions. The first is C: this is the main partition where the operating system is installed. The second is the D: drive, where files, games and other data are located. Desirable system partition do not touch it at all, but separate space from drive D. But if you have already decided to reduce the system partition, for example, because you only have drive C, then in no case touch the beginning of the partition, you can cut only from the end. And so, first we need to shrink the partition. So check required volume, right click on it, click "Shrink Volume":

In the window that opens, you need to enter the size of the free space to which you want to compress this volume:
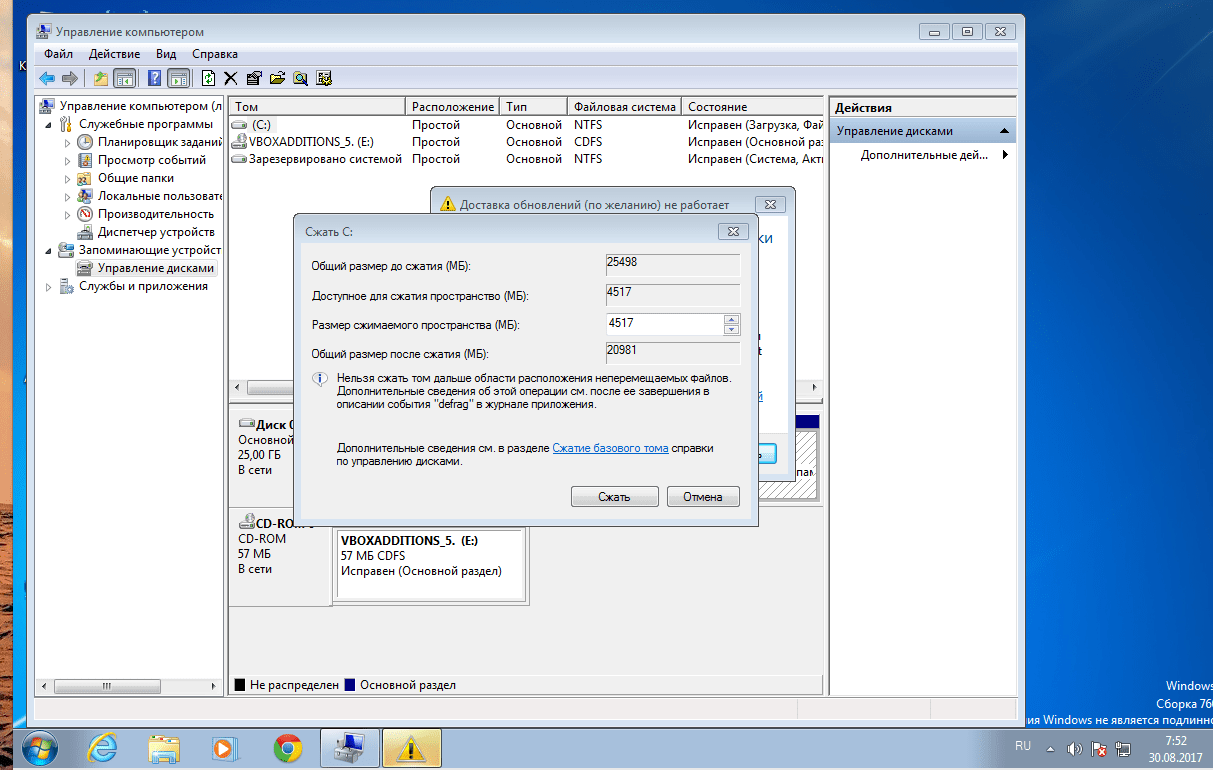
We need about 100 GB for Linux, at least 30 GB for the root partition, 10 GB for other partitions and about 60 GB for the home partition. This is quite enough for you not to think about what to do in order to have more memory. When you have selected the volume, click "Compress".

When the compression is complete, an empty space will appear in front of you. This completes the work with Windows. Further partitioning is best done from Linux. Almost everything is ready to be done installing windows 7 and ubuntu.
Bootable media recording
Next, we need to burn Ubuntu to our media, for example, a USB flash drive. Since we are working on Windows, we will use the Rufus utility. Download and run the program. In it, select the USB flash drive to which you are going to record, then go down below and find "Create boot image" , select "ISO image":

Then select the disk image you want to burn and click "Start":

When the recording is complete, you can restart your computer.
Preparing a disk in Ubuntu
Next, you need to restart your computer and boot from the media you just burned. I will not tell you how this is done. If you are going to install Linux, you probably already know how to work with the BIOS. When the Ubuntu image starts, you will need to immediately press any key to select the language:

Please select "Russian" and press "Start Ubuntu without installing"... We need to start the system without installation because this will give you more freedom in the event of any problems.

When the system starts, immediately open the installer. Although I will consider stable version Ubuntu 16.04, these will definitely work for Ubuntu 17.04, 17.10 and newer. There, nothing but the desktop wallpaper has changed.

In the first step of the installer, select the language:

Then do not forget to check the boxes that you need to install updates and additional software:

On the next screen, we can already move on to working with the disk. The installer himself identified Windows 7 and beginners, those who are afraid to climb into the disk settings themselves can select this item and install Ubuntu next to Windows 7 in automatic mode. But we will go the other way and consider manual disk partitioning, so choose "Another variant":

Here we see the free space that we have allocated for Linux, I have 22 gigabytes, this will be more than enough to install a test system, but I recommend you take about 100 GB and definitely at least 50. We have to create three partitions - a swap partition , root partition and home partition. First, we make a swap partition. To do this, select free space and click "+" :

The size of the partition must be equal to the amount of RAM, and the file system select "Swap partition":

The next section is the root one, the size of the partition is from 30 Gigabytes, the minimum size is 8 GB, but it is better to take more so that later you do not think about where to get the memory. For example, in my working system, which has been installed for a year now, 17 gigabytes are used on the root partition, despite the fact that I have not installed any games or heavy applications. We select the file system Ext4, and the mount point, where this partition will be mounted in the file system - of course "/".
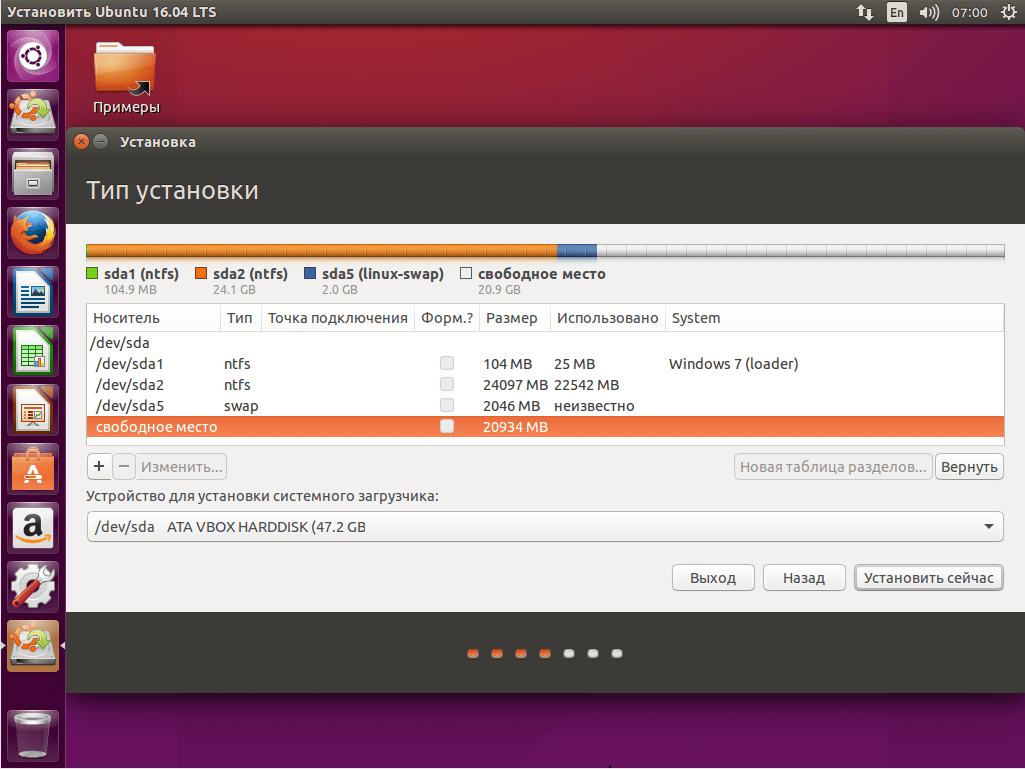

The last one is the home section. It takes up all the remaining space, the filesystem is also ext4, and the mount point is / home.

System installation
You are now ready to proceed with the installation. We leave the bootloader as it is, let it be installed on this disk. It will move the Windows bootloader to the system partition, and it will write itself to the MBR. The installed Widnows will be detected and you can access it from the menu at boot time. When done press the button Install Now:

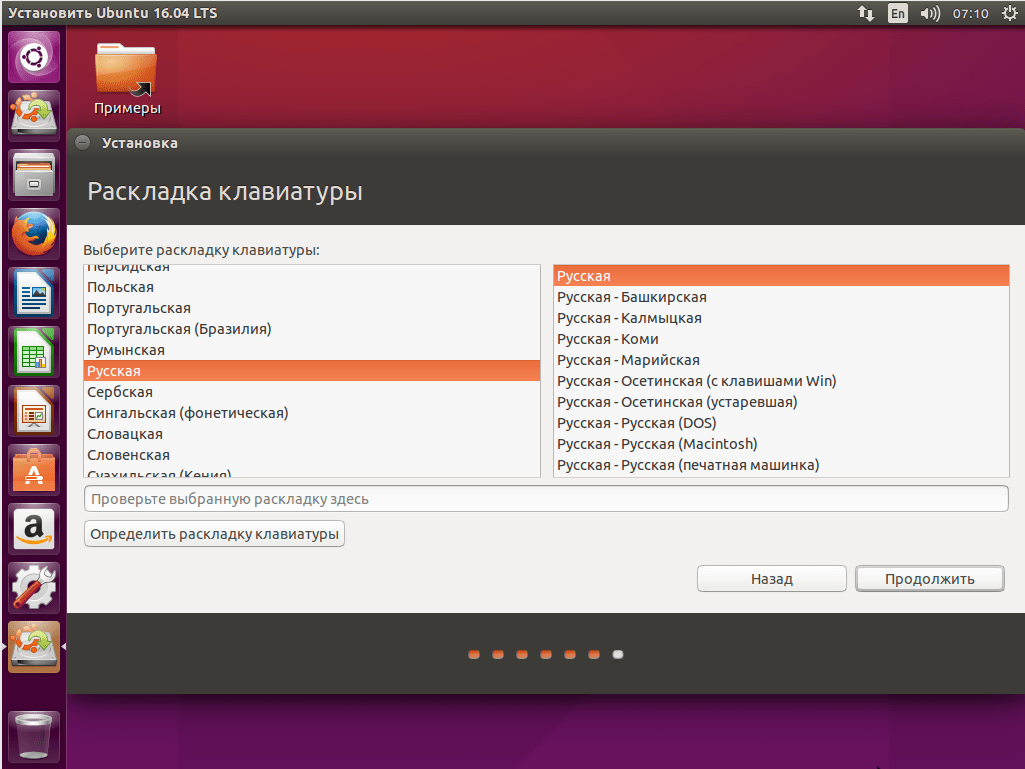
Next, you still have to create a new user, select a time zone, keyboard layout and wait. There is nothing specific here, so see Install Ubuntu 17.04 for information on this.


Ubuntu
On the Internet, you see a lot of instructions on how to install ubuntu, many suggest going straight to the actual installation on a disk together with Windows, but many newbies are often afraid of doing something wrong because of their inexperience so as not to accidentally format the disk or even destroy all their data on another drive.
I have seen many legends and fairy tales, do not install the Ubuntu operating system from under Windows using Wubi, maybe there is a certain part of the disadvantages of which you will not fully experience if you install the system in this way, but this is not a significant part that you can ignore at all ...
How did I get started using Linux system? At first, when I was still studying, we were taking a course on Linux and I needed to install one of the systems, the first thing I did was to install Mandriva and I don't remember which version of the distribution kit, but I didn't really like it. On the next couple, the teacher explained that it would be better for us to install Ubuntu as this distribution is widely popular among both beginners and experienced users. From there I began my journey to the Linux World.
Which way did I install Ubuntu? After looking at a lot of instructions on how to install the system, I was scared to do something wrong and not harm the Windows that is installed by the primary system. I chose the type of installation from under Windows - Wubi, for beginners this is a great way out, since the installation takes place in several steps, which can be handled by any and even not an experienced user.
What do we need for ubuntu installations with Wubi? It is advisable to cut with Acronis disk director a separate disc of about 20 GB, this disk space will be enough for you to start mastering Linux.
Next, download the image of the operating system Ubuntu - ubuntu.com, downloaded? burn the image to disk or extract the contents of the image using a utility Pover ISO to the folder on drive D... After you have extracted all the contents of the image inside you will see the file Wubi.exe, run the file which will begin the procedure for starting the installation of the Ubuntu system from under Windows... I hope you completed the previous step to cut a 15-20 GB disc for system installation, if so, continue.
After running the file Wubi.exe, we will open the following window, look below:
- Installation disk - at this point we select the disk (The disc that we cut off for this, not the C or D disk).
- Installation size - the disk space that we will allocate for the system, choose about 15GB is enough for you.
- The desktop environment is Ubuntu.
- The installation language is Russian, as you like, you can choose English or any other.
- Username - the user under which you will log into the system, in other words, the super user Root.
- Set a password.
- The last step is to click on the install button.
After the steps taken for the installation above, the system files will be extracted to the drive of your choice on which the operating system will be installed Ubuntu Linux... At the end of the extraction of files, you will be prompted to restart the computer, restart, from this moment the direct installation of the system will begin, everything will happen automatically, you will not even need to press something or enter commands or something else. The system will be installed for 15-20 minutes, after which, upon completion, a reboot will also be required, after rebooting you will have to log in as the user you created at the very beginning of our installation.
That's all, the system is installed, you can get used to it. Also, you may immediately have a question, but how to set up the Internet? if you have a cable provider, then the configuration takes place in a couple of minutes, open a terminal and enter the command:
A window will open. Enter the password you created for the user when you installed your system.
After that, the Internet connection setup program will open PPPoEthat detects and displays our network devices... In most cases, you just need to press Tab - "Yes" - Enter.
After that we will be asked if we want to use the options:
noauth (do not require authentication from PPPoE server)
defaultroute (automatically adds the default route) and remove the nodetach option. Click "Yes".After the program pppoeconf will notify us of the change in the configuration file dsl-provider.
We agree and click "Yes".We will be prompted to enter our login from the contract and click "OK".
We enter the password from our contract. Click "Ok".
Be careful the password is case sensitive. In the event that you entered it with errors, you can correct the password by repeating the procedure by starting the pppoeconf program again.Establish a connection using the command - sudo pon dsl-provider
Disconnect the connection using the command - sudo poff dsl-providerAfter, when you fully get used to the system and you will understand which team is responsible for what, where and how and what is corrected and at least basicly master the terminal and some of the commands, you can easily remove the system installed from under Wubi by going to the second windows system - Control Panel - Programs and Features - Add or Remove Programs - and at the very bottom you will find our Ubuntu system, select it with a mouse click and click uninstall. I will tell you how to properly install the Ubuntu system together with Windows in the next article.
That's probably all. I look forward to your comments.
Some of the images are taken from - home.eltel.net
There are many ways to try Ubuntu. Someone likes to install it next to Windows more, someone changes hard drivessomeone rapes virtual machine... For me, the easiest way is Wubi. Windows-based Ubuntu Installer. An application that allows you to install Ubuntu as a regular Windows program.
The essence of Wubi is very simple - we launch the program, it creates a folder on the hard disk where the necessary files are uploaded, the original Ubuntu image is downloaded, minor settings, reboot ... And your Ubuntu is ready to use!
Almost all Ubuntu-based products can be installed with exactly the same images - Kubuntu, Xubuntu, Mythbuntu. Previously, there were also Netbook versions, but on 11.04 it remained only for Ubuntu. For version 11.10, Lubuntu is likely to appear.
Wubi is available on all Ubuntu discs. It is located in the root folder of the disk, the file wubi.exe. But this file can be downloaded separately. The Ubuntu website has a direct link to it.
This orange button with the words "Start download" - and the download will begin. The program weighs nothing at all, less than 1.5 megabytes. Still, it's better to download the original CD image anyway. Why, I'll tell you later.
After launch, we will see this:

Actually, the main window of the program. Everything is very simple, you must admit, there is no place to even get confused!
In the very first window, you select which hDD You want to install Ubuntu. I have one, so I will leave him.
Below is the location that is needed for the new Ubuntu. Possibly from 3 GB to 30 GB, with steps of 1 GB. Ubuntu itself is about 7GB, but I go for the maximum. You never know what you need ...
In the lower list, select which system you want to install. Let me remind you that on drives for 11.04, these can be Ubuntu, Ubuntu Netbook, Kubuntu, Xubuntu, and Mythbuntu. Who likes what more.
In the column on the right, the language of the future system is selected, the username (login) and password are entered with confirmation. It turns out that the password is the same for the entire system - both for the user login and for the administrator.
It is also possible to customize special tools for people with disabilities. To do this, click the "Accessibility" button.

Such a window will appear in front of us. I don't know what each of the points means, because I haven't tried it myself, there was no need. You can experiment if you want. By clicking the "Next" button, we will return to the previous program window.
There is nothing more to insist. If you still want to install Ubuntu - feel free to click "Install", if you don't want to ...
Install. The download of the files and image will begin. I said that downloading the original image is better, because you can do without downloading the image for Wubi, just skipping this moment. To do this, the installer and the image file must be in the same directory, no matter what.
The installer will check the image file and, if everything is in order, extract the necessary files from it. No additional files, for example MD5, you do not need to download.
This method is convenient for those who will download the x64 image by default. If you want to have an x86 system, it is enough that the Wubi image and installer are in one place, and then the x86 system will be installed.
Attention! The image file with this method must necessarily be a CD-ROM and not an alternative one. Unfortunately, Wubi is not on friendly terms with DVDs. Although the Wubi file itself is on the DVDs.
If everything went right, you will see a window like this:

I have captured just the moment of checking the disk image file.
At the end of the installation (1 minute for the existing image, 30 minutes for downloading), it will only be enough to reboot:

Rebooting ... Done!
If something went wrong, or you don't like your Ubuntu, you can easily uninstall it. Run the same installer again:

Press the "Delete" button and the system is completely erased from your computer. As if it never happened!
If you want, you can experiment as many times as you like.
Instead of an afterword.
It happens that when launching the Wubi installer, an error pops up. It's okay, just press the "Cancel" button the required number of times. The system, on both Windows and Ubuntu, is not affected.
Each Ubuntu build has its own version of the Wubi installer. The example used is the Wubi 211 version - it corresponds to Ubuntu 11.04. If you want more early version, they are easy to find on the internet.
Wubi works on all systems except Windows ME.