
Hello admin! For the second time in my life I buy myself a laptop and I can’t figure it out in any way. hidden section x on his hard drive! I bought my first laptop a long time agofrom before installed Windows 7 in 2009 and there were two hidden partitions, yesterday I bought a laptop with Windows 8.1, and it already has three hidden partitions, and after upgrading to Windows 10 there were already four, and one IT expert said that there is also a fifth partition, but you can see it only via command line or special program! Explain to a non-professional why they are needed, because in total they take up 20 GB of disk space on my laptop.
Hello friends! On all modern laptops with Windows 7, 8.1, 10 operating systems installed, you will see hidden partitions on the hard drive. Why they are needed, how to view their contents and what will happen if they are deleted, I will talk about all this in today's article.
Hidden partitions on laptops appeared along with the Windows 7 operating system. There were no hidden partitions on Windows XP, along with laptops there was an installation disk with the operating system, if the XP-ic was unstable, then it could easily be reinstalled using the distribution kit.
With the advent (in 2007) operating system Windows Vista the rules have changed, when buying a laptop, no installation disk was no longer attached, but on a laptop it was possible to create DVD discs recovery and, if necessary, restore Vista using them. Many laptop models already included ready-made recovery discs.
Windows 7
In 2009, on laptops with Windows 7 preinstalled, I first saw two hidden partitions, the first 9 GB in size Good (recovery partition) and the second System Reserved (Reserved by the system) with a volume of 100 MB.
Note: on laptops from many manufacturers, on the contrary, the first was the partition System Reserved 100 MB, and the latest (third or fourth) recovery partition 9-15 GB.
Naturally, I immediately wanted to know what is inside these sections! E If you assign a letter first hidden partition -System Reserved System Reserved 100 MB, it turns out that the section containsin itself Boot storage configuration files (BCD) Boot folder and system boot manager (bootmgr file)- these files are responsible for loading the operating system.

The second section (9 GB) contained ( compressed file Windows image 7 divided into several parts and the Recovery rollback program, with which you could return the laptop to its factory state even if it did not boot.

Windows 8, 8.1, 10
On October 26, 2012, laptops with Windows 8 installed appeared, and a year later Windows 8.1 and they already had UEFI BIOS with the protocol safe boot secure boot, and contained four hidden partitions, including a third hidden MSR service partition not displayed in Disk Management(size 128 MB), you can see it using the command line

or any partition manager hard drive, For example .

When updating Windows 8.1 up to Windows 10 has another (fifth) hidden partition


You can see all the existing partitions on your laptop's hard drive not only using AOMEI Partition, but also using the command line. Run the command prompt as administrator, enter the commands:
diskpart
lis dis
sel dis 0
lis par

So, what do the hidden sections of the new laptop upgraded from Windows 8.1 to Windows 10 contain?
How to enter a hidden section and see what's there?
Friends, if you enter the Laptop Disk Management and right-click on the hidden partition, only Help will open, that is, assign hidden section letter and enter it will not work.
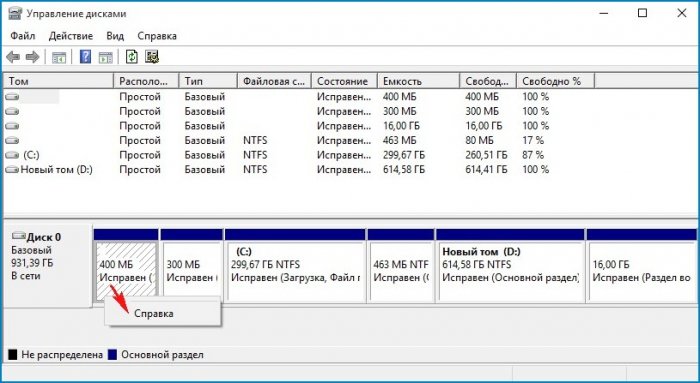
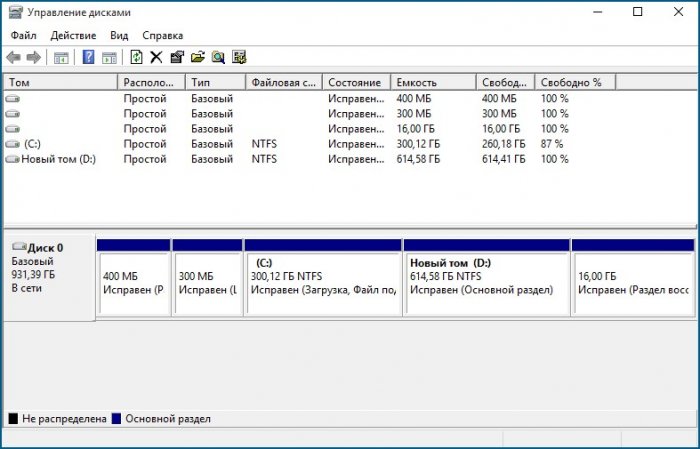
You can do this in another way. For example, let's take a look at the hidden partition (463 MB) that was created when updating from Windows 8.1 to Windows 10.
Run the command prompt as administrator, enter the commands:
diskpart
lis vol
sel vol 1 (1 hidden section number created when updating from Win 8.1 to Win 10), you may have a different number.
assign
Assignment of the drive name or mount point was successful.
exit
exit

To our hidden Windows partition 10 assigned the letter (E :) and it is visible in the explorer, we go into it.

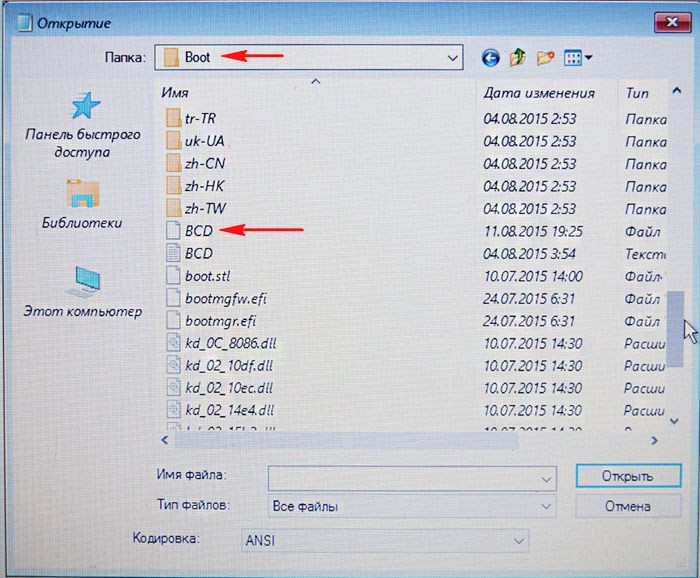
The hidden partition contains the Recovery folder.

The Recovery folder contains a folder WindowsRE and is already in ita custom image with Windows 10 Recovery Environment tools (Winre.wim).


So we guessed the secret of this hidden section created when windows update 8.1 to Windows 10, it contains all the tools for emergency system recovery. If this hidden section is removed, then we will not be able to restore Windows 10 in the recovery environment.
Let me remind you how the recovery environment works.
Rebooting Windows 10 with a key pressed Shift.
And enter the Windows 10 Recovery Environment,
Diagnostics -> Extra options . We see everything available tools operating system recovery environment.

Now we format or completely delete the hidden partition.
We enter the recovery environment and see that not a single tool is available to us.

Also, we will not be able to create a USB flash drive or a Windows 10 recovery disk, an error will occur"We can't create a recovery drive on this computer. Some required files are missing. To troubleshoot when the computer does not boot, use the installation Windows media". That is, when restoring Windows 10, we will have to boot from the distribution of the operating system, since it also has recovery environment files.

At the end of the article, let's see what is contained on other hidden sections of a Windows 10 laptop:

1. The first hidden partition is 400 MB in size contains Windows 8.1 Recovery Environment files, in Windows folder RE is located a custom image with Windows 8.1 Recovery Environment tools (Winre.wim). H o since we have upgraded to Windows 10 and are not going to roll back to Windows 8.1 , then we no longer need this section and we can delete it.

2. Second hidden partition 300 MB in size Healthy (Encrypted (EFI) system partition) FAT32 contains the Boot Storage Configuration (BCD) files - the EFI\Microsoft\Boot folder. In no case should this section be touched, otherwise you will not boot into Win 10.
3. The third MSR service partition, hidden and not displayed in Disk Management, required for GPT partitioning on UEFI systems, NTFS file system, size 128 MB.

4. We have already dismantled the fourth hidden partition of 400 MB, on it, like on the first hidden partition of 400 MB, there are recovery environment files, but not Windows 8.1, but Windows 10.

5. On the fifth partition, in the Recovery folder, there is a factory install.wim image with Windows 8.1. Via this section you can restore the factory settings at any time, that is, Windows 8.1.


Total: Of all the hidden partitions of a laptop that has been upgraded from Windows 8.1 to Win 10, only the first 400 MB partition can be deleted without consequences (but what will it give you). The rest, whatever one may say, are still needed.
By default, Windows Explorer displays only those partitions to which the user can write and work with his files. This is the system and all third-party sections, of which there can be a great many. Sometimes, for some unknown reason, a mysterious RECOVERY disk may appear in Explorer ( recovery disk), which should not be displayed in principle. This manual will tell you what to do with this disk if it suddenly appears on your computer.
What is a RECOVERY disk
Most often it is displayed on laptops and assembled computers and its size can be up to several tens of gigabytes. By default, it should not be displayed - you should not store information on it. Manufacturers use a recovery disc to store utilities needed to restore the computer in the event of a problem.
Unfortunately, scientists cannot explain why the recovery disk appears. It should always be hidden, but for some reason it suddenly falls on the user. Many report that recovery disk unexpectedly appeared after updating to Windows 10 April 2018 Update. For many users, displaying an extra disk in Explorer will not be a big problem, but the bottom line is that in the vast majority of cases this disk is actually displayed as 100% full, and therefore a red bar will catch your eye and the system will constantly send notifications about the disk full . This is already beginning to significantly annoy even the most patient users.
Whatever the reasons for the appearance, the Recovery disk can be hidden by the built-in system tools, and this procedure will take you no more than 10 minutes. The instructions are relevant for both Windows 10 and Windows 8.1 and Windows 7.
How to hide the Recovery drive in Windows 10 File Explorer
Since this disk is used only for recovery tools from the manufacturer, it can theoretically (and practically also) be completely removed. This will save you a few extra gigabytes on the partition, but we do not recommend doing this. If you have experience in restoring your computer, most likely this instruction is of no use to you, since you yourself know what to do with this disk. We recommend it to other users. hide so that you can quickly return your computer to a working state in the event of a problem using specially provided means.
Let's look at two methods of hiding a disk and start with the simplest.
For your information: This instruction will only work if the RECOVERY drive (be it an OEM partition or a Windows system recovery drive) suddenly started showing up in Explorer with a separate drive letter and 100% full space. If this drive is not displayed in the system, hide it unnecessarily. Also, you will not be able to access the menu with options for regular sections. While we don't recommend deleting it, there is still a way to free up the space it's taking up. This is covered in a separate section of this manual.
How to remove the recovery partition using the command line
Another option is to use the command line. A more complicated method since the procedures are executed using commands, but we recommend trying different ways, since the above method may not be available in various scenarios.

How to delete the recovery partition
Although we said a couple of paragraphs above that we do not recommend that you remove the Recovery disk, we understand that the user can do whatever he wants with his PC, therefore, after a little thought, we decided to add a way to remove the OEM Recovery disk. If you are passionate about freeing up the extra couple of gigabytes that the recovery image occupies, you can forcibly clear it.
Warning: keep in mind that cleaning the RECOVERY disk will deprive you of the opportunity to restore the system to the factory state without unnecessary dancing with a tambourine. If something happens to your computer, you will have to manually reinstall the operating system, all drivers, and diagnostic utilities from your computer manufacturer. Before removing the Recovery drive, we advise you to look at the website of the PC manufacturer and see if he offers utilities for creating such partitions.
From the instructions above, you already understood that it is most convenient to work with disks from system utility Disk Management. The only catch is that Microsoft severely limits the user's options regarding reserved partitions. Roughly speaking, this is such a "protection against a fool." Although when trying to open context menu On the Recovery disk, you will see only a help button, it is quite easy to bypass the built-in protection. All this is done from the Command line using the Diskpart utility.
- Run command line on behalf of the Administrator in the same way as described in the instructions above.
- Enter command diskpart and press Enter.
- Next enter the command listdisk. The command line screen will display a list physical disks. If you have only one disk in the system, divided into several partitions, after entering the command listdisk will only display one disk.
- Now you need to select the drive on which the recovery partition is located. Enter selectdiskX. Replace X with the disk number. For example, disk 0.
- Now we need to display the list sections selected disk. To do this, use the command listpartition.
- Find disk Recovery The occupied space of which you want to remove. Enter select partition 6. Press Enter.
- It's time to remove the disk. Enter deletepartition. After that, you will see an error message about deleting a protected drive. The command line will immediately inform you that in order to delete protected partitions, you must specify the forced deletion option.
- Enter command detailpartition. The screen will display detailed information about the section, namely the type, the values of the "hidden" and "mandatory" attributes, the optional attribute, and the byte offset. OEM recovery partitions use type 27. You need to change it to type 07 - normal partition file system NTFS.
- Enter command setid=07 , and then deletepartition. If that doesn't work, try typing deletepartitionoverride, after which the section will be deleted. The command line should report the successful execution of the procedure.
The space has been freed. Now you can return to the utility Disk Management and assign free space for any of your needs. You can expand an existing disk or create a new one.
How to create a recovery partition
Let's say you want to return the recovery disk to the system. If your manufacturer provides the necessary tools for this, then you just need to download them and follow the instructions from the computer supplier. If not, you can try to create a recovery partition using the third-party OneKey Recovery application.
Advice: it is best to create a recovery partition on a clean operating system on which all drivers are installed and desired applications. Though no one will stop you from Reserve copy system in any state, you need to understand that all the garbage that has accumulated on your system partition will be backed up to the recovery partition.
The procedure begins with the creation of the very recovery partition on which the application will write backup and which will be hidden. Please note that there must be enough free space on the disk - at least the amount occupied by the system in this moment. If the system disk is 40 GB busy, you will need 40 GB to create a recovery partition.

After that, an additional option to download AOMEI OneKey Recovery will appear in the system boot menu. Select it when you need to restore the created system backup.
This is very simple instruction, so you shouldn't have any complications. Tell us in the comments if you have encountered this, and whether this article helped you if the RECOVERY disk suddenly appeared in the system.
Almost all computers shipped with an operating system Windows 8 have a dedicated system recovery partition consisting of important files needed for reset or Windows 8 recovery to factory condition.This recovery partition, typically consumes about 15 GB of disk space. Since most computers that are available today can offer at least 500 GB of disk space, users may not feel the need to free up more disk space. But users who purchased a computer with a 64 or 128 GB SSD (Solid State Drive) may want to free up some space by deleting this system recovery partition.
Moment partition recovery consists of restoring images and other important files before deleting the recovery partition, you must first go to recovery partition USB flash drive .After moving recovery partition delete partition recovery. You can then use the new USB disk recovery to restore Windows 8 to factory settings.
Do the following step by step instructions for moving recovery partition to a USB stick and then delete recovery partition in windows 8.
NOTE: This procedure only works on Windows 8 and does not work on Windows 7.
Step 1: Connect a USB drive that has at least 16 GB of storage space (you may need more USB space if recovery partition larger than 16 GB) and backing up all data to a safe location. This USB stick will be erased.
Step 2: Switch to the Start screen, type Create a recovery disk change search filter Parameters(see picture) and then press the Enter key to launch the Disk Recovery Wizard. If you see UAC, just click the "Yes" button.
Step 3: After starting the Repair Disk wizard, check the option Copy PC Recovery Partition to Recovery Drive, and then click Next.
Step 4: Select the USB drive and click Next.
Step 5: You will see the message “Everything on the disk will be deleted. If you have personal files on the drive, make sure you back up your files.” Since you have already transferred all the data from USB, click on the button Create to start transfer recovery partition to the selected USB drive. Depending on the size Windows recovery partition This process may take several minutes (or hours to complete).
Step 6: When Windows 8 finish copying recovery partition to the USB drive, you will see the message “You can also delete recovery partition on your PC to free up some disk space”, and a setting named Delete recovery partition.
Step 7: Click the button Delete recovery partition to see an error message saying that “You can free up some disk space by deleting the system recovery partition, but you won't be able to update or restore your computer again without a recovery disc.” Since you've already migrated recovery partition to a USB stick, you can safely delete disk recovery partition.
Click the button Delete and recovery partition will be deleted. After the deed is done, Windows 8 will show you how much disk space you got by deleting the recovery partition. Good luck!
Surely any user of operating Windows systems knows that in the event of unforeseen critical failures, their performance can be restored. The Windows Recovery partition is responsible for this, which stores the files necessary to perform such a procedure. However, they take up quite a lot of hard disk space (sometimes up to 15 GB, as in Windows 8). This is especially felt on hard drives with small volumes. And many quite rightly begin to wonder about freeing up space, which is occupied by the notorious recovery partition.
How to remove it and whether it can be done at all, we will consider further. But I would like to immediately warn all users that when performing this procedure, you will have to sweat, as they say, and you should perform such actions only at your own peril and risk.
What is a recovery partition and is it needed?
The partition itself, as is already clear, is a reserved space on the hard disk, moreover, in the system partition where the installed OS is located.
As a rule, depending on the modification of the system, its size may vary, but usually it is about 300-500 MB. The Recovery folder is located here, in which there is a WindowsRE directory with the Winre.wim image nested in it. It also looks completely logical that all this is hidden from the user’s eyes so that he does not accidentally (or intentionally) delete the necessary recovery tools.

But the matter is not limited to this. There are two more hidden partitions on the disk, the existence of which the user does not even know. This is an EFI system partition with a volume of about 100 MB and a 128 MB MSR partition responsible for GPT partitioning. Thus, for example, the question of how to delete the recovery partition in Windows 10 comes down to removing from system disk not one, but three sections to attach them to the available space.
I must say that not all users realize that system recovery tools can also be found on installation media, and on special disks for rollback and fixing system errors. Therefore, in some cases, you can not only hide the recovery partition, but also delete it, as they say, without a twinge of conscience. Several methods can be proposed for this.
Will reinstalling remove the recovery partition?
First, a few words about reuse Some users naively believe that reinstalling Windows 10 or any other modification with full formatting of the system disk will also destroy the above partitions.

Nothing like this! Yes, at the stage of choosing a disk for installing the OS, absolutely all partitions will be displayed, and formatting will really merge them into one. But in a "clean" system, which the user receives immediately after installation, automatic recovery system is activated by default, so that the OS itself, whether you like it or not, again reserves space on the hard drive, where it writes necessary information At once.
Recovery partition: how to delete via command line?
So, let's start with the most difficult, but absolutely effective method, which involves the use of a command console (cmd), which must be run with administrator rights.

But before that, you need to do a few simple actions. First you need to create a recovery disk. If the "Recovery" menu is used in the "Control Panel", you will need a USB flash drive, if the backup and restore partition is used, optical media is used. A flash drive with a capacity of 64 GB or more is convenient in that you can perform full data on it from the recovery partition itself (but more on that later).

Further, the solution to the problem of how to remove the recovery partition from the hard drive is to select the line of special boot options (for Windows 10) in the update and security menu, which is located in the options section, or install removable media as the first boot device in BIOS.
After the restart, at the beginning of the installation of the operating system, the combination Shift + F10 calls up the command line, in which the following commands are sequentially written:
- diskpart;
- lis dis (list of all partitions);
- sel dis 0 (select drive with OS installed);
- lis par (view sections);
- sel par 1 (selection of the first section);
- del par override (delete the first section);
- sel par 2 (selection of the second section);
- del par override (removing the second section);
- sel par 3 (selection of the third section);
- del par override (removing the third section);
- create par efi size=100 (Create an encrypted EFI partition with a size of 100 Mb);
- create par msr size=128 (create an MSR partition with a size of 128 MB);
- lis vol (section view);
- exit (exit from diskpart);
- bcdboot C:\Windows (set boot partition);
- exit (full exit from the console).
Disk management with AOMEI software
The reload field should, for ease of further operations, use the AOMEI application, select the disk to which you want to attach the place, and then use the resize / move line in the menu on the left side.

Next, the partition is selected to move, and the slider is dragged to the limit (in order to completely allocate all the space for drive C. Be sure to note that after such actions, there are zeros on the “Unallocated space before” line.
Click "OK" and "Apply". In the pending operations window that appears, the transition button is pressed, after which you need to agree with the instructions in the message. After that, a black free space mode window will appear. Upon completion of the process, the recovery partition will be deleted, and the freed space will be attached to the system partition.
Method for Windows 8 and above
Now about how to delete the recovery partition in Windows versions 8 and above (in the seventh modification and below, this solution does not work).

Remember, it was about creating in the first stage bootable flash drive? So, if you check the box next to the backup line, the entire section, user files and programs can be transferred to this medium. True, this may even require several hours and a flash drive larger than 64 GB in volume.

But at the end of the process, the system itself will offer to delete the desired recovery partition. We agree and immediately see how much space is freed up.
Conclusion
It remains to be said that it is advisable to delete the desired partition only in cases where recovery in any situation is planned to be carried out exclusively from removable media, which must be created in advance. If for some reason it is not at hand, it will be absolutely impossible to roll back the system even to the factory state without reinstalling.
Hello to all! I offer a short story in which I had to solve one small task using the command line, I think it will be useful in your knowledge box.
My friend bought a computer with a solid state drive (120 GB) instead of a hard drive, there simply wasn’t enough money for a simple hard drive (we all know that the prices for components have now risen). Our mutual friend decided to help him out and offered him a time to store files not quite old HDD SATA II 400 GB. Together they connected the hard drive to the computer, entered Disk Management and saw that there were four partitions on the disk and only one of all four was deleted normally. The fact is that the factory Windows 8.1 with all the service partitions was previously installed on this hard drive. If you click on the first, second and last section with the right mouse, then only "Help" will be offered from all the options.

Without thinking twice, they decided that if you format the disk (D :) in the "Computer" window, then all partitions will be deleted. Entering the Computer window, they clicked right click mouse on the drive (D:) and just formatted it.


Going into disk management again, they saw that all partitions were safe and sound, then they simply deleted the disk (D:). Once again seeing that nothing had happened to the other sections, their patience ran out and they called me.

Friends, hard disk partition managers immediately came to mind for many: and, of course, you can use them, but there is an easier way, the command line!
Run command prompt as administrator.

To manage disk space, enter the diskpart command.
We display a list of all disks with the command list disk , press Enter.
A list of all disks connected to the computer appears. Be careful, you can't go wrong here. By volume, one can guess that Disk 0(111 GB) is a solid state SSD drive, and Disk 1 (372 GB), this is our second hard disk, on which we need to delete all partitions.
Select to delete all partitions Disk 1 (372 GB), enter the command select disk 1. (Caution! In your case, the number in the command may be different).
We enter the clean command and press Enter, it happens complete removal all partitions on the second hard drive.

Everything is ready, close the command line.
We enter disk management and see that all partitions on the hard drive have been deleted.
Before creating a single partition, the disk must be initialized. Right click on Disk 1 and select Initialize disk.

If you don't know what is , then select Master Boot Record (MBR) and click OK..

Now let's create a simple volume. Right mouse click on unallocated space and select Create volume.